

The Ultimate Code Signing in Visual Studio Tutorial

 (5 votes, average: 5.00 out of 5)
Cybercriminals kicked their efforts into high gear in 2023, netting $1.1+ billion in ransomware payments. Don’t let your organization and customers become their next cash cows; master the art of code signing in Visual Studio. It’s one of the best protections against unauthorized code manipulation
Signing your code is more important than ever. CrowdStrike reports that in 2023, application security professional survey respondents indicated that 70% of critical security incidents took organizations more than 12 hours to resolve.
Knowing how to sign in Visual Studio, the second most popular integrated development environment (IDE) used by developers globally, will:
- Ensure the integrity and authenticity of your Visual Studio applications.
- Help you reduce the number of potential entry points to gain access to your systems or users’ devices that install your software.
- Minimize the risk of successful attacks.
Explore how to use SignTool to sign your apps like a pro with our definitive Visual Studio code signing tutorial. You’ll never worry about tampering again.
Code Signing in Visual Studio: How to Sign Your Application With SignTool
Code signing in Visual Studio has been a powerful weapon against malicious code modifications for years, and it still is. However, the code signing process has changed in an important way to reflect the more stringent CA/B Forum’s Code Signing Certificate Baseline Requirements. As of June 2023, you must store your key in secure hardware (e.g., using a secure USB token, a hardware security module [HSM], or a compliant cloud storage method).
Fear not. Our detailed, up-to-date Visual Studio code signing tutorial will take you through the new SignTool process in a breeze.
How to Get Started: A List of Visual Studio Sign Code Essentials
Before we get into the nitty-gritty of how to sign Visual Studio applications with SignTool, let’s look at the tools of the trade you’ll need and the actions required to add a digital signature to your application.
1. Purchase a Code Signing Certificate Issued by a Trusted Certificate Authority (CA)
Do you already have one? You’re in luck. After checking that it hasn’t expired, you can move to the next item on the list.
You don’t have a certificate yet? You’ll have to buy one. If you want to save money and think you can use a self-signed certificate, guess again. You might as well not bother signing your Windows app, as you’ll essentially get the same result.
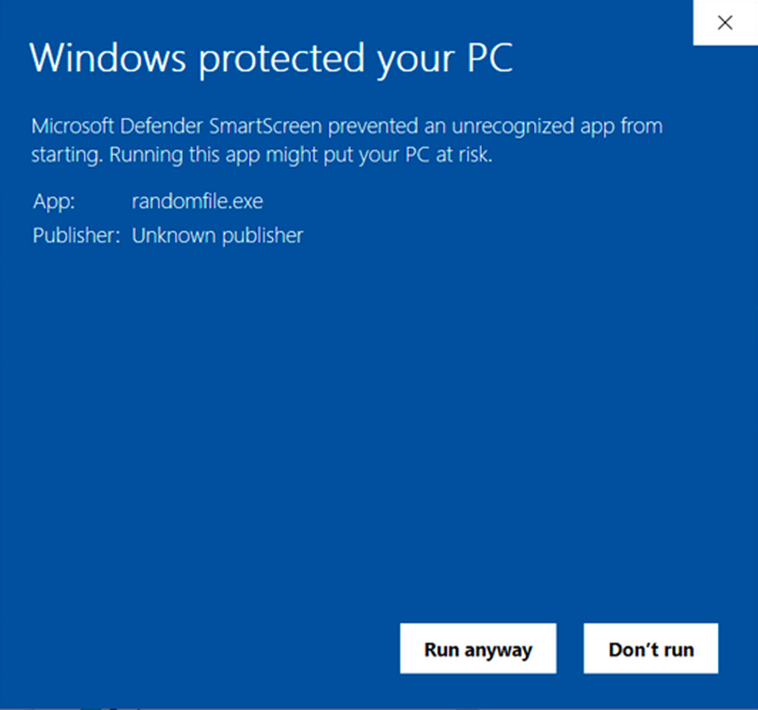
Code that’s unsigned or signed with a self-signed certificate is considered equally dangerous by all major operating systems (OSes) and browsers. Why? Because there’s no trusted root involved. Nasty warnings will display, and Windows users won’t be able to run it or install it without having to push past these scary messages:
So, keep self-signed certificates for testing purposes only. For apps that have to be released to the public. purchase a code signing certificate from a trusted CA and use that to sign your Visual Studio application. It can be a standard (OV) code signing certificate or an extended validation (EV) certificate. The main difference between the two? The EV certificate will remove all warnings because it will be automatically trusted.
2. Set up Your Secure Hardware Token
Did you just receive your secure token? It’s now time to configure it. Our quick guide will take you through this one-time process. During the set-up, you’ll be asked to choose the encryption algorithm for your key. Opt for a 3072- or 4096-bit Rivest Shamir Adleman (RSA) key (whichever your token supports) to ensure Visual Studio recognizes it.
(NOTE: ECC certificates are not supported by Visual Studio at this time.)
Pro tip: When you’re not using the token to sign code, be sure to store it securely.
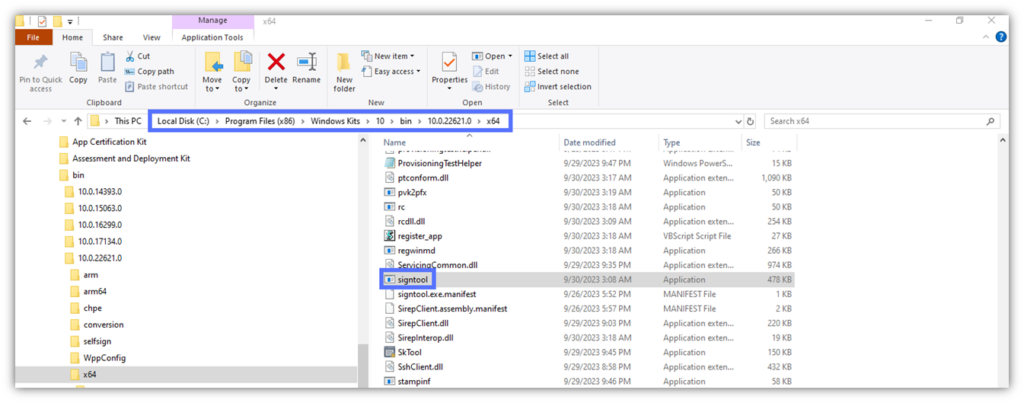
3. Check That SignTool.exe Is Installed on Your Device
SignTool.exe comes embedded in both Visual Studio and Windows Software Development Kit (SDK). To verify that it’s already present on your device:
- Open Windows Explorer

- Navigate to the Windows SDK’s x64 folder: C:\Program Files (x86)\Windows Kits\10\bin\10.xxxxxx\x64
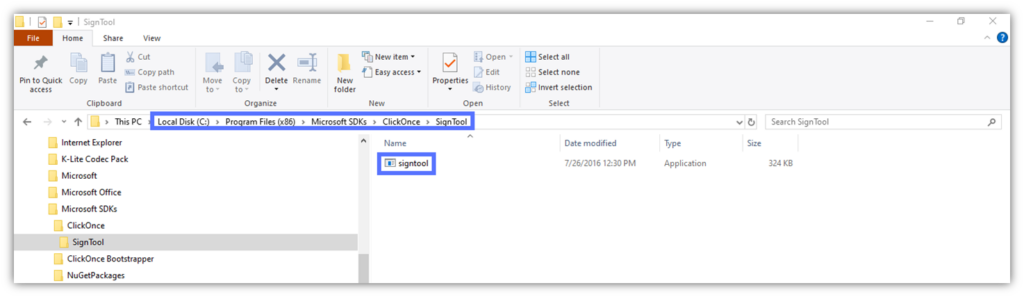
Tip: If you can’t find it, you might have installed SignTool with Visual Studio. In this case, it may be located under the following file path:
C:\Program Files (x86)\Microsoft SDKs\ClickOnce\SignTool\signtool.exe.
Still can’t find SignTool on your device? You probably haven’t installed it yet. Downloading and installing Windows SDK is the easiest way to get it.
Now, let’s move on to the core of this tutorial.
Visual Studio Code Signing Tutorial (SignTool Edition)
With the checklist done and dusted, it’s time to start learning how to sign your Visual Studio application’s .exe.
1. Open Your Authentication Client
The first thing you’ll need to do is open your authentication client. In my case, I’m using a DigiCert code signing certificate for this example, so I’ll have to open the SafeNet Authentication Client.
2.Insert Your USB Token Into Your Device
To ensure your token is recognized by Visual Studio sign code tools, you must plug it in before opening the IDE.
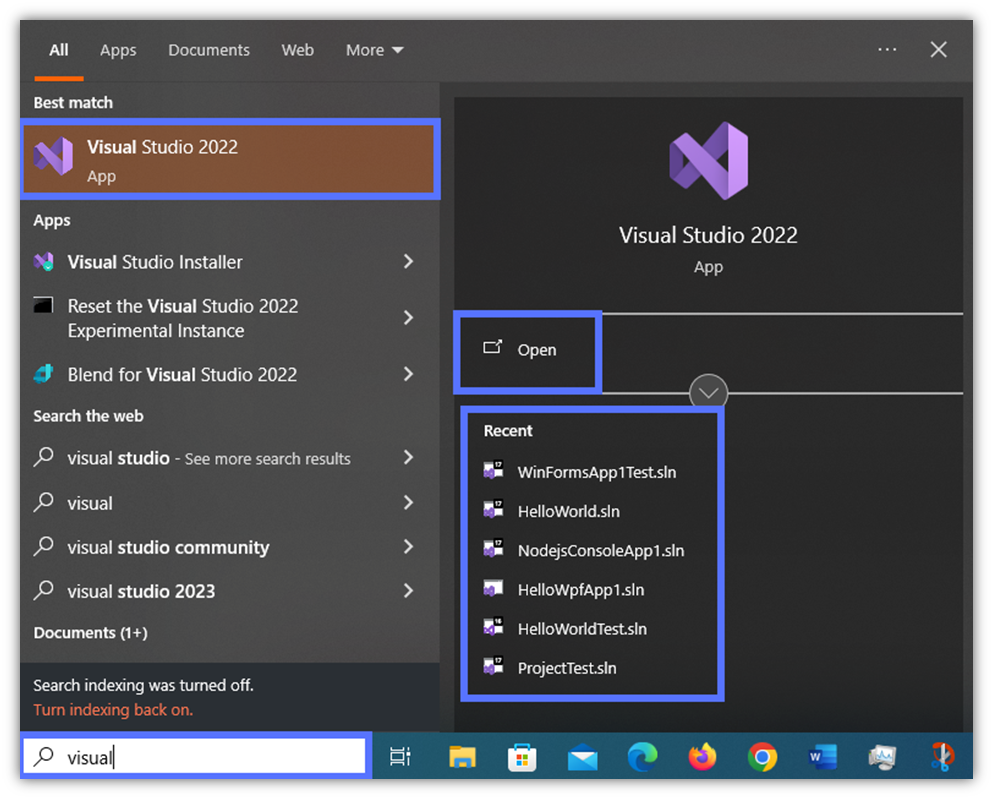
3. Open the Visual Studio Project You Want to Sign
- Start the Visual Studio app. In this example, we’re using Visual Studio 2022.
- Hit Open a project or solution and select the project you want to sign.
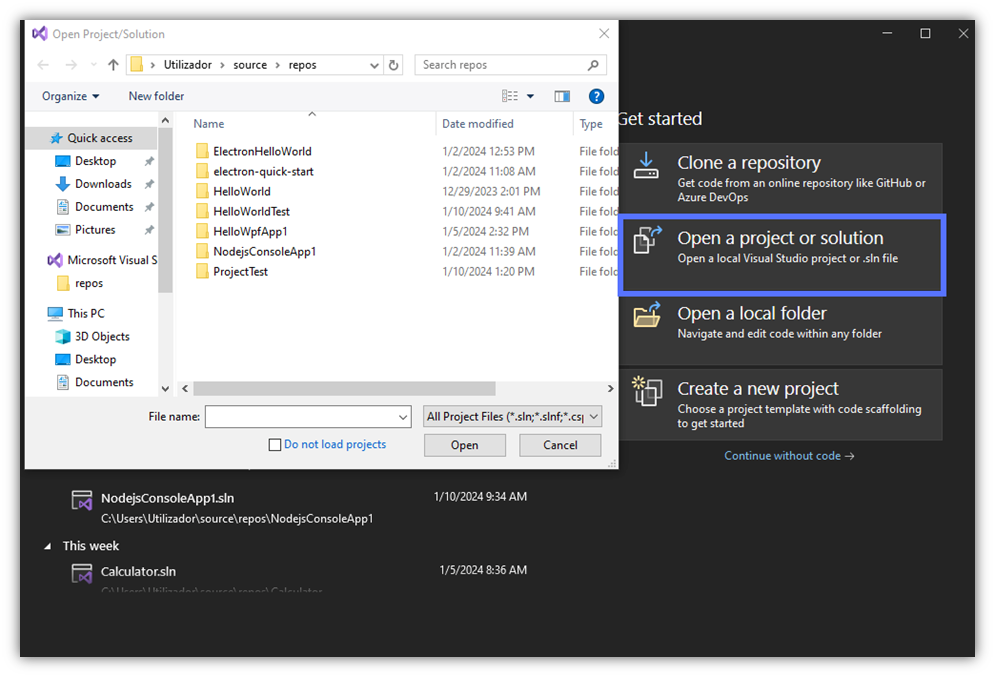
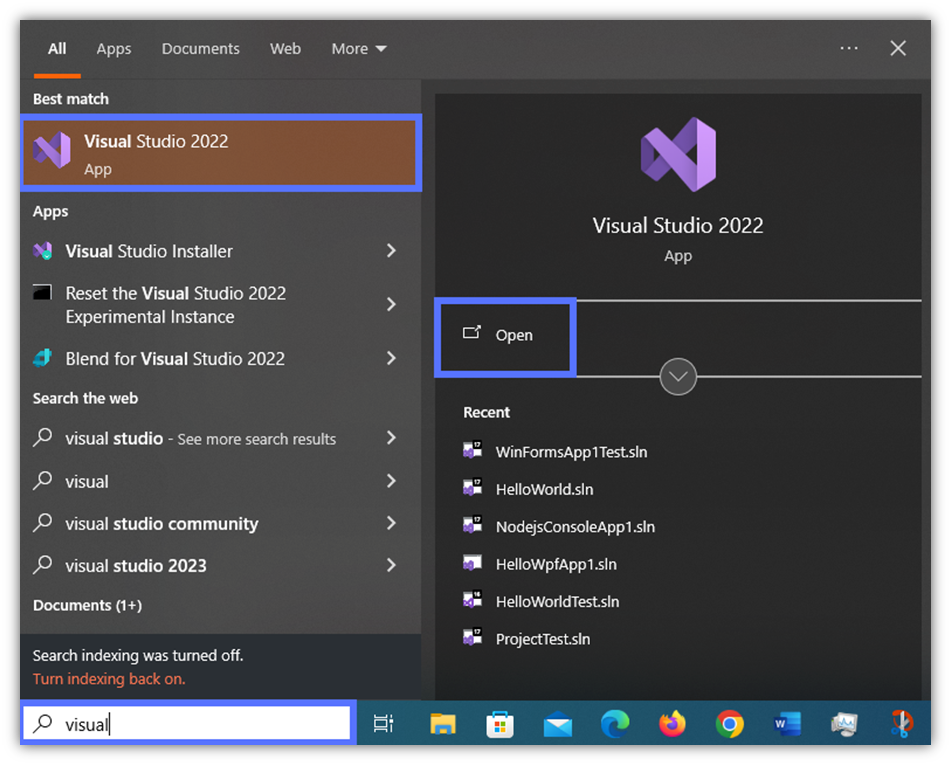
Pro Tip: Does the target app appear under the list of recent apps, as shown in the example below? Select the related .sln file from that list to open it.
4. Sign Your Application’s Manifests
Signing your application’s .exe or .dll files won’t be enough to secure the app against the bad guys. Attackers aren’t fussy. They’ll target any other critical and/or vulnerable app file, including application manifest and deployment manifest files.
These two XML files describe the application and how it’s deployed. If an attacker manages to breach into one of them, they can easily modify the app and/or its behavior. This is why the installation will immediately stop if the manifests aren’t signed.
Is this statement still true, even if the other files (e.g., .exe) have been correctly signed? You betcha.
So, can you use the same code signing certificate to sign both manifests and executables? Yes, you can! To sign your manifests, follow our definitive guide to ClickOnce manifest signing. You see, this is the beauty of code signing certificates. They can be used to sign tons of files and code — everything from software apps and executables to drivers and PowerShell scripts.
5. Open the Developer PowerShell Window
OK, with the manifests signed, we can now start the .exe signing operations. Here, you have two options. Either you:
- Click on the Developer PowerShell tab at the bottom of the project’s window. It’ll show you the embedded PowerShell terminal with the path to the project.
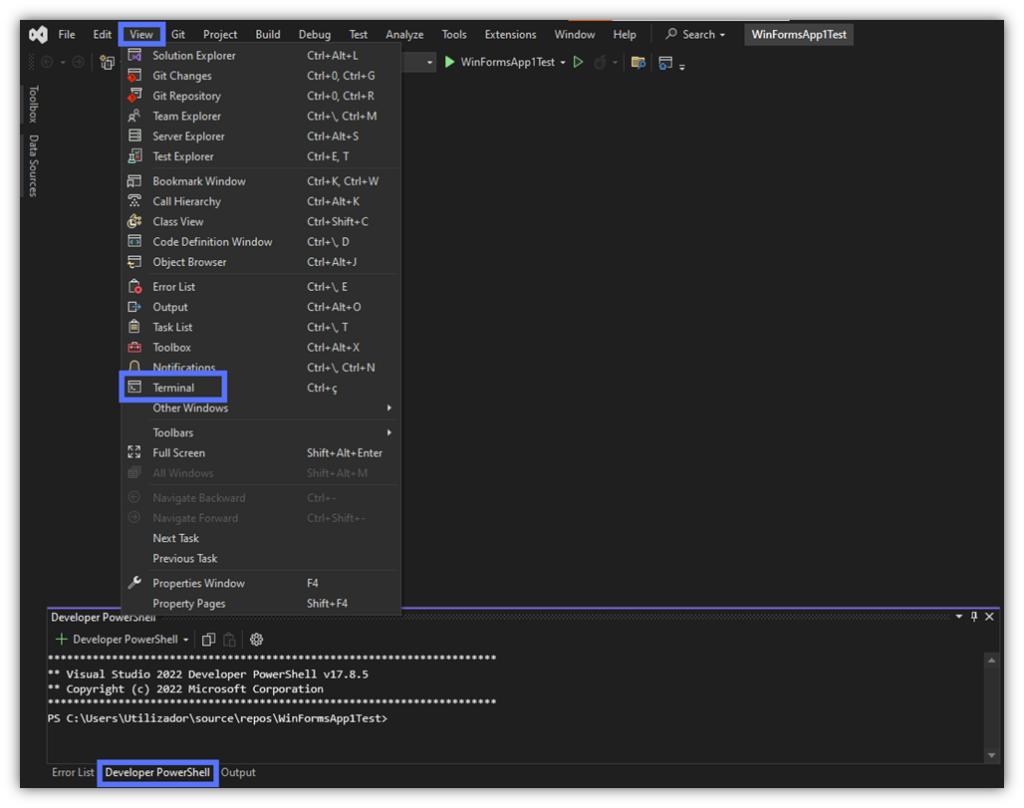
or,
- Click on the search bar at the top and type “Developer PowerShell.”
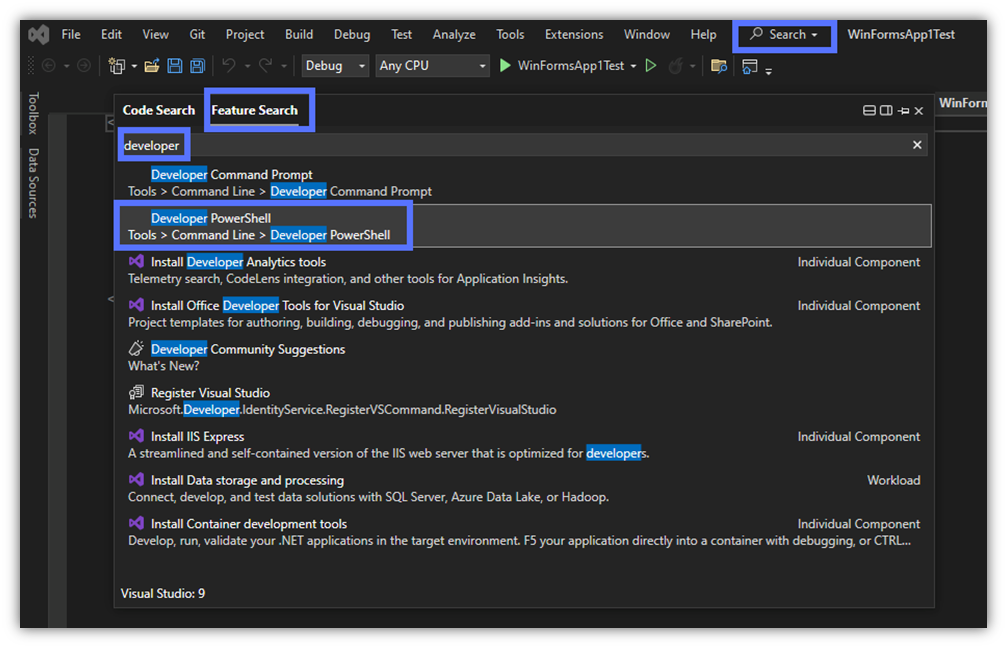
- Select it from the Feature list. The PowerShell terminal will open as a standalone window, as shown below.
Our favorite? The latter. The standalone PowerShell interface is usually easier to work with (i.e., re-sizable and mobile) than the small, built-in box. For instance, if you have two monitors, you can view your Visual Studio project on one monitor and PowerShell on the other.
6. Sign Your Visual Studio Application.Exe With SignTool
1…2…3…Action! Here’s where you’ll notice the differences from the old code signing method that didn’t require a hardware security token.
- Type: signtool sign /fd SHA256 “Path_to_Your_.exe” and click Enter. Remember to replace “Path_to_Your_.exe” with the actual path to the executable to sign. The Authentication client window will pop up.
In our example, we’re using a DigiCert standard code signing certificate and SafeNet Authentication Client:
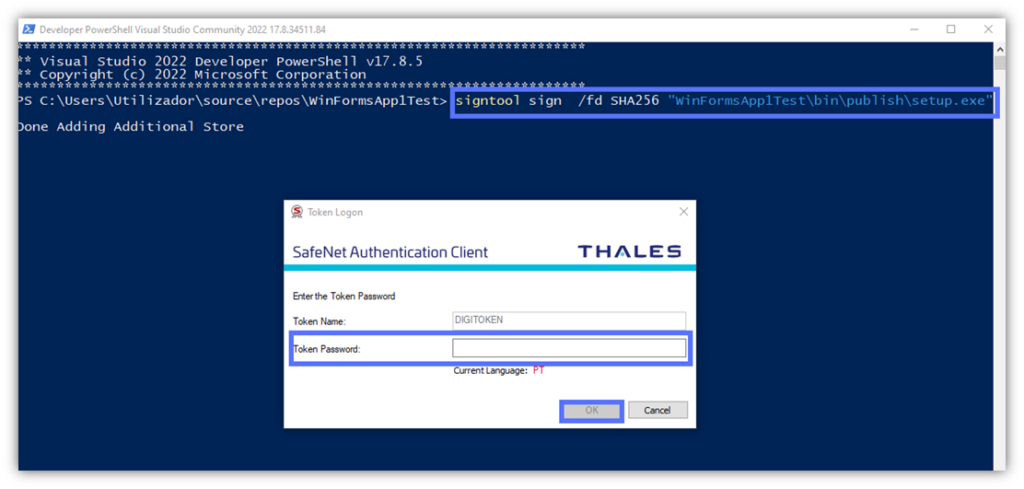
- Type the USB token password and click on the OK button.
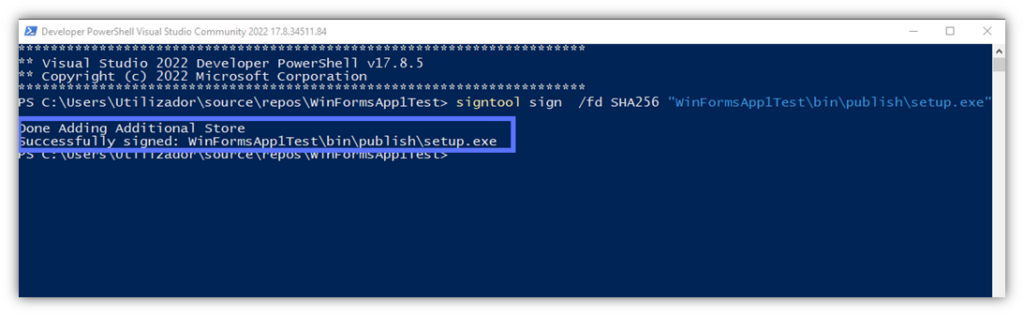
Did it work on your end? If so, you should see a message stating that the .exe has been “Successfully signed” as shown above.
7. Timestamp Your Digital Signature
Most Visual Studio code signing tutorials stop at point four. After all, the .exe and the manifests have been signed. Mission accomplished, right? Maybe that’s true for some, but not for us. This is the ultimate code signing in Visual Studio tutorial, remember?
Want to code sign like a pro and keep the unknown publisher warning from appearing, even after the certificate used to sign the app has expired? Freeze your signature in time by adding a timestamp. Adding a timestamp ensures that your signature remains valid long after your certificate has expired.
- Go back to the same PowerShell window and type: signtool timestamp /tr “https://yourCAtimestamp.com” /td SHA256 “Path_to_Your_Setup.exe.” Before hitting Enter, replace “https://yourCAtimestamp.com” and “Path_to_Your_Setup.exe“ with the details related to your certificate’s issuing certificate authority’s (CA) timestamp server and project file name.
For example, this is what it looks like for us using the DigiCert timestamp server:

Verify Your Work in Under 5 Seconds
You’re a pro, and pros take nothing for granted. (Not even their own work.) With PowerShell still open, enter the following script: signtool verify /pa “Path_to_Your_Setup.exe.” Click on the Enter key to check if the Visual Studio digital signature and timestamp you’ve just applied worked correctly.
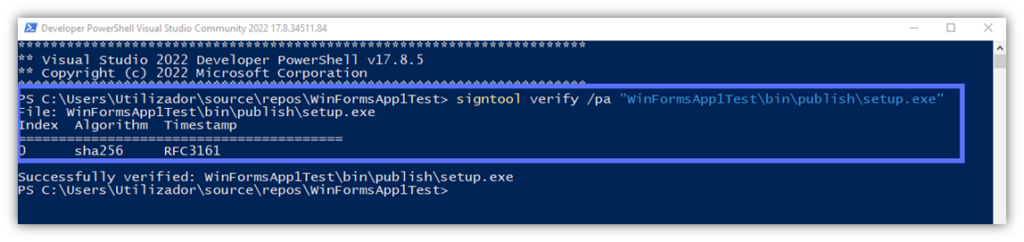
Do you see something similar to what’s displayed in our screenshot? Yeah! Your Visual Studio application has just been signed and timestamped. You now have the ultimate protection against malware infection and tampering.
What are the implications for you as a developer/software publisher and for your users and customers? This is the question we’re going to answer next.
This is What Happens When You Sign Your Visual Studio Applications
Technically speaking, the SignTool script we’ve just learned to use takes an application, file, or executable and hashes it using a cryptographic function. Then, it encrypts the outcome value (i.e., the hash digest) with the developer’s private key. This creates something of a checksum for users and their Windows operating systems, enabling them to verify that the software hasn’t been altered since it was signed.
After that, it generates a digital signature bundle that includes the following:
- The software’s signed hash digest,
- The developer’s code signing certificate, and
- A timestamp (if added, which is something we highly recommend).
All of this data is appended to the application. But what are the consequences (or benefits) for your organizations and customers? Spoiler alert: you’ll both gain a great deal from it.
5 Most Amazing Code Signing Perks That Organizations (and Users) Can’t Do Without
Profits, trust, security — these three magic words perfectly summarize some of the key benefits offered by code signing to software providers. Sign your Visual Studio applications to:
- Increase download rates and revenue while offering a smoother user experience. Security alerts are a blessing and a curse for users and software publishers alike. Get rid of or minimize those pesky alerts to offer a pain-free installation. Customers (and downloads) will flock to your business like never before. Can you hear the till ringing?
- Foster trust in your brand and products. Based on Forrester’s 2023 Business Trust Survey results, 43% of B2B customers prefer a safe product over a fancy one. Show your customers that you’re the brand they’re looking for, the company that develops authentic, tamper-free apps that are safe to install. Sign your Visual Studio applications for Windows apps in particular.
- Enhance security protections. The Visual Studio sign code solution will shield you and your customers against the risks associated with harmful and counterfeit software. Use code signing to thwart cybercriminals who aim to exploit vulnerable applications for attacks.
- Safeguard from viruses and malware. When a user attempts to install a signed application, the client generates a hash that’s compared with the original in the signature bundle. If the app has been modified, the hashes won’t match. This will trigger a warning and stop the installation. Phew! Disaster averted.
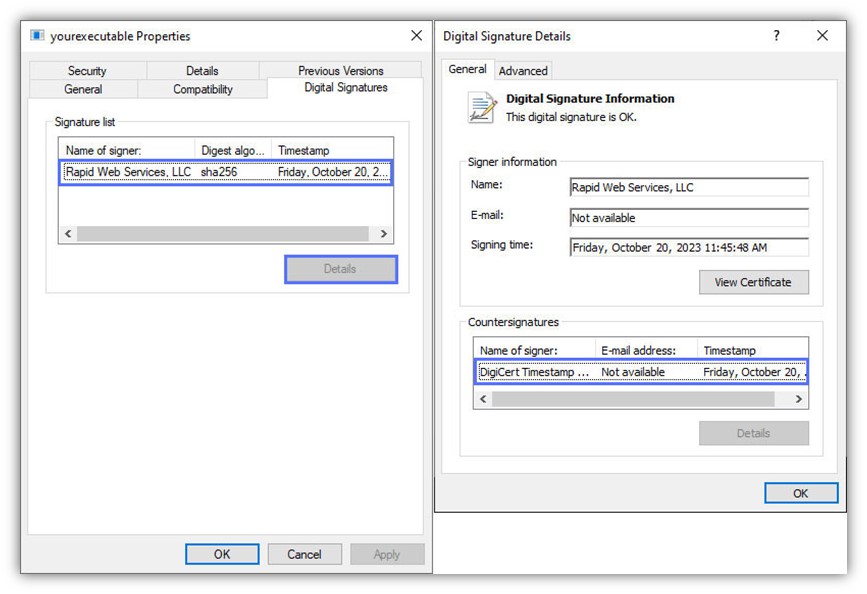
- Provide a way to confirm that the application is safe to install. On top of the client’s verification process we’ve just described, code signing also enables users to manually verify the executable’s signature. How? Right-click on the .exe file, hit Properties, and check the digital signature tab.
See? Told you, you would have both gained from it. This isn’t enough to start code signing in Visual Studio following what you’ve just learned in our tutorial? Explore even more amazing benefits that code signing can offer. You won’t regret it.
Final Thoughts About the Ultimate Code Signing in Visual Studio Tutorial
In February 2024, Microsoft and OpenAI published research on emerging threats in the era of artificial intelligence (AI). The study confirmed what most cybersecurity experts predicted: bad guys have added AI to their offensive arsenal, and they’re actively misusing it to boost their abusive techniques by using generative AI to create malicious scripts and codes.
Put this together with the cybercriminal’s old favorite, “low-hanging fruits” (e.g., unsigned or poorly protected apps), and you’ve got the perfect mix for an easy attack.
Using a code signing certificate issued from a publicly trusted CA to sign your Visual Studio applications with SignTool enables you to:
- Affirm your identity as a verified (thus, trusted) software publisher,
- Reassure customers and other software users that your product hasn’t been tampered with since it was signed, and
- Protect your applications from malware and malicious modifications.
Do you use Azure Key Vault? Discover, in our next article, how to sign software packages with Azure Key Vault.
