

The Ultimate ClickOnce Manifest Signing Tutorial

 (6 votes, average: 5.00 out of 5)
66% of organizations interviewed by ArmorCode in 2023 confessed to prioritizing fast release times over security. Go against the tide and take the time to sign your software. Explore how to secure your ClickOnce Windows desktop apps with ClickOnce manifests signing
In the first three weeks of 2024, the AV-Test Institute identified over 6.6 million new pieces of malware. The overwhelming majority targeted Windows operating systems. As we’ve discovered in our previous article of this series, signing using a ClickOnce signing certificate can help protect your Visual Studio-developed applications from malware while proving that they’re truly coming from you.
Want to make 2024 count and offer your customers first-class applications (and updates) that won’t put them at risk of being attacked?
That’s what we’re here for. Today, we’ll move from theory to practice andl show you how to sign your ClickOnce manifest, one step at a time. C’mon, it’s showtime!
What Is a ClickOnce Manifest and What Does It Do?
A ClickOnce manifest is an XML file that describes the details and files of an application deployed in Visual Studio with ClickOnce. One benefit of using ClickOnce deployments for your applications is that it enables you to create self-updating Windows apps.
Each ClickOnce deployment architecture has two types of ClickOnce manifests at its core.
An Overview of the Two Types of ClickOnce Manifests
1. ClickOnce Application Manifest
This is an XML file that includes required and optional elements and attributes describing the application that’s being built. This file:
- Indicates the application’s security requirements and where its updates will be available.
- Specifies a distinct application version. You must generate a new application manifest when a new version is deployed.
- Ends with the extension .manifest (e.g., YourApplicationName.exe.manifest).
Want to learn more about it? Check out Microsoft’s ClickOnce application manifest page.
2. ClickOnce Deployment Manifest
This XML file is created when an application is first deployed. The ClickOnce deployment manifest must:
- Be updated every time a new version of the application is released.
- Have a strong name. In other words, have a unique name that’s guaranteed by hashing and encrypting the manifest with the developer’s private key, thereby creating a digital signature. (This cryptographic approach ensures no assembly collisions.) This way, when the manifest is loaded, you’re sure that you’re really loading the one you created, not a similar one with the same name generated by a malicious third party (more on this momentarily).
- Include several mandatory and optional application elements and attributes explaining how the app is deployed and run. This includes info such as the app version that the client should run and the information necessary to sign the deployment manifest.
- Refer to the newest application manifest available.
- End with the .application extension.
These two manifests are the XML files we’ll learn to sign.
Why Should You Sign Your ClickOnce Manifests?
By adding a digital signature to your ClickOnce manifest, you’re providing users (at the time of installation or update) with a verifiable way to check whether your application has been tampered with. If someone has messed with it without authorization (resulting in a change in the original digital signature’s hash value), the client will display a warning.
How can an operating system tell whether it’s been changed? By verifying the validity of the ClickOnce manifests signatures.
Isn’t the deployment manifest’s strong name enough to protect the application from unauthorized modifications? Not quite. Despite being very similar, strong naming and ClickOnce manifest signing have two different purposes.
- Strong naming provides only an integrity check. In other words, it ensures that the deployment manifest’s name and contents haven’t changed since it was generated.
- ClickOnce signing takes trust to the next level by adding digital identity to the equation. It not only confirms your application’s integrity but also its authenticity (i.e., who it came from). When you sign your manifests with a code signing certificate issued by a trusted third party (i.e., certificate authority), you’ll offer users a verifiable chain of trust This trust chain proves that a trusted root certificate authority (CA) is confident that the manifest’s creator is legitimate because the CA vetted them before issuing their code signing certificate.
If you want to learn more about the differences between strong naming and code signing digital signatures, check out this great Microsoft article from Eric Clippert.
Signing your ClickOnce manifests and files is invaluable, particularly when you consider that at the end of 2023, 75% of U.S. consumers interviewed by Vercara were ready to stop buying from organizations that have cybersecurity issues. Furthermore, as stated by Cybersecurity and Infrastructure Security Agency (CISA) Agency Director Jen Easterly, cybersecurity is not a responsibility that should rest solely on consumers’ shoulders. Rather, software developers and publishers need to take responsibility and release more secure software products.
Knowing this, let’s see how you can sign the ClickOnce manifests for your applications using a publicly trusted certificate right from the get-go.
How to Sign Your ClickOnce Manifests Step-by-Step
Before you can get started with ClickOnce signing, you’ll need a code signing certificate. While it’s possible to use a self-signed certificate for testing purposes, it’s always best to use a publicly trusted digital certificate instead.

Save 27% – DigiCert Code Signing Certificate
Enhance your code’s integrity and boost user confidence through digital “shrink-wrapping” using a DigiCert Code Signing Certificate.
Why? Using a publicly trusted code signing certificate ensures you don’t forget to sign it later before distribution/deployment. You won’t forget, you say? Don’t be so sure; mistakes happen, and forgetting to re-sign your software using a publicly trusted certificate can be easy to overlook. (Above all when you’re in a hurry to deploy an application to respect a deadline). Been there, done that, got the t-shirt.
So, if you want to sign your ClickOnce manifest, you’ll have to purchase a code signing certificate from a trusted CA of your choice.
Tip: As you’ll be using the certificate for ClickOnce signing, make sure you get a Rivest Shamir Adleman (RSA) certificate. As it turns out, Visual Studio doesn’t yet support Elliptical curve cryptography (ECC) certificates yet. Until they do, your best bet is to us an RSA certificate with a minimum key size of 3072 bits.
Do you remember when we mentioned that the certificate would create a chain of trust? To initiate this process, the CA validates your identity to ensure you’re a trusted publisher. Afterwards, it’ll:
- Issue a code signing certificate. This is a small digital file that includes your organization’s verifiable identity details, and
- Mail you a USB token. Since new CA/B Forum’s security code signing baseline requirements rolled out in June 2023, all private keys must be stored on secure hardware (e.g., a USB token or a hardware security module).
Tip: Some CAs offer the option to receive a pre-configured hardware token while others don’t. If you received a blank USB token, follow our comprehensive guide that will walk you through how to set it up.
Now, let’s assume you’ve already:
- Downloaded and installed a recent Visual Studio version,
- Have a Visual Studio project you want to sign (e.g., an application you’ve created),
- Purchased your RSA ClickOnce signing certificate,
- Installed your token’s authentication client, and
- Set up your secure hardware token.
- Strong-named your assemblies.
You can now proceed with the first step of the ClickOnce signing manifest process. In this instance, we’ll use:
- Visual Studio 2022,
- A standard code signing certificate issued by DigiCert, and
- SafeNet Authentication client.
1. Plug Your USB Token Into Your Device
To avoid issues (visual Studio can be temperamental), it’s strongly recommended that the token is inserted before you open Visual Studio.
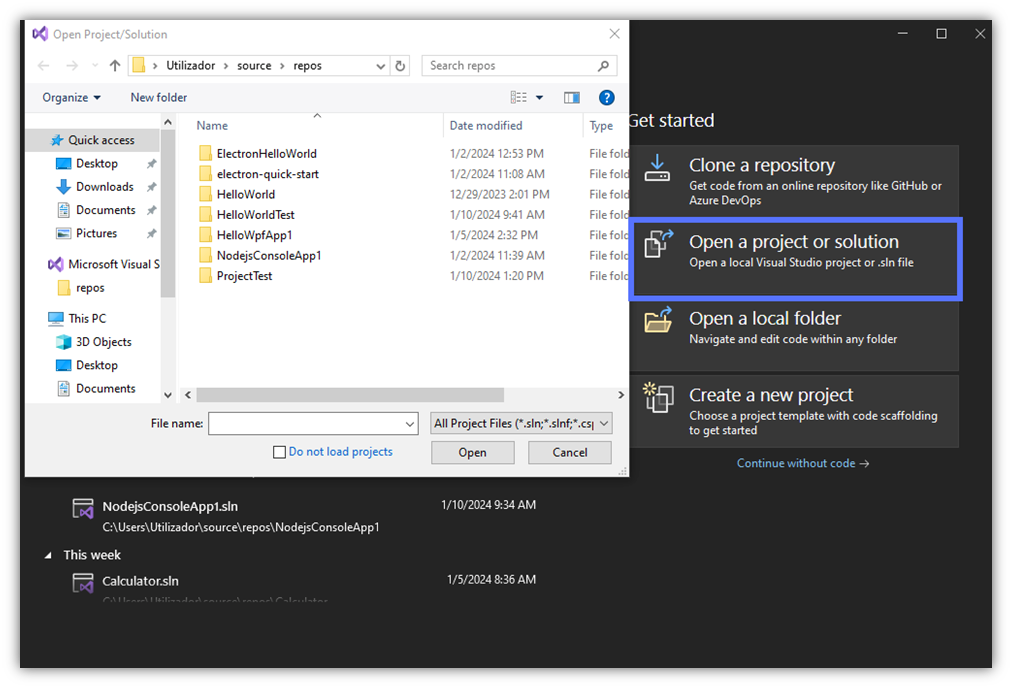
2. Open Visual Studio
Start Visual Studio and click on Open a project or solution to select the ClickOnce project you want to sign.
3. Go to the Publish Profile Section
Once opened, click on Build and, on the drop-down menu, pick Publish Selection.

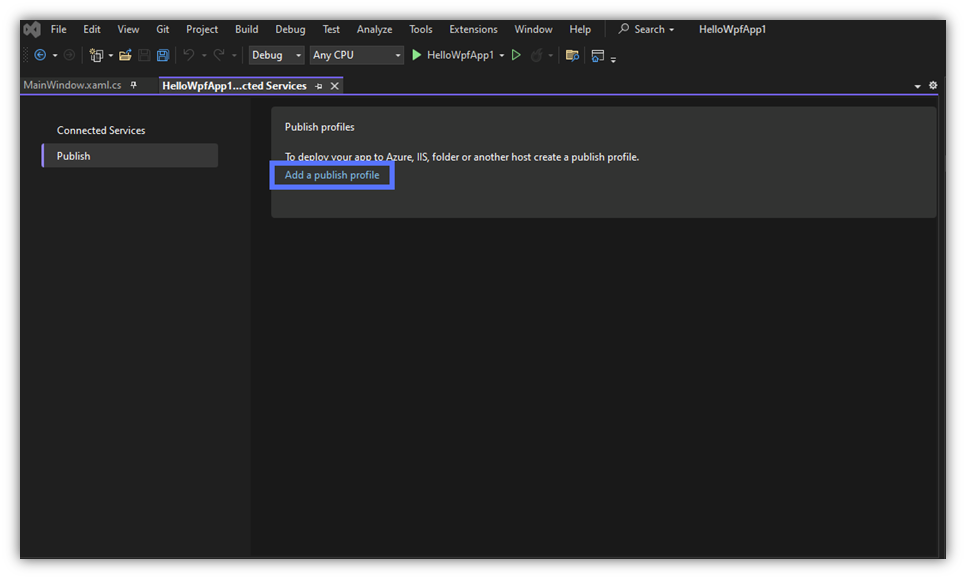
4. Add Your Publish Profile
Click on Add a publish profile to create it. A pop-up window will come up.
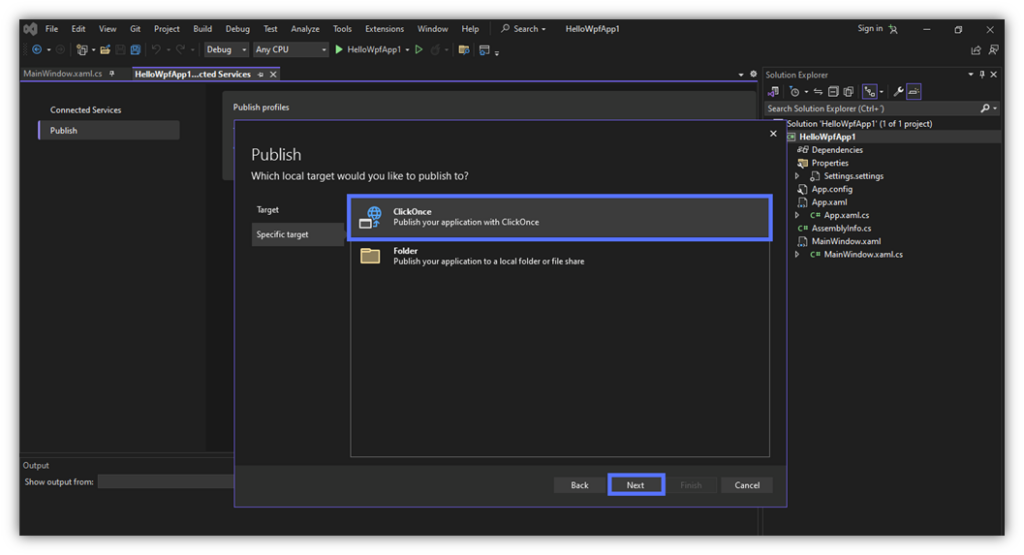
5. Select Your Publishing Target (ClickOnce)
In the target section, pick your publishing target(s). In this example, as it’s a .NET app. Knowing this, we’ve selected folder as the target and ClickOnce as a specified target. Click Next to continue.
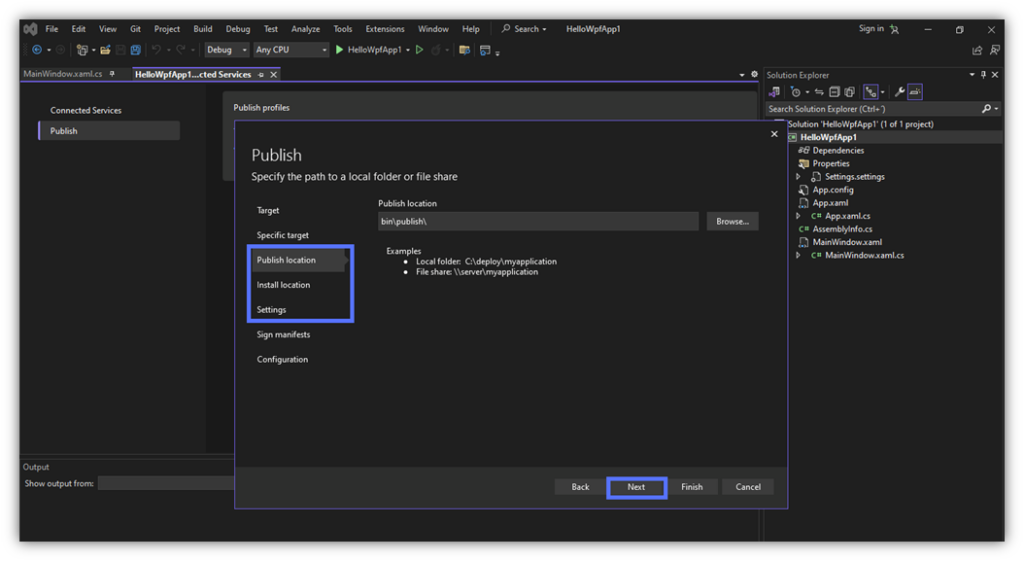
6. Fill in the Application’s Publishing Information
Set the application’s publish and installation path/location, and provide the desired ClickOnce settings (e.g., whether the application is available offline, its publish version, and updates preferences). Click on the Next button to move to the next section.
Tip: Confused about which locations and settings to choose? No problem. Check out Microsoft’s ClickOnce Properties guide. Want to change a location or a setting you’ve just entered? Navigate to the previous section simply by clicking on the Back button.
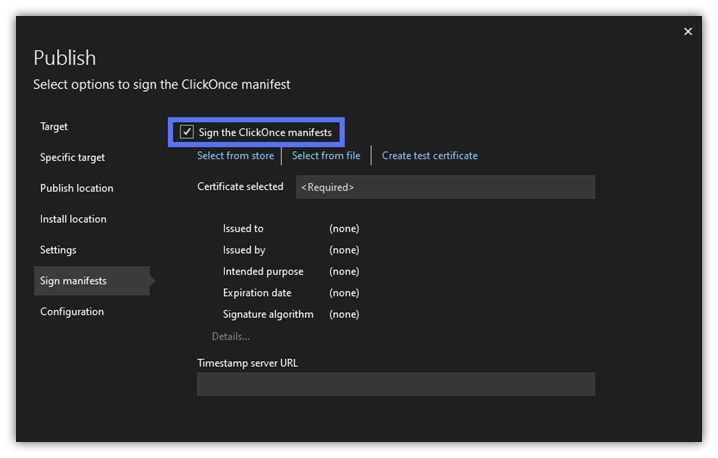
7. Set the Signing Details
Let’s get ready for signing! In the Sign manifests section, toggle Sign the ClickOnce manifests box.
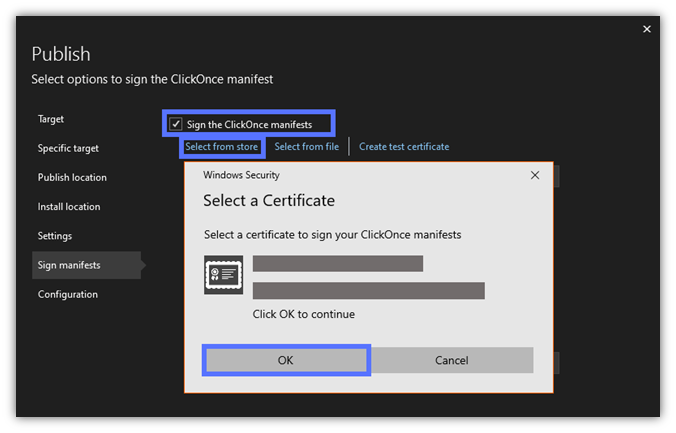
8. Choose Your Code Signing Certificate
To choose your ClickOnce signing certificate, click on Select from store. A pop-up will come up listing the code signing certificate stored on your secure token. (NOTE: Visual Studio will search all of the RSA certificates in your store and list them as options. It won’t find any ECC certificates because they’re not currently supported by Visual Studio.)
To select it, click on OK.
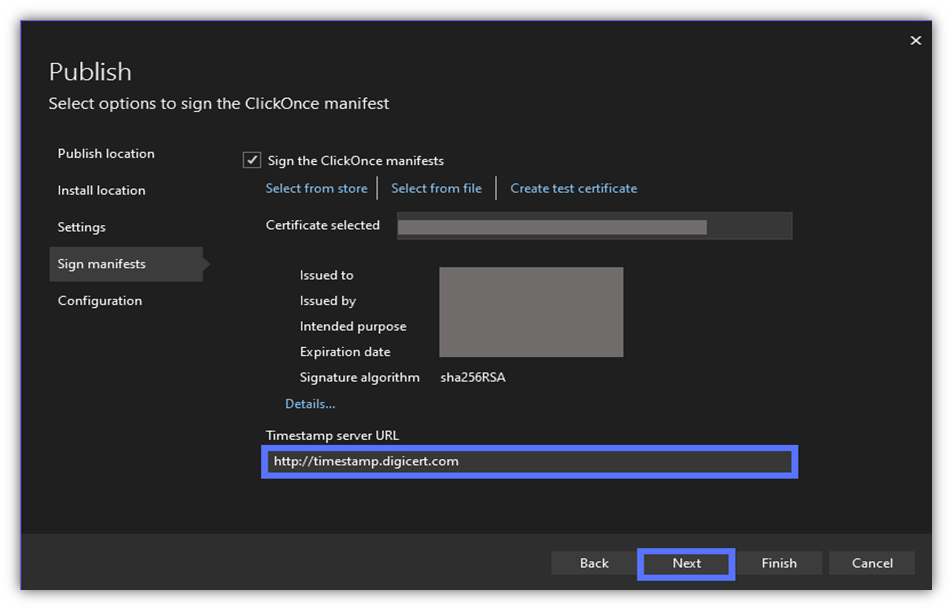
9. Add a Timestamp (Optional)
The certificate information will be loaded. At the bottom of the page, add the timestamp server URL and click on Next. In this demonstration, as we’re using a code signing certificate issued by DigiCert, we’ve added DigiCert’s URL.
Are you using a certificate issued by a different CA? Go to their support page to find their timestamp information.
Tip: The timestamp is technically optional, but it’ll guarantee the validity of your signature even after your code signing certificate expires. So, in our experience, it’s best to add a timestamp (and doing so won’t cost you anything).
10. Configure Your Project
Set the project’s configuration details. When you’re happy with it, hit Finish.
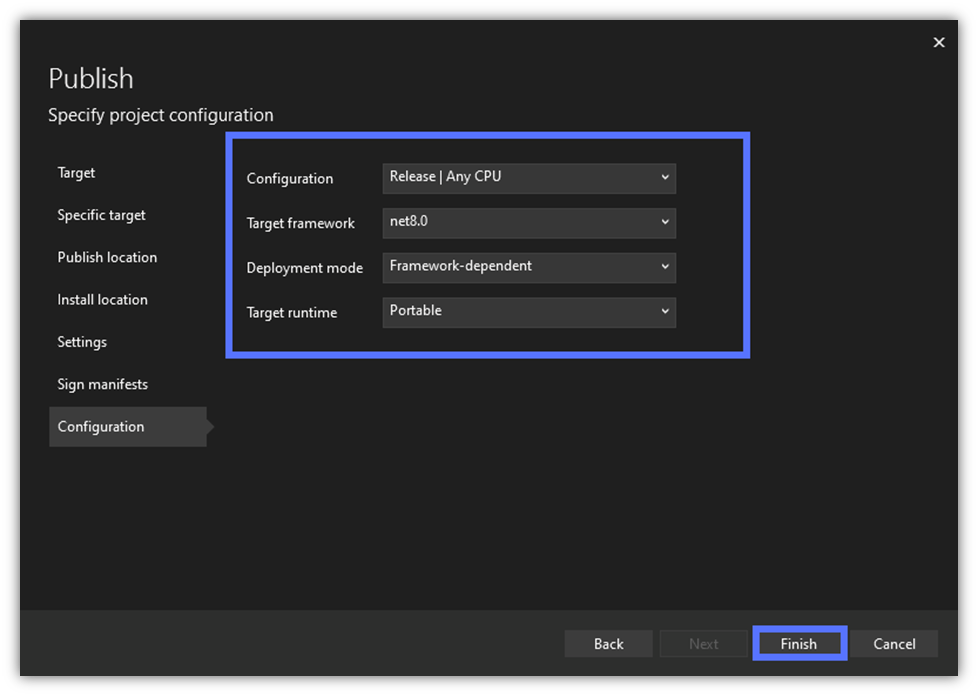
Image caption: The screenshot shows the project’s configuration page.
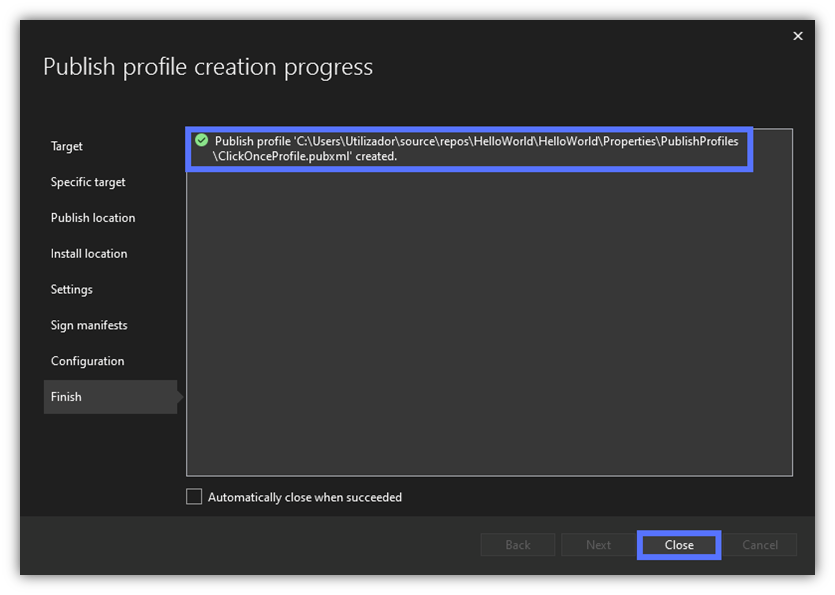
The Wizard will create your Publishing profile. Once completed, a Finish page (similar to the one below) will be displayed. You can now click on Close.
11. Publish Your App and Sign the ClickOnce Manifests
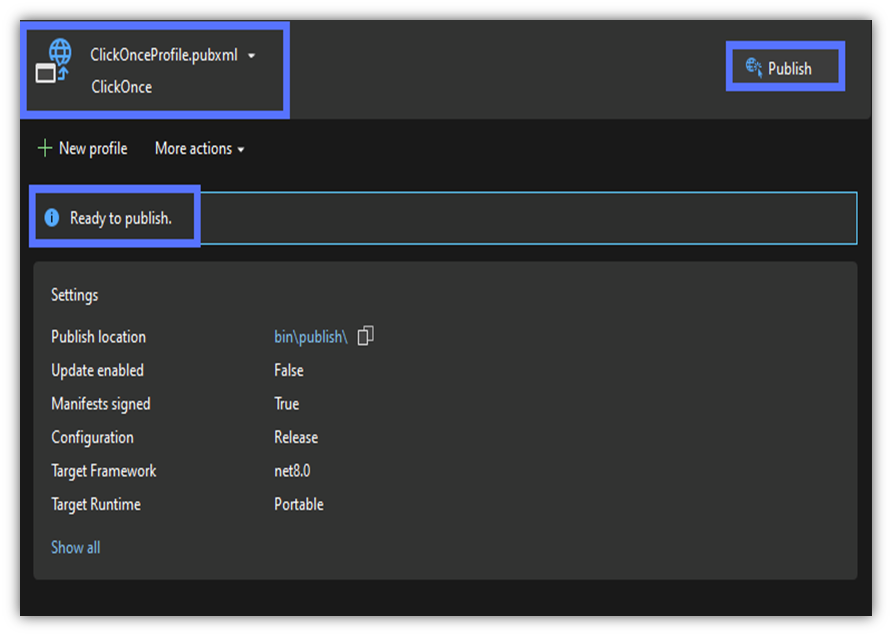
Can you see the “Ready to publish” message like the one highlighted in our example? Great! Hit Publish to get the ball rolling.
The publication and signing process of the application files (e.g., .dll, bootstrapper) will start.
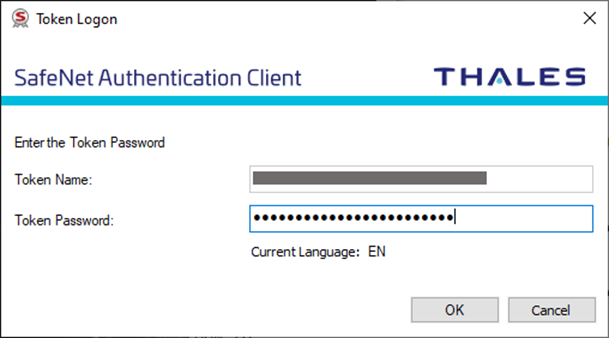
Tip: During the process, you’ll be prompted to enter your code signing hardware’s authentication client password several times. Make sure you’re ready to type it in.
12. Validate Your Manifests Signatures and Publication
Ta-da! If everything goes well, the Wizard will display the publication confirmation in a green box. You made it!
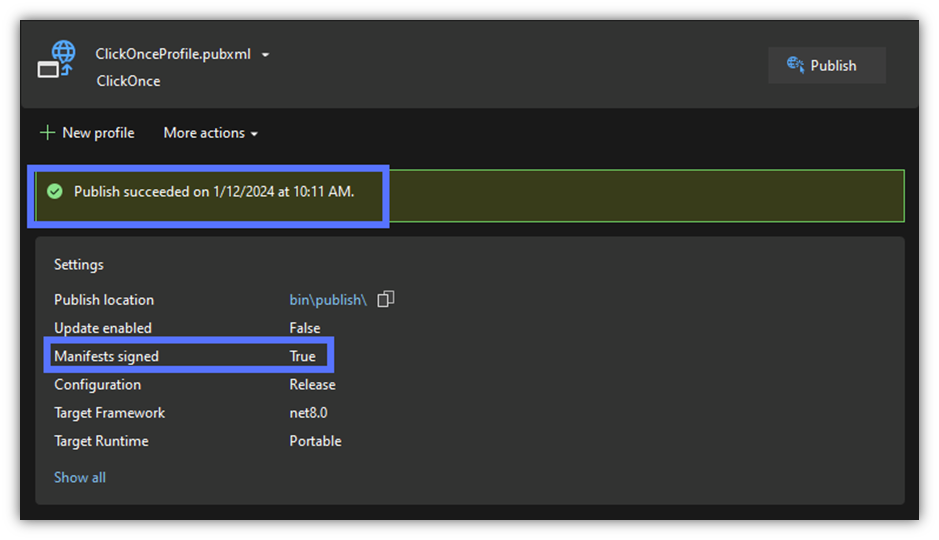
Image caption: The screenshot shows that the signing and publishing process succeeded.
Want to check the details of the ClickOnce Signing certificate used for the signing process? Toggle Show all (shown at the bottom of the screenshot above).
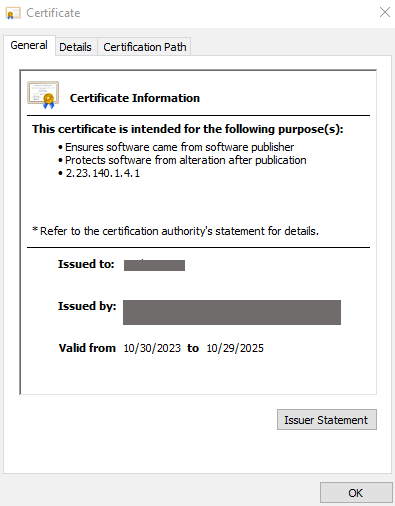
Image caption: The screenshot shows the certificate’s details.
So, from now onward, as long as the manifests and the key files (e.g., .dll) have been signed, when a customer runs the application package:
- No warning will be displayed for signatures created using an extended validation (EV) code signing certificate.
- The Verified Publisher information will be displayed by the User Account Control pop-up (signatures using a standard (OV) certificate. Your organization’s verified details will look similar to Microsoft’s company information, as shown in the next image.
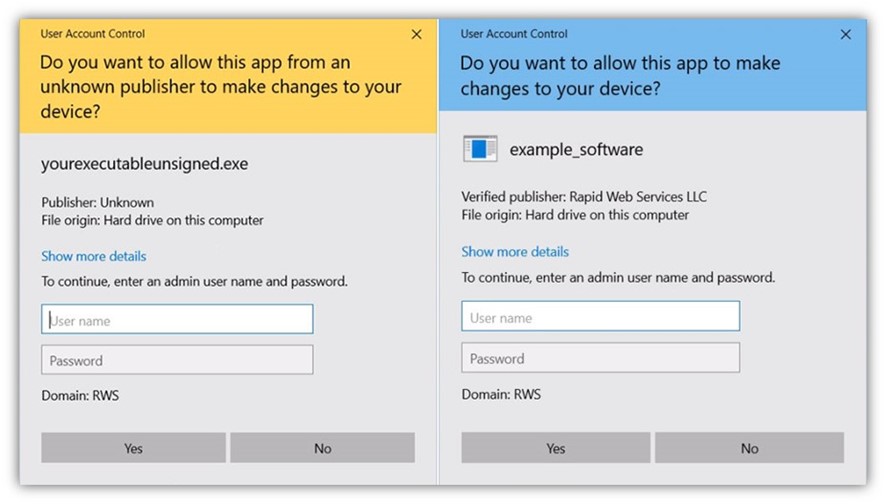
Are you planning to get your application installed via an executable file alone? Make sure you sign it with a publicly trusted certificate too. Failing to do so will trigger the Unknown Publisher warning and block the installation. (The Microsoft Defender SmartScreen Unknown Publisher warning looks like the following image.)
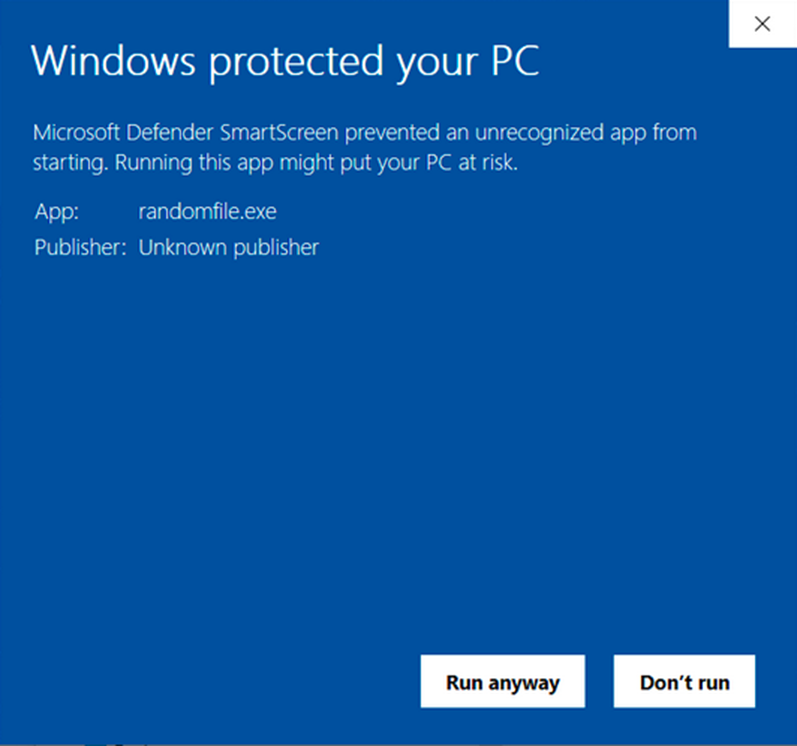
Image caption: The screenshot shows the Unknown Publisher warning triggered by an unsigned executable.
Discover how to do it in our next article of the series.
Final Thoughts on the Ultimate ClickOnce Manifest Signing Tutorial
As we’ve just learned, the signing process isn’t overly complicated. Yes, it entails the purchase of a publicly trusted ClickOnce code signing certificate; however, the investment has an amazing additional benefit: The same certificate can be used over and over again! This is because a “ClickOnce signing certificate” is just a way of calling a traditional code signing certificate based on its application (i.e., how you’ll use it).
This is why you’ll also see references to Authenticode code signing certificates and Java code signing certificates.
A ClickOnce signing certificate can be used to sign (and timestamp) an incredible variety of files, including:
The list goes on and on.
So, what do you think? Isn’t it time to unlock the power of code signing certificates to sign your ClickOnce manifests?
