

How to Sign a PowerShell Script (a Step-By-Step Guide)
 (5 votes, average: 5.00 out of 5)
In 2021, PowerShell was the number one attack vector with 35% of organizations impacted. The solution? Code signing your scripts. Discover how to activate world-class security and protect your PowerShell scripts with a code signing certificate
Companies expect their development teams to do more with less. This is why 66% of businesses automate their processes, and using PowerShell scripts is one way to do this. Versatile and powerful, these scripts help companies streamline business operations and increase productivity by enabling administrators and developers to automate repetitive tasks.
But how do you ensure the integrity and security of your scripts? Especially considering that a recent Trellix report shows a whopping 41% of the programs used by cybercriminals are represented by PowerShell alone. This is where code signing your scripts with PowerShell can help.
You don’t know how to do it? We’ve got you covered. Our easy-to-follow, step-by-step guide will help you learn everything you need to know about how to sign a PowerShell script using code signing. It’ll help to keep your automated tasks secure and your IT security manager happy.
So far, in our series of three articles dedicated to PowerShell you’ve learned:
- How to Create a Code Signing Certificate With a Private Key, and
- 9 PowerShell Code Signing Best Practices for Signing Your Script
What You Need to Know First: A Few Prerequisites to Sign a PowerShell Script
You finally succeeded to put the most tedious patch management tasks on autopilot with a few carefully written scripts. Fantastic! From now on, they’ll work for you so that you’ll be able to focus on the work you were born to do.
But what about security? How can you be sure that those scripts aren’t going to be tampered with and end up being used to load malware on your users’ devices instead of patching their latest vulnerabilities? Code signing is the answer. But before you can start securing your scripts, you’ll need the following:
- A device running a Windows operating system (OS) that’s not older than version 8.1.
- Windows PowerShell version 5.1 or higher.
- A PowerShell script. It can be any script saved in any folder. If you use a script that you’ve already created, double-check it to ensure it hasn’t had any unauthorized alterations introduced since it was first created.
- A publicly trusted code signing certificate. (More on that in just a moment.)
Have you got everything you need? Good. Now let’s dive into how to digitally sign a PowerShell script so that you can have some peace of mind on your next script release.
How to Digitally Sign a PowerShell Script in 5 Steps
Are you ready to power up your scripts? Let’s go!
1. Purchase a Trusted Code Signing Certificate
Code signing certificates are PKI certificates (i.e., digital certificates) that enable you to protect your scripts, software, and other executables from unauthorized third party modifications. This reduces the risks of tampering and also guarantees to your users and fellow administrators that the scripts are really coming from you.
Do you already have a standard code signing certificate or an extended validation (EV) one? If so, you can skip this and jump to step two. You don’t have one yet? Then you’ll have to purchase it here at CodeSigningStore.com at a low cost.
Save Up to 27% on a Standard Code Signing Certificate
Assert your organization’s verified digital identity to increase trust in your software and updates. Boost your sales and download rates for as little as $195.00/year (with a 3-year certificate).
Did you just remember that you have a self-signed certificate (which we’ve covered how to create a self-signed code signing certificate in PowerShell previously) and want to use that to sign your scripts to save a few dollars? You could certainly do so, however, we wouldn’t recommend it. Why?
As self-signed certificates are created by the developer itself, they aren’t verified by a third-party authority, thus they aren’t trusted by major operating systems and browsers. In addition, they’re much easier to exploit as they often have a very long expiration date or use a weak or deprecated encryption algorithm. That’s why they’re good to use in internal testing environments where trust isn’t an issue… but that’s about it. If you’d use them to sign scripts for other purposes, especially in public-facing environments, you’ll end up with:
- Security warnings pop up on all devices using the scripts.
- Someone potentially using your software as a way to transport malware.
- Higher risk of breaches (and all of the headaches that come with them).
Standard and extended validation code signing certificates are different. They’re issued by a globally trusted certificate authority (CA) only after your organization undergoes background checks. During this process, the identity and legitimacy of your organization are verified. This means that your scripts look to people using them as:
- Authentic. People will be confident that the scripts were made by you.
- Unchanged. Users will be able to verify that your scripts haven’t been modified by a malicious third party.
- Secure. MITRE suggests that code signing is one of the top ways to mitigate the risks of PowerShell scripts being abused by cybercriminals.
On top of that, depending on the certificate chosen, those annoying security warnings will be completely removed or reduced to the minimum. Do you get now why these certificates are defined as “trusted” by browsers and OSes globally?
Do you have your standard or EV code signing certificate at hand? Good. Time to move to step two. Before we go though, don’t forget to plug into your device the secure USB token that’s required to store your private key and certificate! Without that form of two-factor authentication (2FA), you won’t be able to sign anything using that certificate. (And that’s a good thing, because it means that no one can try to use it fraudulently because they won’t have access to the token that the key is stored on.)
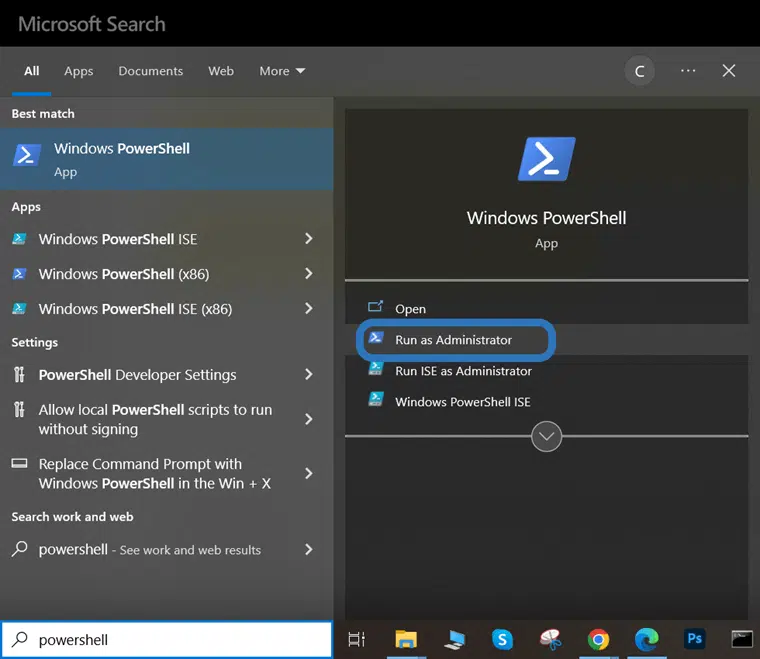
2. Open Your Windows PowerShell
PowerShell script signing requires the administrator’s permission. To open PowerShell as an administrator:
- Click on Start.
- Type powershell in your search box.
- Select Windows PowerShell App.
- Click on Run as Administrator.
3. View Your Code Signing Certificates and Select One to Use
Do you have more than one code signing certificate? If you don’t, you can skip this. If you do, make sure you select the right one by viewing the whole list of all your certificates, just to play safe. How? There are scripts for that, too!
Save Up to 27% on a Standard Code Signing Certificate
Assert your organization’s verified digital identity to increase trust in your software and updates. Boost your sales and download rates for as little as $195.00/year (with a 3-year certificate).
To view only your code signing certificates use the following command:
Get-ChildItem Cert:\CurrentUser\My -CodeSigningCert

Do you prefer to play safe and view all certificates available on your device? You can do that in two ways.
The Changing Directory Method
- Go to the folder where your certificates are stored by entering the following command:
- Type ls and click Enter.

The One Command Method
- Type the following command: Get-ChildItem Cert:\CurrentUser\My
- Press Enter.

Note: If your code signing certificate is in a different folder from “My” make sure you replace the example file path Cert:\CurrentUser\My with the correct path. For example: Cert:\CurrentUser\My -CodeSigningCert [0] or Cert:\LocalMachine\My -CodeSigningCert [2]
Once you hit enter, all your certificates will appear listed on your PowerShell window.
As an example, I’ve chosen to use the command to view only my code signing certificates. This is what I get:
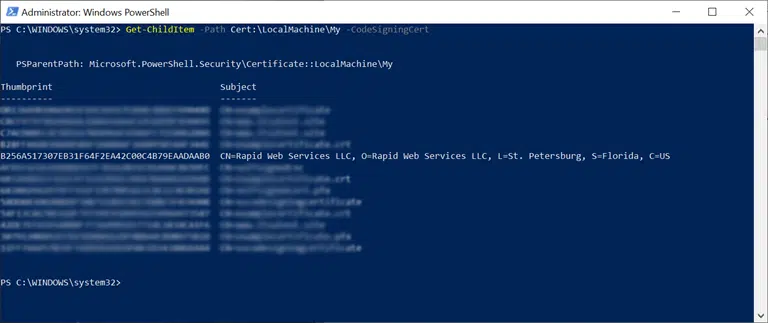
The screenshot shows a list of available code signing certificates.
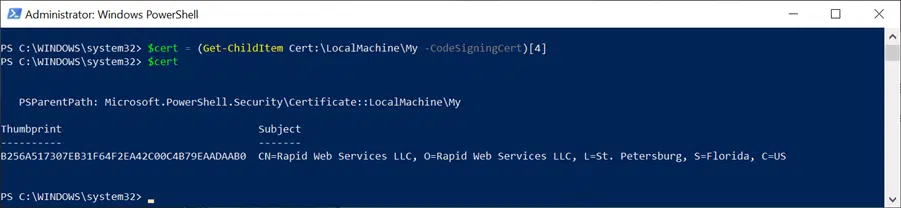
Now, you’ll want to select the certificate you wish to use for the signing process. You’ll want to set the certificate to the $cert variable. To do this, you can use the following command, which selects the specific certificate from the list (starting from the top, which you’ll count as 0). This command will look like the screenshot below:
$cert = (Get-ChildItem –Path Cert:\LocalMachine\My -CodeSigningCert)[4]
4. Sign Your PowerShell Script
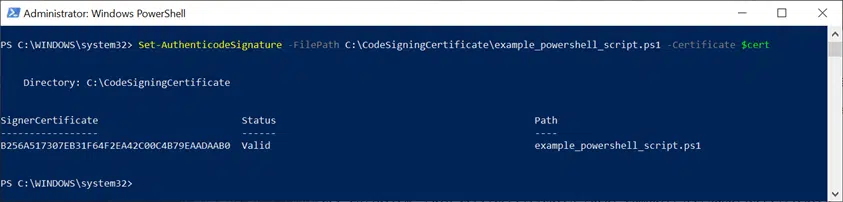
Okay, now that you’ve selected the certificate you wish to use and have saved it to your $cert variable, you’re ready to rock. Sign your PowerShell script using the Set-AuthenticodeSignature command, which looks like this:
Set-AuthenticodeSignature -FilePath SCRIPT_PATH -Certificate $cert

Note: Replace SCRIPT_PATH with the path to your script.
For example, this is how it looks using a test script:
Set-AuthenticodeSignature -FilePath C:\CodeSigningCertificate\example_powershell_script.ps1 -Certificate $cert
Do you want to give a longer life to your signature? Add an optional timestamp to it when you sign your script using the following command:
Set-AuthenticodeSignature -FilePath C:\CodeSigningCertificate\example_powershell_script.ps1 -Certificate $cert -TimeStampServer https://timestamp.digicert.com
Note: In this timestamping example, we’ve used DigiCert’s timestamp server. Make sure you replace that with the time stamp server of your code signing certificate provider. You can typically find this information on the issuing CA’s website.
That’s it! You’ve now signed your first PowerShell script. Well done! Do you want to know if the process really worked? Let’s check your signature.
5. Verify Your PowerShell Script Signing
A simple mistake can kill your credibility. Therefore, just to play safe, make sure you always double-check that the script does have your signature before publishing it or showing it off to your boss. How?
The Easiest Way: By Opening Your Script
This is probably the fastest way to establish that your script has been signed correctly.
- Open the script using a text editor.
- Look for the signature block at the bottom of the script. It’ll start and end with # SIG #.
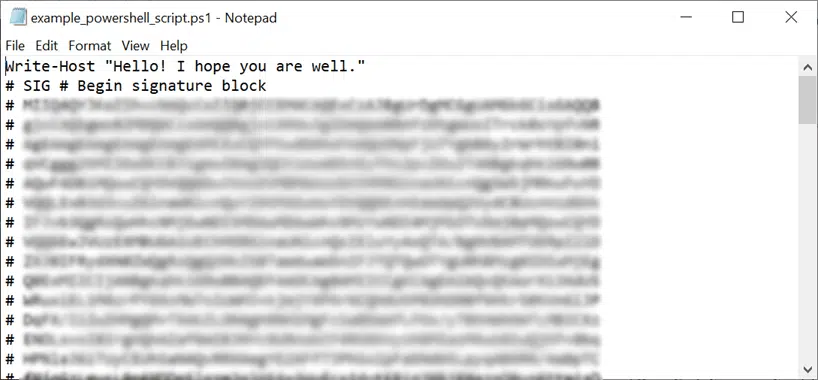
Did you find it? Great!
The Windows Explorer Way: By Checking Your Script’s File Properties
Are you a visual learner like me? Then you may want to opt for this method.
- Open Window Explorer and navigate to the folder where you saved your script.
- Right-click on the folder
- Select Properties.
- Click the Digital signatures tab.
Do you see a signature under the Signatures list? Success!
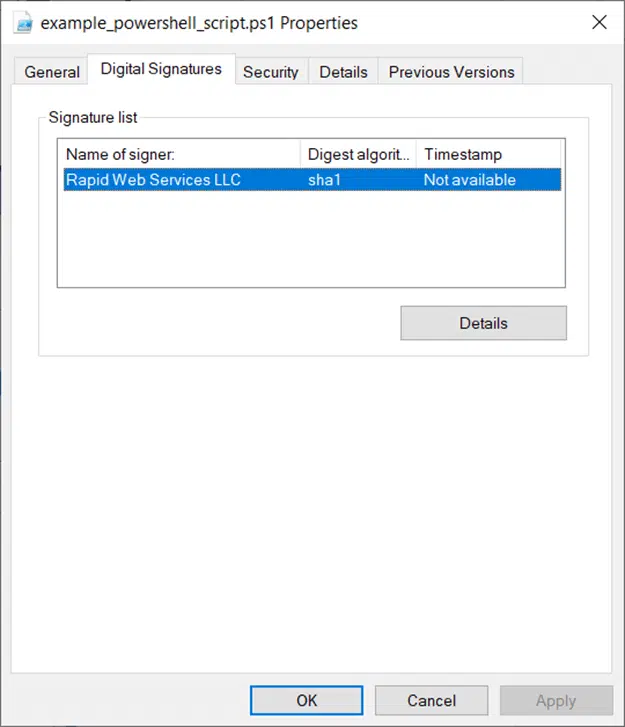
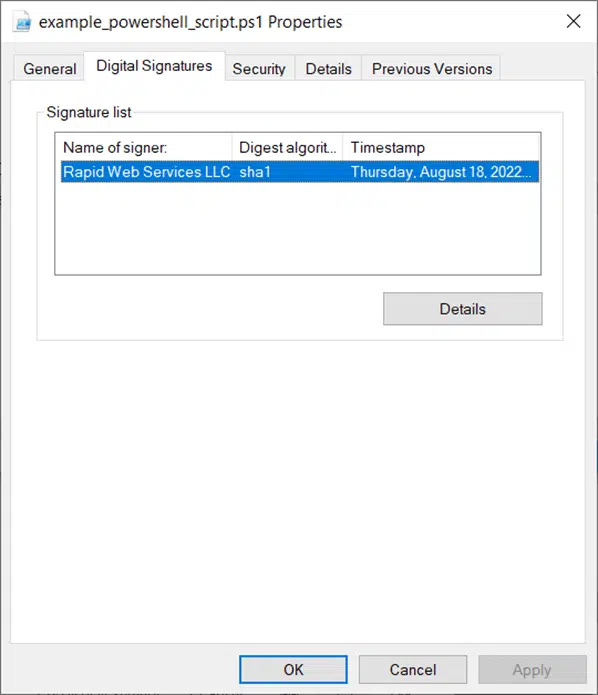
Not seeing a timestamp with your digital signature? It’s because we didn’t add one in our original example that we walked you through. If you decide to add an optional timestamp to your digital signature during the signing process, this window will display additional information like the following screenshot:
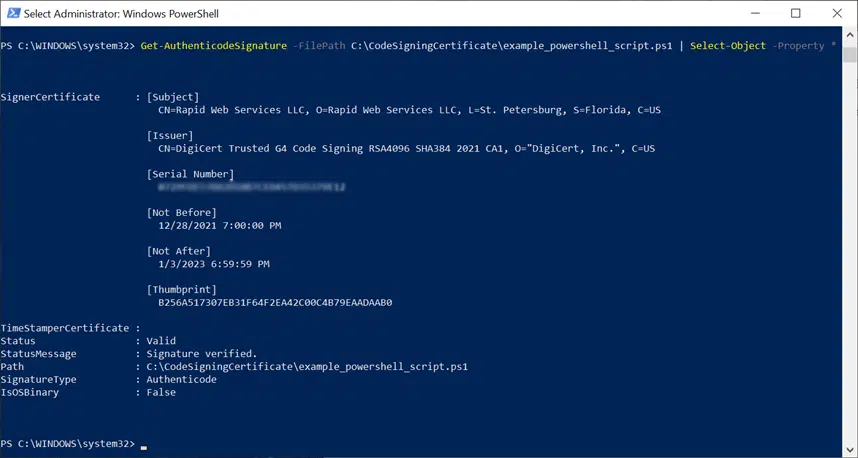
The PowerShell Master Way: Using Get-AuthenticodeSignature
Are you feeling geeky, or did you enjoy playing with PowerShell so far? Why don’t you give it a try then and verify the outcome of your code signing with a PowerShell command?
- Go back to your PowerShell Window.
- Type the cmdlet below:
Get-AuthenticodeSignature -FilePath SCRIPT_PATH | Select-Object -Property *

As previously advised, don’t forget to replace SCRIPT_PATH with the correct path to your script.
If you can see something similar to what is shown in the screenshot below, then you did everything right.
Bonus: Three Code Signing Certificate and PowerShell Tips
1. Do you want to prevent your PowerShell script’s code signing signature from expiring? At the time of writing, trusted code signing certificates usually expire after a maximum of around three years (39 months). Your script’s signature will expire with them. To ensure that your users and colleagues can still use your script after that date, add a timestamp to it. A timestamp attaches verifiable data and time to your script that proves the precise moment when it was digitally signed. This timestamped signature will remain valid years after the certificate has expired.
2. Do you need to change a signed PowerShell script? Once you implement your changes, don’t forget to re-sign it with your digital certificate. Just follow the same process you just learned in this article.
3. Are your users getting an error when running your script? Windows 10 clients have the PowerShell policy set as restricted by default. This means that while individual commands are permitted, scripts aren’t allowed to run. To change that ask your users and colleagues to:
- Open PowerShell as administrator.
- Run the command Set-ExecutionPolicy AllSigned
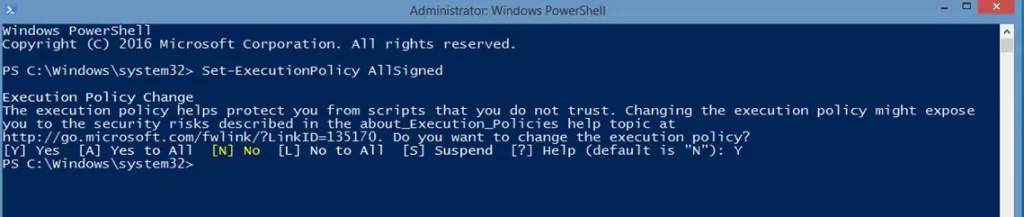
- Type Y (yes) and hit Enter.
From now onward all scripts signed by a trusted code signing certificate will work. “It’s a kind of magic,” much like the famous Queen’s song says.
Why Should I Sign My PowerShell Script?
PowerShell scripts empower you to fully streamline your work and take it to the next level. With them, you can work smarter by running automated actions whenever you like, and exactly how you want. However, if not duly protected with trusted code signing certificates, these scripts can also be double-edged swords. For this reason, PowerShell script signing is also included in the security measures suggested by U.S., UK, and New Zealand cybersecurity government agencies.
Code signing your PowerShell scripts will enable you to do the following:
Minimize the Risks of Exploitation
In fact, due to PowerShell’s ease of use and wide availability, cybercriminals don’t hesitate in using it to exploit your scripts for malicious intentions. PowerShell script exploitation has become so popular in the last few years that in 2020, McAfee Labs reports that incidents involving them grew by an astonishing 208%. And it didn’t stop there:
- In 2022, malicious PowerShell downloader scripts were used by the MuddyWater hacker group to infect many users’ machines.
- The AvosLocker ransomware variant, discovered in May 2022, also used a PowerShell script to disable the victim’s antivirus software.
And these are just a couple of examples…
Prove to Users and Colleagues That Your Scripts Are Authentic and Legitimate
Whenever a user downloads your script, the digital signature enables him to verify the validity of the certificate used to sign it. This will also confirm that the script hasn’t been modified by a malicious third party since its signature.
Prevent Users in Your Organizations From Running Unsigned, Dangerous Scripts
When all scripts used by your organization are signed with a trusted code signing certificate, you’ll be able to enforce PowerShell’s execution policy to AllSigned on all devices used in your organization. Once enabled, the only scripts permitted to run on the devices will be those signed with a trusted code signing certificate.
Isn’t that worth it?
Final Thoughts on How to Sign a PowerShell Script
Scripts signing helps you ensure that every change to your script is approved and reviewed while also mitigating the risk of security breaches. With automation becoming a key element in every organization, ensuring that PowerShell scripts are protected has become critical.
To do so all you need is:
- A pubicly trusted code signing certificate.
- Your Windows PowerShell.
- A simple command.
Save Up to 27% on a Standard Code Signing Certificate
Assert your organization’s verified digital identity to increase trust in your software and updates. Boost your sales and download rates for as little as $195.00/year (with a 3-year certificate).
Et voila’. You’re all set.
Now that you’ve grasped the fundamentals, harness the power of code signing so you can stop worrying about bad guys making unauthorized changes to your legitimate scripts. Start signing your scripts now and save yourself the headaches. And if you want to become a PowerShell scripts master, don’t miss our third article of this series. Get a deep dive into our best practices for signing your scripts and learn how to make the most of PowerShell code signing.
