

How to Digitally Sign a Driver For Windows (A Step-By-Step Guide)

 (6 votes, average: 5.00 out of 5)
An average of 46% of buyers interviewed by Forter in 2023 are willing to spend more with vendors they trust. Boost customers’ trust by showing your users that your drivers are authentic (i.e., published by you) and unmodified. Follow our step-by-step instructions to learn how to use SignTool to sign your drivers
In today’s digital world, driver signing has become a “must-have” tool for your toolbox. Threats are lurking around every corner. In the first half of 2023, S21Sec Cyber Solutions by Thales reports that ransomware attacks have increased by an astonishing 43% compared to the previous six months. The AV-TEST Institute reports that nearly 9 million new malware and unwanted applications are identified every month. And what better way to prevent someone from tampering with your software files than to digitally sign them before release?
If you’re a software developer or a vendor who’s trying to figure out how to digitally sign a driver that meets the industry’s new code signing requirements, then search no more; we’re here to help.
This step-by-step tutorial will walk you through how to digitally sign a driver with a code signing certificate.
Getting Started – What Do You Need to Sign a Driver for Windows?
Here is the essential checklist of the five actions to carry out before signing a driver:
| Essential Tools For Signing Windows Drivers | Description |
| 1. Install SignTool.exe on the Windows device you’ll use to sign your driver. | The SignTool is a command-line tool embedded in Windows SDK that lets you sign, timestamp, and verify Microsoft Authenticode-supported file formats such as .exe, .cat, .cab, .jar, and of course, drivers (i.e., .sys, .dll files). |
| 2. Purchase a code signing certificate issued by a publicly trusted certificate authority (CA). | A standard certificate, like the one used in this guide, works in many cases. However, in some cases, you may need to sign using an extended validation (EV) code signing certificate (more details in the following sections). |
| 3. Set up the hardware security token sent to you by the CA. | This reflects the new industry criteria requiring, since June 2023, that all code signing certificates’ keys are stored on cryptographically secure hardware (e.g., USB tokens). |
| 4. Download and install the authentication client provided by the CA. | This is the software you utilized to set up your secure token when you received it. In this tutorial, we’ll use the SafeNet Authentication client. |
| 5. Get administrator permissions. | The SignTool.exe will work only with admin permissions. Contact your IT department if you don’t have admin access on your device. |
Did you check all the five points? Well done. We can now move on to the next section and discover the steps to sign a driver. Let’s get the party started!
How to Sign an Unsigned Driver With Microsoft’s SignTool
Got your driver to sign at hand? Good. In our demonstration, we’ll sign a user-mode driver (e.g., a .dll file). However, the same process can be used to sign kernel-mode drivers (e.g., .sys files) and driver packages (e.g., .cat files). Ready? C’mon, it’s driver-signing time, baby!
1. Connect Your Hardware Token and Open the Authentication Client
This is the first thing you’ll have to do each time you must sign a file or software. Should you forget about it and try to do it later in the process, it won’t work.
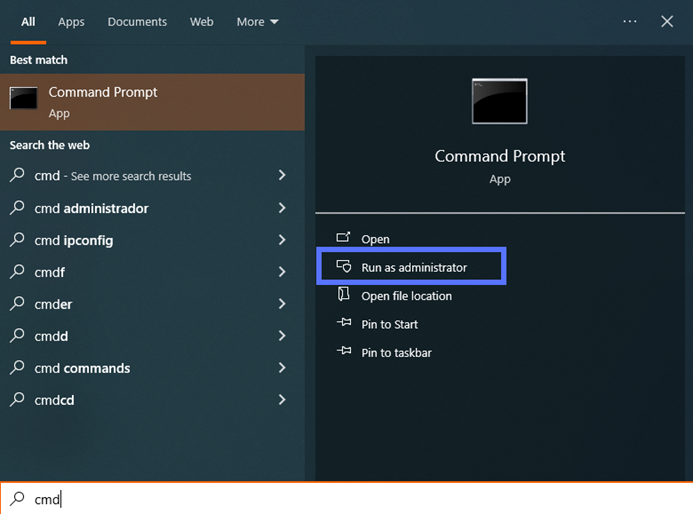
2. Open a Command Prompt Window (CMD) as Administrator
If you’re already logged in as an admin, click the CMD app icon. If you aren’t, search for “cmd” using the Windows search box. Under the Command Prompt App icon, select Run as administrator. Enter your admin password when prompted.
3. Switch to the Directory Containing Microsoft’s SignTool
To change directories after you’ve installed Windows SDK in the default folder (i.e., .bin), use the command below.
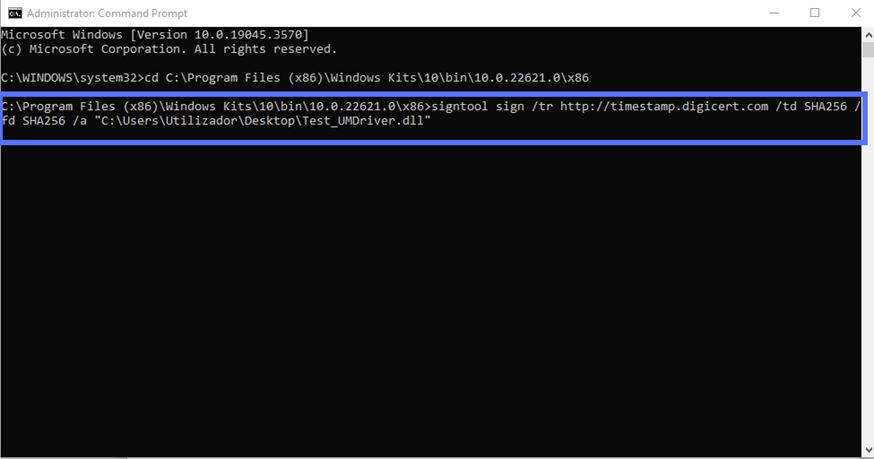
cd C:\Program Files (x86)\Windows Kits\10\bin\YourSDKversion\x86Replace “YourSDKversion” with the correct version number installed on your machine (in our example, shown in the screenshot, it’s 10.0.22621.0).

If SDK has been installed in a different directory, adapt the script to reflect the specific file path and folder name:
cd C:\your filepath\your folderDid you have to log in as an admin when you first opened the CMD? Jump to step four.
Were you already logged into your device as an admin? After executing the cd command illustrated above, in the same window, type “c:” and hit enter.
4. Sign (and Timestamp) Your Windows Driver
OK. Now, this is the part when you get to really sign your driver. This section will walk you through how to add an optional timestamp to your digital signature. Wondering why you should do that if Windows policies don’t require it? Because doing so is generally a good idea.
In a way, a timestamp is like a free extended warranty. When applied, it’ll keep your signature valid, even when your code signing certificate expires. This means no ugly warnings will be displayed to the users when they attempt to install your driver. Yeah!
So, how can you sign and timestamp your driver in one go? All you have to do is type the command below in the command line. Get your CA’s timestamp’s server information (which is usually available on their support page) and replace the “CAtimestamp.server.com” bit with it. Double-check you’ve also entered the correct driver’s file path and name.
signtool sign /tr http://CAtimestamp.server.com /td SHA256 /fd SHA256 /a "C:\filepath\Mydriver.dll" Here’s what it looks like for us when using the DigiCert timestamp server:
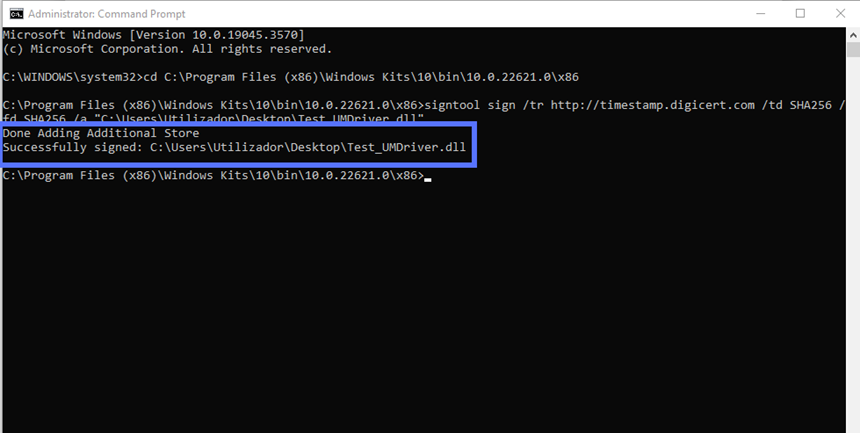
Once you hit enter, a pop-up will prompt you to type your Authentication client password (as shown below).

Once the password has been entered, click on the OK button. That’s all, folks! If you did everything correctly, you should see a message like the one displayed in our screenshot below:
Want to sign without timestamping? Use this command instead:
signtool sign /td SHA256 /fd SHA256 /a "C:\filepath\Mydriver.dll" 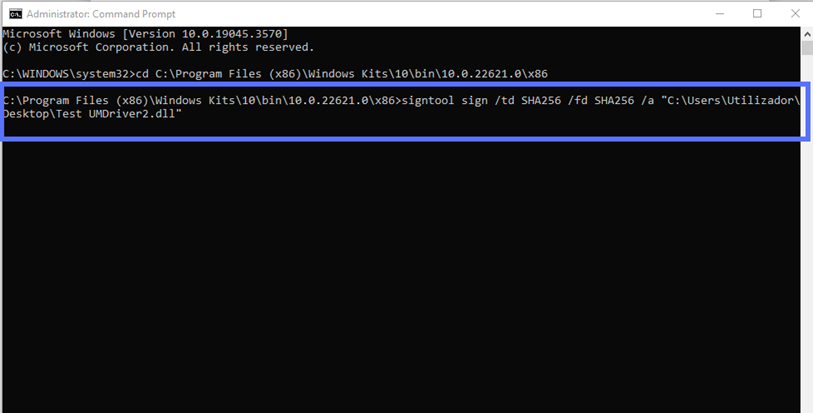
Last but not least, regardless of whether you signed your driver with a timestamp, take the time to verify your signature was applied successfully. As the Scottish historian and philosopher Thomas Carlyle said: “One must verify or expel his doubts, and convert them into the certainty of yes or no.”
5. Verify Your Signed Driver
Two scripts can be used to verify your signature in CMD. The verbose one (shown below) will provide:
- Highly detailed information about the signature;
- The code signing certificate used; and, if applied
- The timestamp data.
Want to use it? In the same CMD window type:
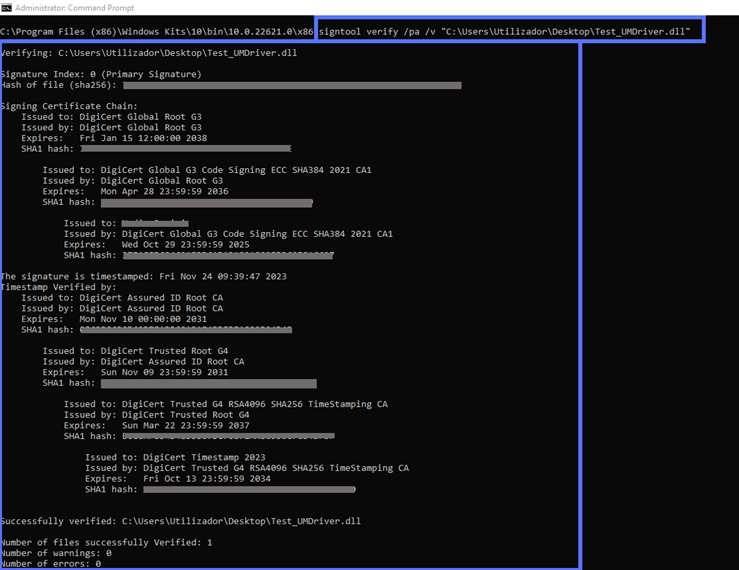
signtool verify /pa /v “C:\filepath\Mydriver.dll”A plethora of juicy details will be displayed, like in the following example:
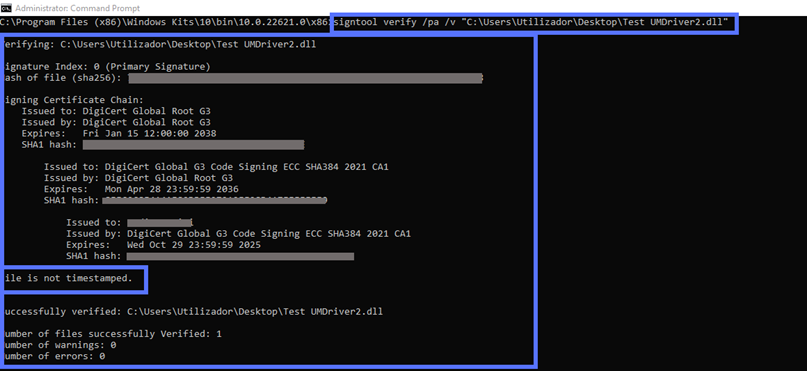
You didn’t add a timestamp? You’ll still get an exhaustive list, down to the fine points. SignTool’s verification information will also clearly state that the driver comes without a timestamp:
Would you rather get a more concise summary? Use this script instead:
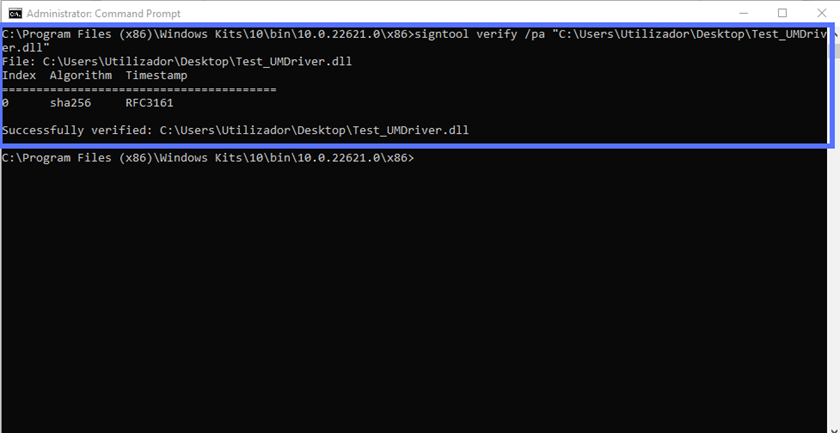
signtool verify /pa “C:\filepath\Mydriver.dll” Et voila’. The results boil it down to covering only the most essential information.
At last, we can confirm that we’ve signed the driver correctly. Do you want to sign a driver package (e.g., a .cat file)? Follow the same process.
Are you planning to distribute the driver through the Windows Update program? Then you’ll have to follow some additional steps. And this isn’t the only case. Let’s find out more about these different situations.
Additional Steps to Follow for Kernel Mode Release Drivers, Driver Packages Signing, and Other Exceptions
Before the advent of Windows 10 version 1607, the code signing process we’ve just described was the only requirement to release any kind of Windows driver. As time passed, cybercriminals’ attacks got more sophisticated. As a result, organizations had to beef up their security measures, and so did Microsoft’s driver signing policy.
Now, the Windows Driver Signature Enforcement requirements are more strict:
- Kernel-mode drivers can no longer be signed with a standard certificate. All drivers “talking” directly to operating systems’ cores (i.e., kernel-mode drivers, usually indicated by the .sys extension) must be signed with the more secure EV code signing certificate. The standard code signing certificate can still be used to sign user-mode drivers (i.e., those running separately from the core operating system).
- An additional signature is required. Did you develop a kernel or user mode driver, or a driver package that’ll be distributed through the Windows Update program or other MS-supported distribution mechanisms? On top of creating the digital signature you’ve just learned to apply, you must:
- Create an account using the Windows Hardware Developer Center Dashboard portal (Dev Portal),
- Ensure your public release driver undergoes testing using the Windows Hardware Certificate Program testing kits (e.g., WHLK for Windows 10, 11, and Windows Server 2016 or later; WHCK for Windows 8.1 and earlier; and WLK for Windows Server 2008 and older), and
- Create a driver submission package (i.e., .hlkx/.hckx or .cab for WLK hardware) for a Windows Hardware Certification Program (WHCP) digital signature in the Dev portal. If successful, your submission will return a WHCP-signed .cat file.
- To access the Dev Portal, you’ll need an EV certificate. If your code must also be certified and signed by Microsoft, as explained above, you’ll have to register with the Dev Portal. And guess what? You’ll need an EV code signing certificate to do that.
Moreover, Microsoft’s Windows driver signing tutorial specifies:
“The mandatory kernel-mode code-signing policy applies to all kernel-mode software for x64-based systems that are running on Windows Vista and later versions of Windows. However, Microsoft encourages publishers to digitally sign all kernel-mode software, including device drivers (user-mode drivers included) for 32-bit systems as well. Windows Vista and later versions of Windows, verify kernel-mode signatures on 32-bit systems. Software to support protected media content must be digitally signed even if it is 32-bit.
User-mode drivers, like the Printer driver will install and work in an x64-based computer. A dialog will appear to the user during installation asking for approval to install the driver. Beginning in Windows 8 and later versions of Windows, installation will not proceed unless these driver packages are also signed.”
Does the driver you’ve just signed fall into one of these examples? If this is the case, to complete the process and get it ready for release, follow the above-mentioned Microsoft tutorial.
Pro tip: If you want to sign a driver package, don’t forget to individually sign your driver (e.g., SYS or DLL) and the .cat file. If you don’t, Windows will still consider the package as unsigned.
Looking to sign other file types? You can do that using the same code signing certificate. Discover how by exploring our compelling guides:
- Sign and timestamp JAR file.
- Sign MSI installer files and packages.
- Sign EXE files using a code signing certificate.
Final Thoughts About How to Digitally Sign a Driver for Windows
Cryptographically signing Windows drivers isn’t too much of a headache, provided that you have the right tools (e.g., an EV certificate for kernel-mode drivers or those you’ll distribute through Windows update) and a good, comprehensive step-by-step tutorial to follow. We hope this guide serves as a useful tool you’ll want to share with friends or colleagues who want to understand how to digitally sign an unsigned driver for Windows systems.
The digital world is a tough place for organizations and users alike. However, you can offer your customers a much more enjoyable and secure experience by signing your drivers. What’s in it for you? Among all the benefits, it’ll boost customers’ trust in your brand and software, which can help expand your potential buyers’ pool.
Gone are the times when users blindly trusted what they were downloading from the internet. In this day and age, to be successful, learning how to sign drivers and software is something that no developer or software vendor can forgo.
