

PowerShell: How to Create a Self-Signed Code Signing Certificate With a Private Key
 (1 votes, average: 5.00 out of 5)
Do you need a code signing certificate to test an application and you don’t want to fork out money to buy one? Learn how to use PowerShell to create a self-signed certificate with a private key. It’s easy as one-two-three and it won’t cost you a thing
In the last two years, incidents caused by an insider threat (i.e., a security risk coming from within the organization itself, like an employee or a contractor) increased 44%, according to global data from the Ponemon Institute and Proofpoint. The same 2022 report also showed an average cost per incident of more than $15 million. That’s a hell of a lot of money for an organization, isn’t it?
But what are insider threats exactly? To put it simply, they’re people with access to an organization’s network and systems who could leak or misuse data and assets. Are they always intentionally malicious? Nope. As pointed out by the U.S. Cybersecurity and Infrastructure Security Agency (CISA), they can also be the consequence of human error, negligence, or simply convenience. For example, leaving internal testing codes unsigned to save money and time.
Using self-signed certificates for testing or troubleshooting within your internal environment can be an affordable and acceptable way to:
- Find bugs and vulnerabilities before releasing your codes.
- Avoid your testing codes being modified without permission.
Find out everything you need to know about this kind of certificate in our three-article series. In this first article, we’ll start with the basics and show you how to create a free self-signed certificate with PowerShell. And do you know what’s the best part? It’s quick and it won’t cost you a dime!
So far, in our series of three articles dedicated to PowerShell you’ve learned:
- How to sign a PowerShell script, and
- 9 PowerShell Code Signing Best Practices for Signing Your Script
How to Create a Self-Signed Certificate With Private Key in 2 Steps
Self-signed certificates (i.e., certificates signed by a developer rather than a trusted certificate authority [CA]) are considered by cybersecurity experts as risky when used for external or public purposes — and rightly so (we’ll talk more on why that is a little later).
However, in some cases (like in a testing environment), self-signed certificates can be extremely useful and have an acceptable level of security. They can sometimes even be a better choice than a certificate signed by a CA in this specific internal use case because they:
- Allow you to set your preferred expiration date.
- Can be issued immediately.
- Don’t cost anything to issue.
So, if you need a certificate to test your app or do some troubleshooting, you may want to give it a try and use PowerShell to create your self signed certificate with a private key. How? Let’s find it out.
1. Open PowerShell in Administrator Mode
With Microsoft PowerShell (already preinstalled in Windows 10), you can generate a self-signed certificate by using the New-SelfSignedCertificate command. To open PowerShell:
- Click on Start.
- Run a search by typing powershell in your Windows search bar.
- Click on Windows PowerShell App.
- Select Run as administrator. If you try to do this using regular privileges, you’ll just receive an error message.
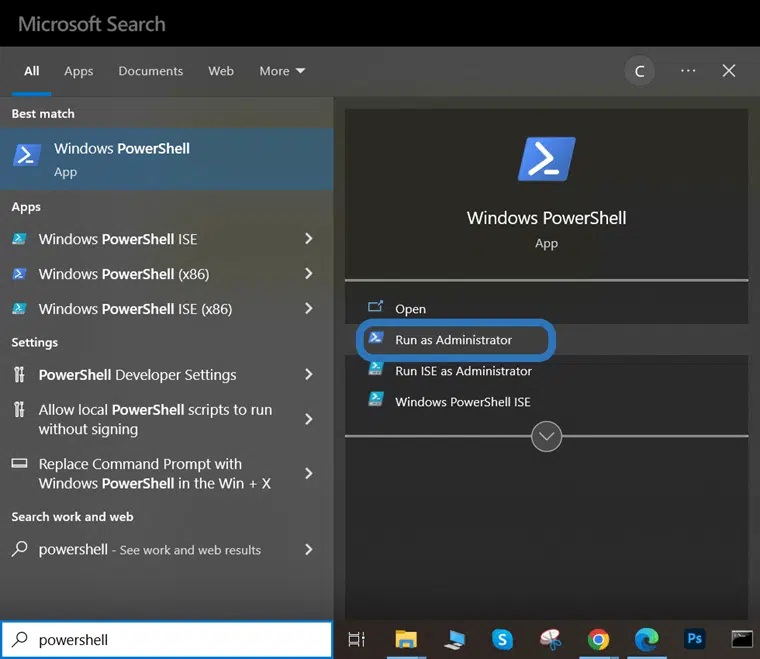
This is how to open PowerShell as an administrator in Windows 10.
The blue PowerShell window will come up.

The screenshot shows the PowerShell window confirming that you’re logged in as administrator.
2. Run the New-SelfSignedCertificate Command
You can now create your code signing certificate with PowerShell (version 5 or higher) by typing the following command and then hitting enter:
$cert = New-SelfSignedCertificate -KeyUsage DigitalSignature -KeySpec Signature -KeyAlgorithm RSA -KeyLength 2048 -DNSName “www.yourdomain.com” -CertStoreLocation Cert:\CurrentUser\My -Type CodeSigningCert -Subject “Your Code Signing Certificate Name”
For those who are not familiar with PowerShell:
- DNSName. Your full domain name.
- CertStoreLocation. It shows where the certificate will be located on your device.
- Type. It indicates the kind of certificate created. In our example, we’re creating a code signing certificate i.e., CodeSigningCert.
- Subject. The subject in the command is a kind of unique certificate label. It’ll enable you to find your new certificate among all the others stored on your device. In this case, for demonstration purposes, I’ve named the certificate “Your Code Signing Certificate Name.”

The screenshot shows the PowerShell command to create a self signed certificate.
Using a real example, this is how it would look:

A screenshot that shows how this process looks in application.
There we go! It’s done! You’ve just created your first self-signed certificate. If you don’t see any thumbprint information, just type $cert again and hit return to display your certificate’s thumbprint.
Before we learn how to check it on your device, though, let’s make sure that the key used is valid for code signing. How? By typing the following command:
$cert | Select-Object Subject,EnhancedKeyUsageList

This is how you can double-check that the certificate’s key can be used to sign your codes.
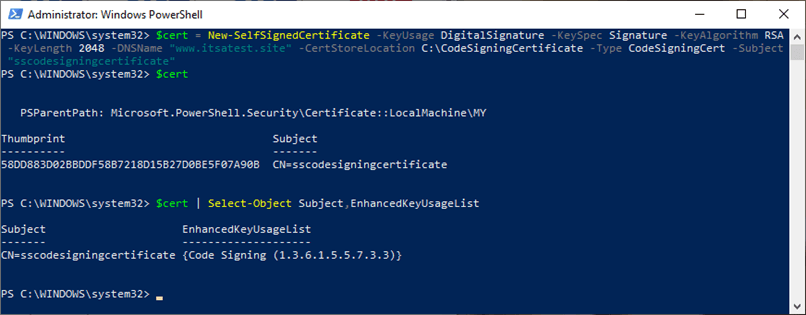
An example screenshot that shows what the usage is for the self signed code signing certificate.
If the EnhancedKeyUsageList value (i.e., a specific identifier) is set as {Code Signing. (1.3.6.1.5.5.7.3.3)}, it means that you’re good to go. The certificate’s key can be used to sign your applications and executables for testing.
How Can I Check My PowerShell Generated Self Signed Certificate?
Now that you’ve learned how to use PowerShell to create a code signing certificate, let’s see what it looks like on your device. To check it out on your Windows machine:
- Click on Start.
- Type mmc (Microsoft Management Console) on the search bar.
- Click on it.
You’ll find your new certificate in your Personal folder, under Certificates.
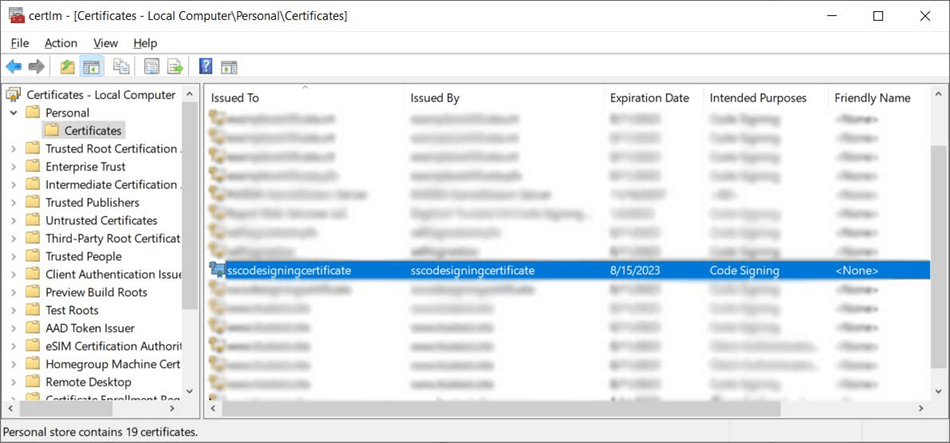
This is what a newly generated self-signed certificate looks like when stored in your Personal folder.
Now, double-click on that specific certificate to view its information. If you click on the Details tab, you can scroll down to view additional information, including the certificate’s thumbprint:
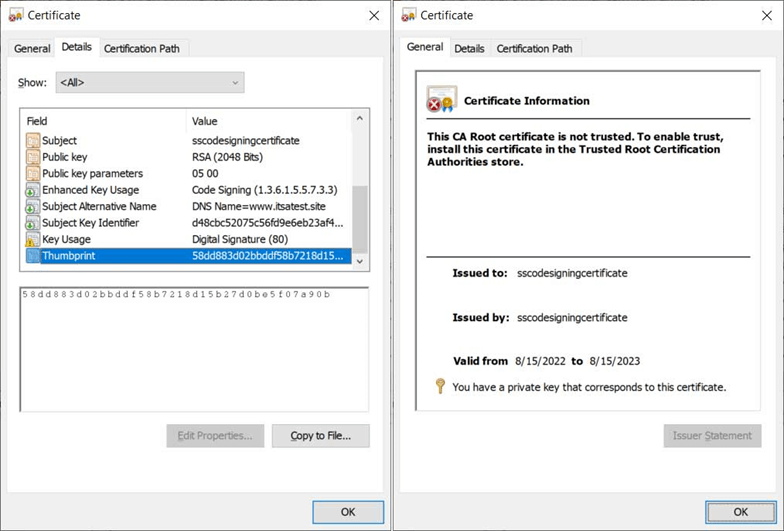
You may have noticed that when you click on the certificate, under Certificate Information, it says that the certificate isn’t trusted. Why? Because the certificate is self signed, it’s not publicly trusted. (It can’t be — that would be too risky for operating systems and browsers because the certificates don’t chain back to a trusted root.) So, where can you use these self-signed certificates if they aren’t trusted? This is what we’re going to discover next.
Ready to Publish Your Software? Use a Publicly Trusted Certificate
Now that you’re revving and ready to go with moving forward with your release and distribution, it’s time to digitally sign your software using a pubicly trusted code signing certificate. Unlike self-signed certificates (which we’ll speak more about in just a moment), publicly trusted code signing certificates are inherently trusted by Microsoft operating systems and browsers.
If you’re ready to move to production and subsequently release your software or update to users, then be sure to sign it first using a certificate from a trusted third party (i.e., a cetificate authority, or what’s called a CA). This will allow you to display your verified organizational information to users whenever they download and install your software.
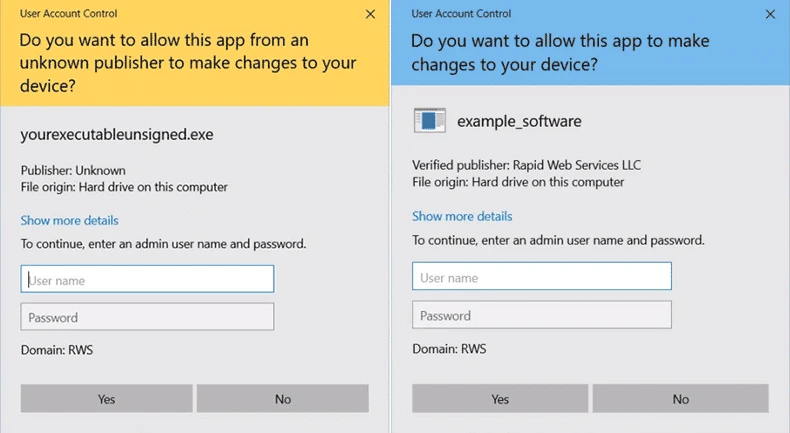
Look at the difference between the unsigned (left) and digitally signed software (right) in terms of the pubisher information field:
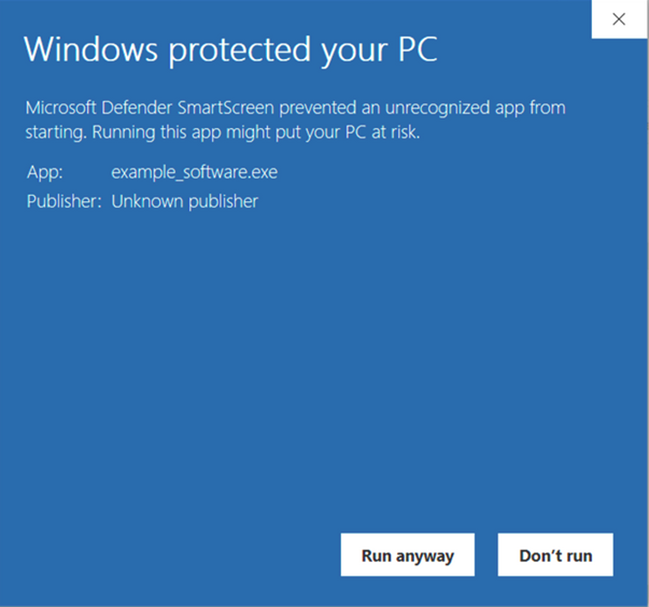
If you release unsigned software, you’ll run the risk of it being flagged by the Windows Defender SmartScreen filter, which can display ugly warnings that may turn away prospective users by making them think your software isn’t safe:
If you sign it using an extended validation (EV) code signing certificate, it’s even better in that you’ll be able to prevent Windows Defender SmartScreen messages from displaying altogether.
Save Up to 27% on an Extended Validation Code Signing Certificate
Bolster trust in your brand and meet the Windows Hardware Developer Center requirement of having an EV code signing certificate. Certificates start at $250.00/year with a 3-year purchase.
What Are Self-Signed Certificates Used For?
Self-signed certificates are very different from traditional code signing certificates issued by a publicly trusted CA. This makes them suitable for internal environments only, like for code testing or troubleshooting where trust isn’t an issue, but completely unusable for signing codes or applications that are in production. Let’s explore the risks and advantages of using self signed code signing certificates.
| Self-Signed Certificate Risks | Self-Signed Certificate Advantages |
|---|---|
| No identity verification. | Issued for free. |
| Non-standard policies. | Easy to generate. |
| Not trusted by browsers and operating systems. | You can choose when they expire by assigning an expiration date. |
| Can’t be revoked by a CA. | Can help you identify bugs and vulnerabilities. |
| Difficult to manage. | |
| Dangerous in case of a breach. | |
| Used by cybercriminals to sign malware. |
The Risks of PowerShell Generated Self Signed Certificates
These are the biggest challenges of self-signed certificates:
No Identity Verification
These certificates are generated and signed by the developer using his own policies. His identity isn’t verified by a trusted third party (CA) like with traditional code signing certificates. This means that customers won’t be able to verify the integrity and authenticity of the publisher.
Non-Standard Policies
While CA-issued code signing certificates follow the policies set by the CA/Browser Forum (CA/B Forum), self-signed ones are set by the developer or publisher.
Untrusted By Browsers and Operating Systems
As a result of the previous two points, every code with a self-signed certificate published on the internet will show Microsoft Defender SmartScreen “Unknown Publisher” warning and it won’t be trusted by major browsers.
This is the warning your customers will visualize when downloading an application or executable signed with a self-signed certificate.
Can’t Be Revoked By a CA
This is one of the big differences between a code signing certificate that’s self signed versus one that’s issued by a publicly trusted CA. Not sure why not being able to revoke a digital certificate is a problem? Consider the relatively recent issue of the stolen NVIDIA certificates? In March 2022, two expired NVIDIA code signing certificates were stolen by the LAPSUS$ ransomware group. The attackers used those certificates to sign malicious software and distribute it all over the world. On top of that, as the certificates were already expired, the CA was unable to revoke them. Thus, the cybercriminals were still able to use them to sign malware disguised as legitimate Windows drivers. Not good. The same fate could happen to your self-signed certificates if they fall into the wrong hands. If you think about it, how could a CA revoke something that didn’t issue?
Difficult to Manage
Been there, done that, got the t-shirt. When I moved to a new job as a cybersecurity professional, I remember asking the developer team I was working with if they were using self-signed certificates. The answer was yes, but only for testing purposes. Fair enough. Then I asked if they had a list of those certificates, or if they knew how many they had. That’s when the panic started: no one knew.
How can you keep track of certificates that can be issued by anyone, at any time, and without any formal processes to manage their issuances? It’s virtually impossible. Therefore, if you want to use create and use self signed code signing certificates, make sure you have a formal and clear process behind it. Did we wake your interest? Stay tuned. We’ll talk more about code signing certificate’s best practices in the third article of this series soon.
Dangerous In Case of a Breach
How can you know if a self-signed certificate and its private key have been compromised when you have been a victim of a security incident? You simply can’t. Imagine having to find and check all self-signed certificates used by your company during an incident if you haven’t been following certificate management best practices and aren’t using a certificate management tool. It’ll be like looking for a needle in a haystack. Good luck with that! In the meanwhile, the attacker can spoof your identity and exploit the certificate.
Used By Cybercriminals to Sign Malware
Isn’t it easier to create a self-signed certificate and use it to sign malware instead than going through all the hassle of stealing a code signing certificate from an organization? I’m not a hacker, but I think it is. As a matter of fact, this is exactly what happened with the Mac-based Trojan attack Flashback that infected over 600,000 Mac devices in 2012.
Of course, this will trigger the Windows SmartScreen Defender warning or, at the very least, the Windows User Access Control (UAC) screen. But we all know some people will not understand what the warning means or they may choose to ignore the warning altogether anyhow.
The Advantages of Self Signed Certificates
OK, now that we’ve gone through the negatives let’s move on to the positive points.
- Free certificate issuance. I know this is a big plus, especially for startups, independent developers, small businesses, and cash-strapped organizations. CA-issued code signing certificates can be expensive, but you must always remember that you’ll always get what you pay for. In the case of self-signed certificates, you’ll save money, but you’ll also have to take on board the risks.
- Easy to generate. Another big plus, at least from a developer’s perspective. Why should you wait days to get an organization validation (OV) code signing certificate or an extended validation (EV) one when you can simply create a self-signed certificate with PowerShell in a matter of minutes? Just remember, though, that there’s a big tradeoff: your software won’t be publicly trusted.
- You Choose When They Expire. Have you ever had to deal with an expired code signing certificate? CA-issued certificates have an actual maximum lifespan of three years. When the developer in charge (or the PKI admin) forgets to renew them before their expiration, it’s a bad day in the office. The poor guy is usually overwhelmed by complaints and he’s running around like a headless chicken trying to fix the issue as soon as possible. With self-signed certificates, you decide when they expire. Do you want to set an expiring date of more than three years? You can. But remember, every rose has its thorns and this one has quite a number of those.
- Can help you identify bugs and vulnerabilities. Do you need to urgently test or troubleshoot the unsigned app you’re developing but don’t have a code signing certificate at hand? You can use a self-signed certificate in a punch. It’ll enable you to spot issues just like if the app was already in production. But just a quick reminder: don’t use a self signed certificate to sign anything on your production server! Self signed certs are intended for internal uses only.
Final Thoughts on PowerShell: How to Create a Self-Signed Code Signing Certificate With a Private Key
Insider threats can be much more difficult to identify and prevent than external attacks. Insiders know where an organization’s sensitive data are located and often have privileged access to those data. After all, 49% of organizations admitted having identified insider threats only after a security incident occurred, or in some cases, they didn’t detect them at all.
Encrypting your applications and executables with a self-signed certificate will help you prevent your internal codes from being altered, either accidentally or maliciously. Remember, though, a self signed certificate should only be used for testing or internal purposes. Never use such certificates to sign codes that will be released to the public or shared on public-facing servers!
Now that you know the process, you can easily use PowerShell to generate your self signed certificate today. You don’t know how to sign your internal codes with it? No problem. Check out our next article to learn how to use a code signing certificate (self-signed or issued by a CA, the process is the same) to sign and encrypt your internal codes. It’ll be a breeze.
