Dreaming of becoming a SignTool Jedi Master? Want to help your customers achieve zero software supply chain incidents, like 33% of organizations surveyed by DigiCert? Nail it learning everything you ought to know about Microsoft SignTool in our comprehensive guide
56% of the organizations surveyed by the Information Systems Audit and Control Association (ISACA) in 2023 consider suffering fewer data breaches and security incidents as two of the top benefits of digital trust.
By using Microsoft SignTool and code signing, you can foster customer trust in your brand and products and enhance the security of your code by:
Helping customers secure their software supply chain, and
Increasing their confidence in your products and brand.
This in-depth, universally unrivaled guide will tell you everything you’ll ever need to know about this simple yet effective code signing solution. From the very basics to little-known tips and tricks, there will be something for both newbies and advanced users. Ready to dive in and transform from a Microsoft SignTool Padawan to a code signing Jedi? Let’s go.
TL;DR: Don’t Have the Time? Here Are the Microsoft SignTool Highlights
Microsoft SignTool is a command-line tool embedded in the Windows software development kit (SDK) that lets you digitally sign, timestamp, and verify many Windows files. To use it to sign files before publishing them on the internet, you’ll need a code signing certificate issued by a trusted certificate authority (CA), and a Windows device with admin permissions.
Got everything ready? Fantastic. Use the command strings below to do one of the following:
Sign and timestamp a file. In this script, /td and /fd are parameter options that define the algorithms used for timestamping and signing. It will look like this once put together:
Add a file description to the user account control window. Insert /d followed by a brief description after “sign” in your command string. It will look like this once put together:
Manage and fix Microsoft SignTool errors. Run the script below to get into the nitty-gritty of the problem. Look for a solution on the Microsoft troubleshooting page.
Microsoft SignTool is a standard command-line program that’s part of the Windows software development kit (SDK). Many companies and independent developers use it to sign, timestamp, and verify the authenticity and integrity of their code, apps, and drivers developed for Windows platforms.
Windows Command Prompt (CMD) shell. The default command-line interpreter for Windows operating systems (OS).
PowerShell. A cross-platform CLI ideal for system administrators that allows you to automate tasks within the Microsoft ecosystem.
.NET Command-line interface. A cross-platform tool for creating, building, running, restoring packages, and publishing .NET applications with Visual Studio.
What SignTool Enables Organizations to Do
In layman’s terms, Windows SignTool allows:
Organizations to sign their codes using a simple script. By applying a digital signature, they prove their identity and confirm their software’s authenticity and integrity.
Users to verify that the code is authentic and safe to install/run. During the verification process, users will be alerted if the software has been tampered with once signed (e.g., infected with malware, ransomware, etc.).
This is how SignTool empowers businesses and customers alike. Not bad in a world where, in January 2024, BlackFog recorded a whopping 134% increase in ransomware attacks over those registered in 2022, huh?
Save Up to 21% on a Windows Code Signing Certificate
Give users a reason to trust your Windows apps by preventing “Unknown Publisher” warnings. You can digitally sign unlimited apps for as little as $211.46/year.
Examples of Files You Can Sign With Windows SignTool
When it comes to applying digital signatures, you can sign virtually any type of file, so long as the file format supports the use of digital signatures. Microsoft SignTool supports a plethora of files, including, but not limited to, those indicated in the table below:
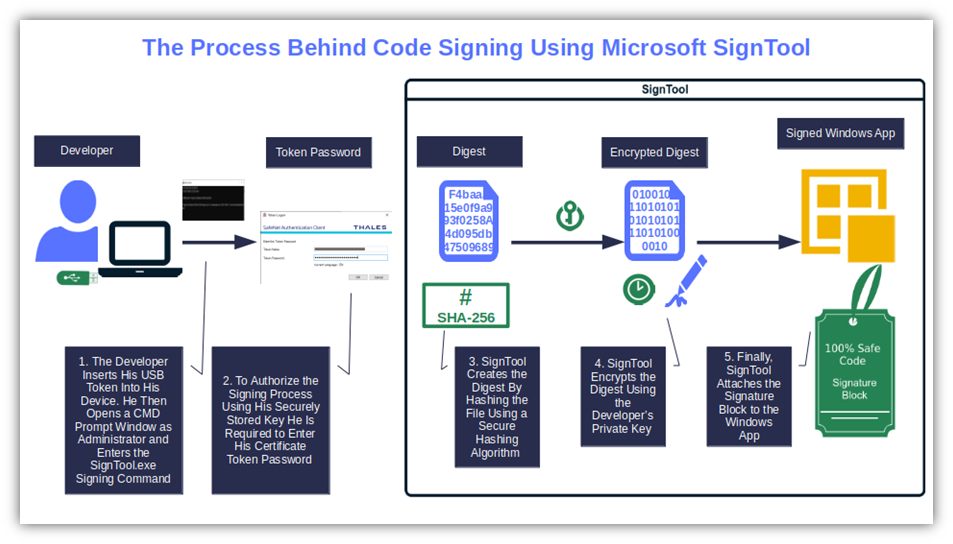
The tool encrypts the digest using the developer’s private key. Subsequently, the file is signed and timestamped (although timestamping is optional).
Finally, Windows SignTool adds the signature block to the file. Et voila’, ladies and gentlemen, the file is signed.
… And all of this occurs in just a matter of seconds. Isn’t it brilliant?
Image caption: This is how Microsoft SignTool code signing works behind the scenes. The final signature block is a combination of the encrypted hash value, public key associated with the certificate, and the certificate itself.
What Happens in the Background When a User Tries to Install Your Digitally Signed Software
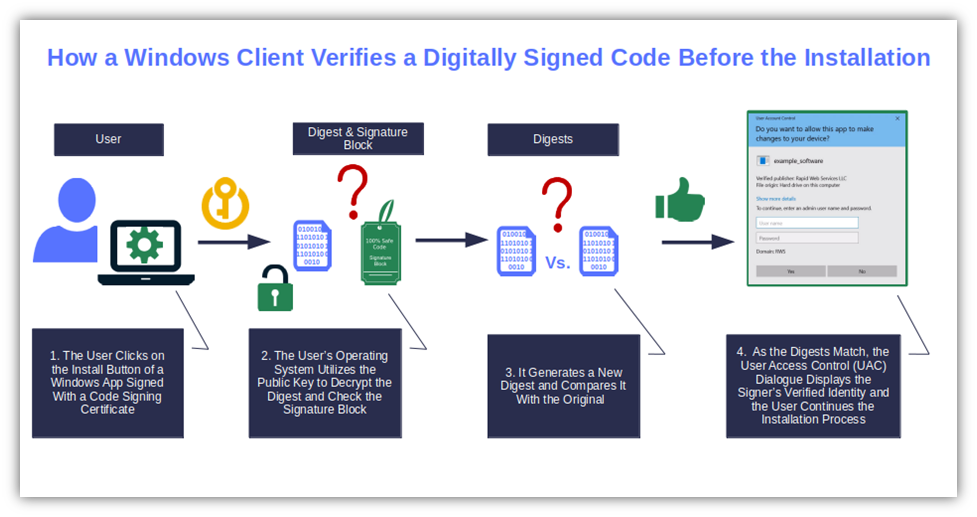
The magic continues when a user attempts to download or install the signed code.
The user’s client uses the public key to confirm the file’s authenticity and the publisher’s identity. It decrypts the digest and checks the signature, the timestamp, and the code signing certificate.
It then verifies the file’s integrity. The newly generated hash digest is compared with the original to see whether they match.
The download/installation continues. The two digest matches? Fine. The process can continue. They don’t match? The client alerts the user and the installation stops.
Image caption: The screenshot shows the verification process of a digital signature applied to a Windows code.
How to Check Whether an App Was Successfully Signed
Now let’s say you want to use SignTool to verify a digital signature instead. To get that done:
Type the verify command (we’ll see that in detail in a moment). You can use Windows CMD or any other CLI.
SignTool checks the file’s signature block using the publish key. In this step, SignTool verifies the signature’s validity and the timestamp. It also generates a new digest to confirm that no unauthorized modifications have been made to the file.
The tool displays the analysis results. Depending on the command used, the outcome of the operation can be more or less detailed. We’ll see a few samples later in this article.
Et voila’. Three simple steps, and you’ll immediately know whether your signature was applied correctly.
Getting Started With Microsoft SignTool
Before we get to play with Microsoft SignTool, you’ll need to:
Download and install the command-line tool on your Windows device, and
Save Up to 21% on a Windows Code Signing Certificate
Give users a reason to trust your Windows apps by preventing “Unknown Publisher” warnings. You can digitally sign unlimited apps for as little as $211.46/year.
Only certificates from publicly trusted CAs are accepted for publishing your Windows code. Signatures created using self-signed certificates won’t be trusted and will throw up error messages.
Windows SignTool: Where You Can Download It and How to Install It
Depending on how you want to use Windows SignTool and your level of expertise as a software developer, there are different download and installation options to choose from. But before diving into all of those options, let’s first check to see whether you already have Windows SDK installed.
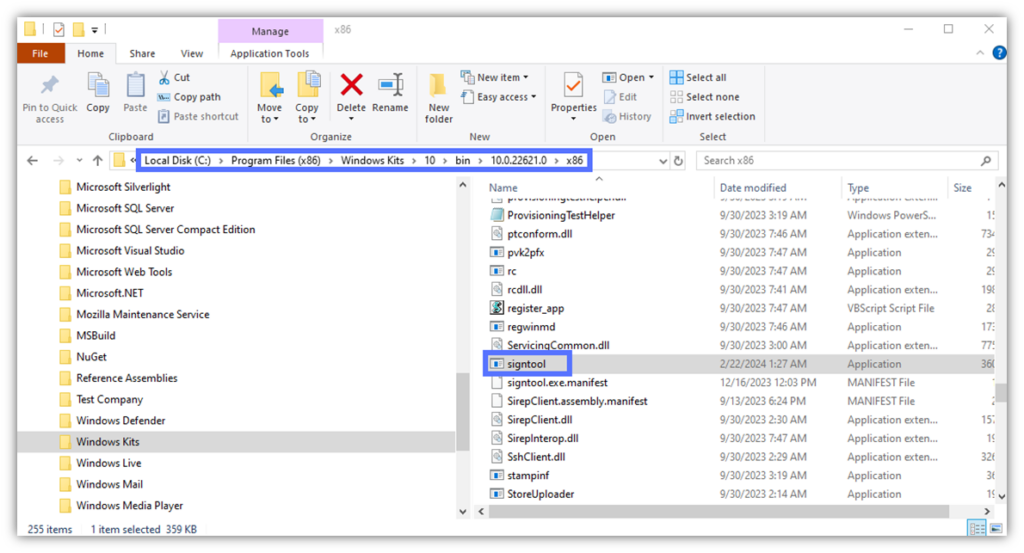
Not sure where to check whether you’ve already installed Windows SDK/SignTool.exe on your device? Open your File Explorer and navigate to C:\Program Files (x86)\Windows Kits\10\bin\Your_Windows_SDK_Version\x64 (or x86 on 32-bit systems). This is where SignTool.exe is installed by default. If you find it, jump to the next section.
Image caption: The screenshot shows Microsoft SignTool’s default installation path.
You didn’t find it? It likely means you don’t have it installed and will first need to download it. Pick a download location from the list in the table below.
Windows SDK/SignTool Version
Ideal For
Where to Download Windows SDK/SignTool
Latest stable release
General software developers (Padawans) Users looking for a stable, fully supported version
Explore the Microsoft SignTool Commands Options and Syntaxes
Sign, timestamp, and verify — these are the three code signing-related Windows SignTool commands you must know. Each comes with its own set of options. It goes without saying that there are many other SignTool commands to know, but we don’t have time to cover them all in this article. So, we’ll explore several key commands and what they allow you to do.
The Sign Command
This is the command to use when you want to add a digital signature to your Windows files. The options below are among the most interesting ones used along with the sign command for code signing with Microsoft SignTool:
/fd SHAXXX (e.g., the more secure SHA256). This mandatory option lets you specify the hashing code signing algorithm you want SignTool to use. Did you forget to add it to your signing script? You’ll get an error message, and your file won’t be signed.
Image caption: In this Windows SignTool example, we’ve used the secure SHA256 algorithm.
/d. Add a blurb to the file with this single letter preceded by a forward slash. This way, when you’re off on holiday, your colleagues will know what it is for. The coolest part? The same description will appear on the User Account Control pop-up (i.e., the window that comes up every time a user attempts to install/run an application). This option must be used with the sign command; if it’s used with another command option (e.g., catdb or verify), then it changes the function of /d to something different.
Image caption: Add the /d option after the sign command to display a file description.Image caption: The info highlighted in the blue rectangle in the screenshot reflects what the developer added with Microsoft SignTool during the signing process.
/n. Do you have more than one code signing certificate? If this is the case, tell Windows SignTool which one you want to use. Add /n followed by the certificate of your choice’s exact name within quotation marks to the signing formula. Alternatively, you can add /sha1 followed by your code signing certificate’s thumbprint. For example: /sha1 [thumbprint]
Image caption: After the sign command, type /n followed by the certificate name to tell Microsoft SignTool which certificate to use for the signature.
Hungry for more signing options? Delve into Microsoft’s list of SignTool commands.
The Timestamp Command
Timestamp your files and grant virtually “eternal life” to your signatures, even after the code signing certificate has expired. Do you remember when we said their Windows operating system inspects the signature when a user attempts to install your code? When you timestamp your software, the user’s operating system (OS) will also check the timestamp to evaluate whether the code signing certificate wasn’t expired when it was signed.
This means that even if the user downloads the signed app years after the code signing certificate expires, the signature will likely still be valid. Consequently, no alert will be displayed. So, what are the options we can (and should) use to get Microsoft SignTool to add a timestamp to our files?
/tr. Indicates the URL of the RFC3161-compliant timestamp authority (TSA) server, which is considered a trustworthy source. The example below shows the timestamp server URL you should call upon when using a DigiCert code signing certificate.
Image caption: The /tr command is followed by the DigiCert server’s URL.
/td SHA256. This command defines the secure hashing algorithm used by the RFC 3161-compliant server to generate the timestamp. If you don’t specify it, you’ll get an error message.
Image caption: The screenshot shows the DigiCert Timestamp server URL, followed by the mandatory /td information (i.e., SHA256).
Leave no stone unturned. Discover additional features for Windows SignTool timestamping by checking Microsoft’s comprehensive table.
The Verify Command
Want to check a file’s digital signature? With the help of the verify command and other options, you’ll:
Determine who issued the signing certificate (e.g., a trusted CA or a potentially dodgy individual).
Find out if the certificate is valid or has been revoked.
When the file was digitally signed (provided the signer added a timestamp).
What options can you use?
/pa. SignTool will verify the signature using the Default Authentication Verification Policy. This covers the validation of most files. Do you want to check a .dll file? Make sure that your driver’s signature is publishing-ready (screenshot example #1 below). Remove /pa from the command. Signtool will authenticate the signature using the Windows Driver Verification Policy (screenshot example #2 below).
Image caption: This is a real-life example of Windows SignTool verification command output using the /pa option.Image caption: Take the /pa out of the equation and see what happens. In this scenario, we’ve verified the signature of a Windows driver that was signed with a self-signed certificate. As Windows requires user-mode drivers to be signed with a code signing certificate issued by a trusted CA, Microsoft SignTool alerted us by producing an error message.
/v. The verbose option is a must-have for everyMicrosoft SignTool Jedi. When combined with the verify command, this feature will show you everything you need to know about a file signature, the certificate and timestamp used, and its signer.
Image caption: In this instance, we’ve used the /pa and /v options. Look at the plethora of information displayed.
/kp. Add this option if you want to be sure your Windows kernel driver signature meets the latest Microsoft x64 kernel policies and the plug-and-play (PnP) device installation signing requirements for Windows OSes. The same selection will also confirm the signature of individual files within any driver package.
Image caption: This time we’ve attempted to verify a kernel driver’s signature signed with a self-signed certificate. One more time, the tool displayed an error message. Windows kernel drivers must be signed with an EV certificate.
This isn’t enough? Explore even more verify options, courtesy of Microsoft.
How to Sign, Timestamp, and Verify Your Codes With SignTool.exe in Windows
Right. Now that you’re familiar with Microsoft SignTool commands and syntax, it’s time to put into practice what you’ve learned. Let’s see a few real-life examples of the key signing, timestamping and verifying commands in action.
Let’s Get a Few Housekeeping Items Out of the Way…
Let’s assume you’ve already:
Purchased a trusted code signing certificate. As previously mentioned, you can utilize a self-signed certificate for testing purposes. But for publishing production files and apps, using a self-signed certificate is a big no-no. This requires a publicly trusted code signing certificate.
Have admin permissions enabled. To sign your software using SignTool, you must run CMD in Administrator mode. You don’t have admin access to your device? Your IT department can help you with that.
Now, it’s time to start signing your apps…
Step 1: Load Your Secure USB Token and Authentication Client
To apply a digital signature and timestamp to your file, the first thing to do is to insert your token into your device. Then, open the authentication client you used to set it up. These are two fundamental steps. If you forget them or insert the token later, your file won’t be signed.
Step 2: Open Windows CMD
Start Windows command prompt (CMD) as administrator.
Step 3: Sign Your Code or App
Next, you’ll need to change directories using the /cd command to navigate to Microsoft’s SignTool directory.
Use the following command to sign your software app or code using the following SignTool command. (Don’t forget to replace the parts in bold with your certificate and file details.)
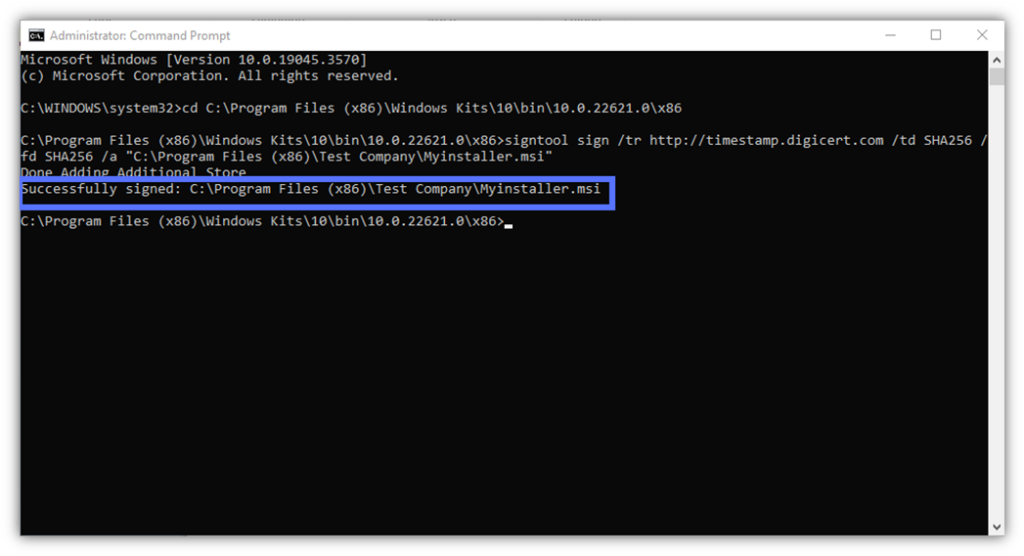
Here is a real-life example of what this looks like when completed. We’ve signed and timestamped an installer using a DigiCert code signing certificate and a trusted timestamp authority (TSA).
Image caption: Windows SignTool has successfully signed and timestamped our installer.
Learn more about the process with our .msi installers Microsoft SignTool signing quick guide. It includes step-by-step instructions and detailed screenshots. Interested in seeing other real-world examples? Discover how the same script can be used to sign and timestamp files in one go:
Would you rather do without the advantages of timestamping, and only apply a digital signature to your files? Use the command below and follow the same code signing process:
Sign up below to get access to your FREE Code Signing Best Practices Guide
How to Verify a Windows File/App Signature Using Microsoft SignTool
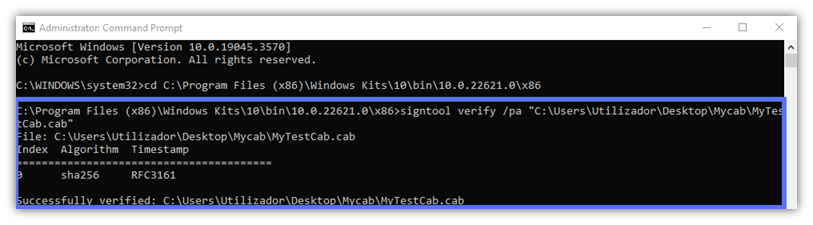
You can use SignTool to verify the software has been signed successfully in less than 10 seconds. From the Windows SignTool directory, copy and paste one of the two commands listed below:
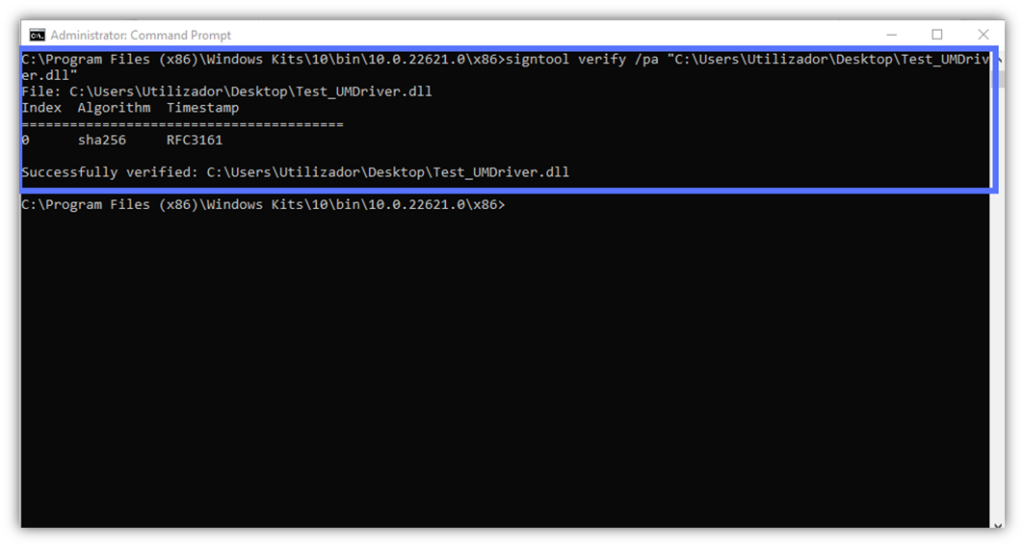
1. Use the Standard Microsoft SignTool Verify Command
This is the quickest way to verify a file’s signature. As we’ve seen before, it provides only a short summary of the signature details (i.e., if it was successful, the algorithm used, and if there’s a timestamp).
Image caption: This .dll file’s signature has been successfully applied using the SHA256 algorithm and timestamped with an RFC3162 timestamping server.
But what if you want more indepth information about the signature and the certificate used to create it?
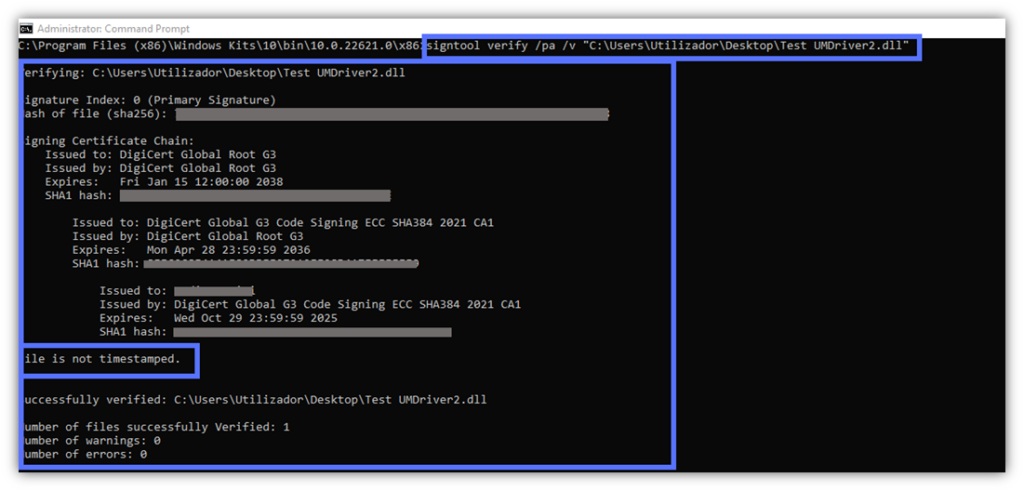
2. Use the Verbose Microsoft SignTool Verify Command
This command displays a compelling signature confirmation. It includes details about the code signing certificate’s chain of trust, even if the file hasn’t been timestamped.
Image caption: This is what you get when you use Microsoft SignTool’s verbose command to verify a non-timestamped file.
3 Bite-Size Tips to Get the Most Out of Microsoft SignTool
We’ve reached the halfway mark of this guide. Well done, Padawan! But as Darth Vader once said, “you’re not a Jedi yet.” Keep reading, as there’s more for you to learn. Once done, you’ll become a fully-fledged Microsoft SignTool Jedi and you’ll get the most out of this useful tool.
As Master Yoda said in Episode III: Revenge of the Sith: “In a dark place we find ourselves, and a little more knowledge lights our way.”
So, let’s “use the force” and check out three Microsoft SignTool Jedi tips.
Use the /debug option to find out more about signing errors. Don’t you just hate it when things don’t work as they should, and you don’t know why? The debug feature will help you pinpoint the issue. Add /debug after “sign” in your code signing command, as demonstrated hereafter. We’ll talk more about error messages in the next section.
Image caption: The screenshot shows the output you get when you add the debug option to your Microsoft SignTool’s code signing (and timestamping) standard command. In this case, the code was signed correctly. No error message was listed in the debug details.
Add a timestamp to a previously signed file. It’s never too late to reap the benefits of timestamping. As long as the code signing certificate you used to sign files and apps is still valid, Microsoft says you can add a timestamp to those signatures retroactively. (NOTE: If you’re trying to sign your file and timestamp it simultaneously, then just be sure to put the signing command first before adding the timestamp command information.)
If you’re signing your file retroactively, the following command will make the magic happen and breathe new life into your old signatures:
Image caption: There you have it. We’ve just used the timestamp -t command to add a timestamp to a file we had previously signed.
Tip: While you won’t need the secure token to apply the timestamp this way, you’ll need an active internet connection to allow Windows SignTool to connect to the TSA. However, we will note that it’s best to timestamp your software immediately after signing it.
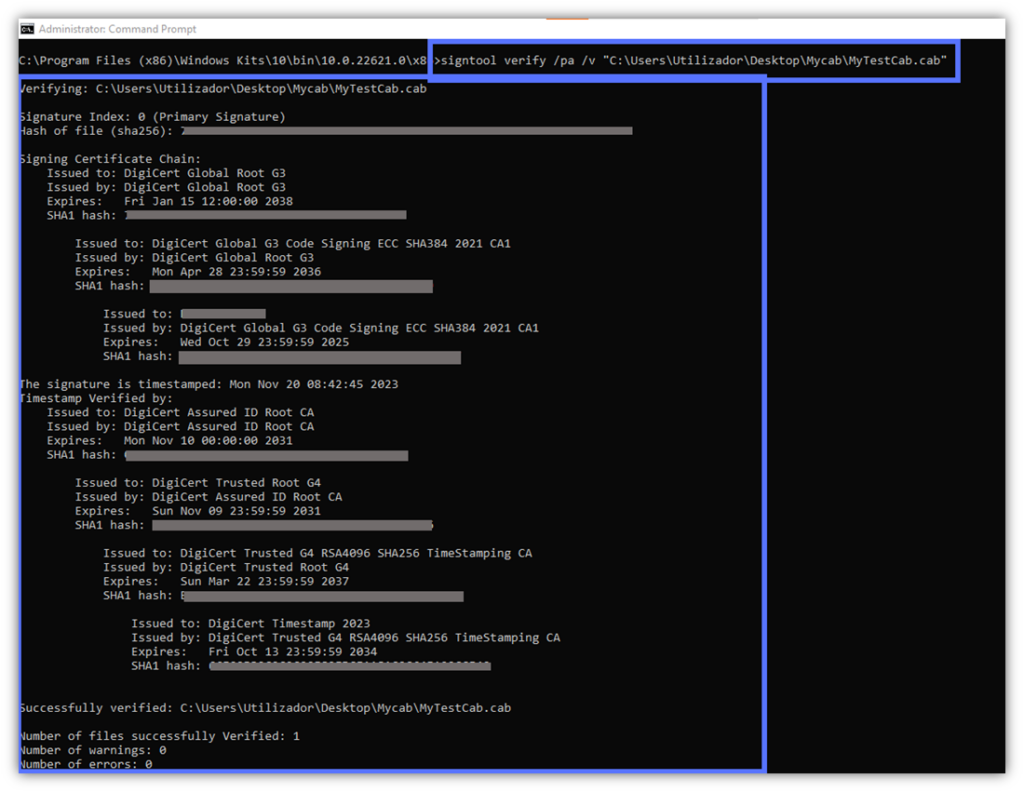
Verify a catalog system file’s signature. You’ve just created a .cat file for your Windows project. In this brand-new catalog, there’s also a system driver. The /c option will enable you to make sure that the driver file included in the catalog has been properly signed. This is how you do it:
Image caption: Here’s how you can verify a catalog driver’s file signature with Windows SignTool.
Looking to install a catalog file on a computer or add or remove it from a catalog database? Windows SignTool does that, too!
Troubleshooting: Tell Me Your Windows SignTool Error, and I’ll Give You the Solution
Software apps ain’t perfect, and neither are the humans who create them. Sometimes, things go wrong and errors occur. Hence, to ensure you can successfully protect your code with Microsoft SignTool, we’ve concocted a list of the three most common Microsoft SignTool errors you may encounter and their solutions.
Microsoft SignTool Error Message
Root Cause
Solution
SignTool Error: An unexpected internal error has occurred. Error information: “Error: SignerSign() failed.” (-2147024885 / 0x8008xxxx)
The file or app you’re trying to sign has a problem.
Rebuild the package and try again as suggested by Microsoft. (Link below in the table caption.)
SignTool Error: invalid parameter (0x80080057)
The portable executable (PE) file (e.g., a .exe and .sys file) is larger than 4 GB.
Note: .cat files can still be signed, but the generated internal hash may not be correct.
Be sure that all PE files you want to sign with Windows SignTool are smaller than 4 GB.
SignTool Error: An unexpected internal error has occurred. Error information: “Error: SignerSign() failed.” (-2147024885 / 0x8007000B)
Multiple issues could cause this error. For instance, attempting to sign a corrupted package, or using an incorrect signing algorithm.
– Match the error message details to the solutions listed in the document.
The error message you’re getting isn’t on our top three list? Explore the Microsoft SignTool troubleshooting page for additional resources and information.
3 Mind-Blowing Benefits of Signing Your Code With Windows SignTool
Windows SignTool and a trusted code signing certificate provide a simple and scalable way to shut the door to malware, data breaches, and software supply chain attacks. Why is this important? Think about it from the perspective of your bottom line…
In 2023, IBM evaluated the average data breach attack cost at $4.45 million. The same year, Veeam reported cyber attacks as the top root cause of costly business disruptions (for the fourth consecutive year).
OK, malware wasn’t necessarily involved in every data breach and cyber attack analyzed by the reports. That said, malware (and specifically ransomware) was indicated by Verizon 2023 DBIR as the primary cause of:
2023 Edelman Trust Barometer showed that 59% of consumers would purchase from a brand they trust, regardless of the price. Even better, 67% of customers would remain loyal and spread the word about the company.
Using Microsoft SignTool to digitally sign your software will be like adding a big, bright signboard to your products that says: “Buy me, you can trust me. I am a legit software that’s safe to download, made by a trustworthy software publisher.”
2. Contributes to Higher Downloads & Revenue, Increasing Chances of Winning Big Customers.
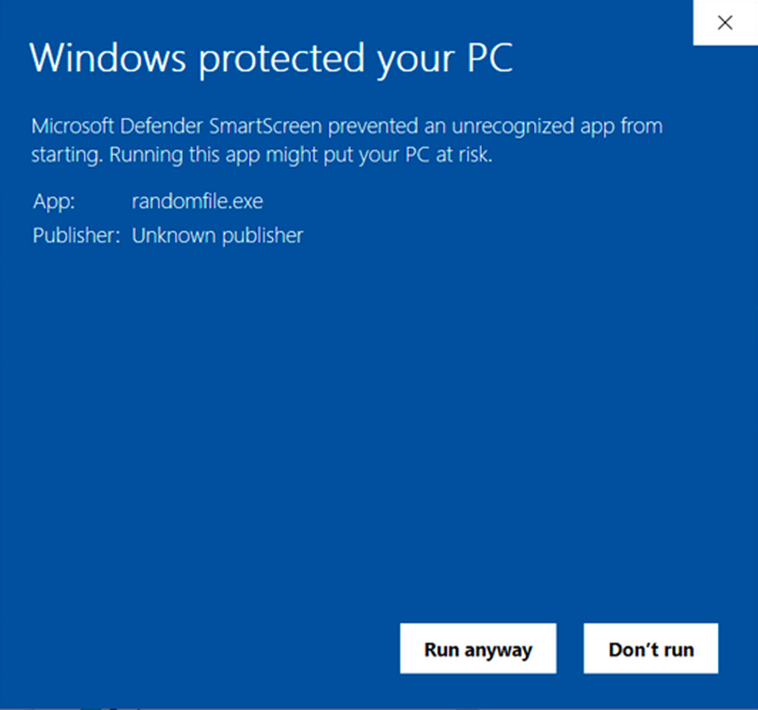
Code signing will show the world that you’re an established software publisher. Moreover, as it reduces Windows security warnings, you’ll guarantee your users a much smoother experience.
Image caption: Code signing replaces the alarming Unknown Publisher warning with the more reassuring User Account Control pop-up.
3. Protects Your Customers’ and Other Users’ Software Supply Chains
91% of U.S. IT professionals surveyed by the Enterprise Strategy Group (ESG) confirmed that their organization was the victim of a software supply chain attack in 2023. Adding a digital signature to your code will guarantee your users/customers that any unauthorized modification made in their supply chains won’t go undetected.
Save Up to 21% on a Windows Code Signing Certificate
Give users a reason to trust your Windows apps by preventing “Unknown Publisher” warnings. You can digitally sign unlimited apps for as little as $211.46/year.
Final Thoughts About the Ultimate Guide to Microsoft SignTool
We’ve now reached the end of our ultimate guide to Microsoft SignTool. As Jedi Master Obi-Wan Kenobi said in Star Wars, “You’ve come a long way, my former Padawan.”Well done! You’ve passed all Jedi trials. You’re now a Windows SignTool Jedi.
To quickly recap, Microsoft SignTool lets you protect the integrity of your Windows-based apps, executables, installers, and drivers without overly complicated code signing procedures. Moreover, it’ll enable you to:
Confirm your identity as a trusted software publisher,
Prevent malware infections by protecting the integrity of your code against unauthorized changes, and
Offer customers a seamless download and installation experience.
In this journey, you’ve learned the ins and outs of Microsoft SignTool. Now, it’s time to demonstrate your commitment to security. Start code signing like a pro by putting into practice the knowledge you’ve acquired. Use the force. Don’t let the dark forces take over your code.
Did you like what you’ve just read? Share it with your friends and colleagues, “Always pass on what you have learned.” — Yoda
Code Signing Best Practices
Want to keep your software and code safe?
Enter your contact information below below to receive your FREE Best Practices PDF:
Contact details collected by CodeSigningStore.com may be used to send you requested information, blog update notices, and for marketing purposes. Learn more…
New users – if this is your first time purchasing a cloud signing product from us, check the email address entered during enrollment for a message from DigiCert. Create your password and follow this guide.
Existing users – if you’ve purchased a cloud signing certificate in this account before, you already have an account. We’ve update your DigiCert CertCentral account to allow another Code Signing Certificate request. Login to your account here.
Code Signing Certificate Delivery Options
Industry standards set by the CA/B Forum now require that all code signing certificate keys be stored on a FIPS-compliant hardware security module (HSM) or hardware token. This is an industry-wide countermeasure against the rise in breaches associated with stolen signing keys. Only certificates that follow these requirements will be trusted by Microsoft Windows and other platforms.
We offer several options to deliver your code signing certificate in compliance with these new requirements:
Easiest Option: Token + Shipping
This is the simplest option and what we recommend for most customers. DigiCert will ship a USB eToken to you, then you’ll use DigiCert’s provided software to download and install the certificate onto your USB Token.
You’ll be able to plug the USB token into your computer or server then sign files using your preferred tool (eg. SignTool.exe, JarSigner, etc.)
Use an Existing Token
If you already own a compatible USB eToken (SafeNet 5110 CC, SafeNet 5110 FIPS, or SafeNet 5110+ FIPS), you can use DigiCert’s provided software to download and install the certificate onto your USB token.
Advanced Option: Install on a Hardware Security Module (HSM)
If you use a cloud or on-prem hardware security module (HSM), you can choose this option to download and install your certificate onto your HSM. DigiCert will send you an email asking you to confirm that your HSM meets the security standards, then they’ll deliver the certificate to you digitally for installation.
Any FIPS 140 Level 2, Common Criteria EAL 4+, or equivalent HSM is compatible for this option. You can use an HSM you manage directly or you may use a key storage/vault solution that uses a compliant HSM (for example, Azure Key Vault or AWS KMS).
Code Signing Certificate Delivery Options
Industry standards set by the CA/B Forum now require that all code signing certificate keys be stored on a FIPS-compliant hardware security module (HSM) or hardware token. This is an industry-wide countermeasure against the rise in breaches associated with stolen signing keys. Only certificates that follow these requirements will be trusted by Microsoft Windows and other platforms.
We offer several options to deliver your code signing certificate in compliance with these new requirements:
Easiest Option: Get your certificate shipped from Sectigo on a USB token
This is the simplest option and what we recommend for most customers. Just choose one of these options to have your code signing certificate and key shipped to you on a FIPS-compliant eToken (USB token):
Delivery Option
Shipping Details
USB Token + Shipping (US)
Ground shipping to addresses within the United States.
USB Token + Expedited Shipping (US)
Air express shipping to addresses within the United States.
USB Token + International Shipping (non-US)
Choose this option if your shipping address is not in the United States.
You’ll be able to plug the USB token into your computer or server then sign files using your preferred tool (eg. SignTool.exe, JarSigner, etc.)
Advanced Option: Install on your own HSM or hardware token
If you already own a compliant token or HSM, you can choose this option to download and install the certificate onto your supported device:
Luna Network Attached HSM V7.x
YubiKey 5 FIPS Series
Only the listed models are compatible. For compatibility with other HSM models, please choose a DigiCert or GoGetSSL code signing certificate.
Code Signing Certificate Delivery Options
Industry standards set by the CA/B Forum now require that all code signing certificate keys be stored on a FIPS-compliant hardware security module (HSM) or hardware token. This is an industry-wide countermeasure against the rise in breaches associated with stolen signing keys. Only certificates that follow these requirements will be trusted by Microsoft Windows and other platforms.
We offer several options to deliver your code signing certificate in compliance with these new requirements:
Easiest Option: Get your certificate shipped from Comodo CA on a USB token
This is the simplest option and what we recommend for most customers. Just choose one of these options to have your code signing certificate and key shipped to you on a FIPS-compliant eToken (USB token):
Delivery Option
Shipping Details
USB Token + Shipping (US)
Ground shipping to addresses within the United States.
USB Token + Expedited Shipping (US)
Air express shipping to addresses within the United States.
USB Token + International Shipping (non-US)
Choose this option if your shipping address is not in the United States.
You’ll be able to plug the USB token into your computer or server then sign files using your preferred tool (eg. SignTool.exe, JarSigner, etc.)
Advanced Option: Install on your own HSM or hardware token
If you already own a compliant token or HSM, you can choose “Install on Existing HSM” to download and install the certificate onto your supported device:
Luna Network Attached HSM V7.x
YubiKey 5 FIPS Series
Only the listed models are compatible. For compatibility with other HSM models, please choose a DigiCert or GoGetSSL code signing certificate.