

How to Sign an EXE With a Digital Certificate

 (6 votes, average: 5.00 out of 5)
SonicWall’s 2023 report reveals that nearly one in three detected malicious files were executables. Prove to your clients that your .exe files are authentic and malware-free. Here’s our no-fluff, step-by-step guide on how to sign an .exe with a digital certificate.
In August 2023, the cleaning product manufacturer Clorox was the victim of a devastating ransomware attack. Production and sales were severely affected. Nearly two months later, the company is still cleaning up the damages and forecasting a net sales loss of up to $593 million.
Digitally signing your exe files with a digital certificate helps to shield you and your customers from malware infections in a world where ransomware runs rampant.
So, how can you digitally sign your Windows executables and applications? Follow our step-by-step guide. Learn how to level up the security of your codes and prove to your customers that they’re legitimate and untampered since they have been signed.
How to Sign an EXE Using a Code Signing Certificate
No matter which type of code signing certificate you choose, signing an .exe with a digital certificate is easier than you think. And Microsoft SignTool makes it even more straightforward. Here is an overview of the steps involved.
| Steps to Sign an .exe in Windows | Overview |
|---|---|
| 1. Purchase a Code Signing Certificate | Buy a code signing certificate and secure USB token from a trusted certificate authority (CA). |
| 2. Set Up Your Secure Hardware Token | Go through the set-up wizard to configure your USB token and set a password for your code signing certificate. |
| 3. Download and Install Microsoft SignTool | SignTool.exe is part of Windows SDK. Download its latest version and install it. |
| 4. Open Windows Command Prompt as Administrator | Type “cmd” on your Windows search bar and open it as Administrator. (You don’t have to do this if you’re logged into your device as Admin.) |
| 5. Navigate to the SignTool Directory | Enter the filepath to specify your SignTool directory. |
| 6. Enter the Signing and Time Stamping Command | Enter the command: signtool sign /tr http://CAtimestampserver.com /td SHA256 /fd SHA256 /a “c:\filepath\myexecutable.exe” |
| 7. Type Your SafeNet Password | Enter your token password. |
| 8. Verify Your Signature | Check your software’s digital signature and ensure there are no errors using the basic check command (signtool verify /pa “c:\filepath\myexecutable.exe”)
or the in-depth verification method (signtool verify /pa /v “c:\filepath\myexecutable.exe”) |
Are you a visual person? Our screenshots will show you the entire process in action.
1. Purchase a Code Signing Certificate
The first thing you’ll need to do to sign your executable is get a publicly trusted code signing certificate. Do you already have one? Great! You can jump to step three. If you don’t,
- Compare the fundamental differences between trusted CAs
- Pick the one that meets your needs, and
- Place your order.
Since June 2023, the new industry standard requires all code signing private keys to be stored on secure hardware. Therefore, no matter which type of certificate you purchase, it’ll be issued on a secure hardware token by default.
Don’t want your users to see a scary warning screen? Then ensure our software is automatically trusted by signing it with an extended valiation (EV) code signing certificate.
Save Up to 27% on an Extended Validation Code Signing Certificate
Bolster trust in your brand and meet the Windows Hardware Developer Center requirement of having an EV code signing certificate. Certificates start at $250.00/year with a 3-year purchase.
2. Set Up Your Hardware Token
Did you already receive your USB token? Fantastic! Now, to be able to use it, you’ll first have to set it up. To do so, plug your USB into your device and follow our quick guide.
Once done, leave your USB token plugged into your device. You’ll need it later to sign your code. But when the token isn’t in use, be sure to store it in a secure location where only you have access to it.
Note: This set-up procedure is done only once. Next time, you’ll want to sign an .exe with a digital certificate, you’ll just have to plug in your USB token.
3. Download and Install Microsoft SignTool
To sign an .exe with a certificate, you’ll need to have Microsoft SignTool installed on your device. If you have Windows SDK or Visual Studio, you can skip to the next step as they both come with SignTool.exe embedded. If you don’t, the easiest way to get it is to download Windows SDK’s most recent version and install it.
4. Open Windows Command Prompt as Administrator
![]() Plug in Your Token and Open SafeNet
Plug in Your Token and Open SafeNet
Before opening CMD, you first need to plug your secure token into your computer and launch the SafeNet Authentication Client. You also will likely need to install your code signing certificate locally on your device in Certificate Manager (CertMgr).
- Click on the Start button to open the search bar.
- Type cmd and Select Run as Administrator.
- When prompted, enter your admin password.
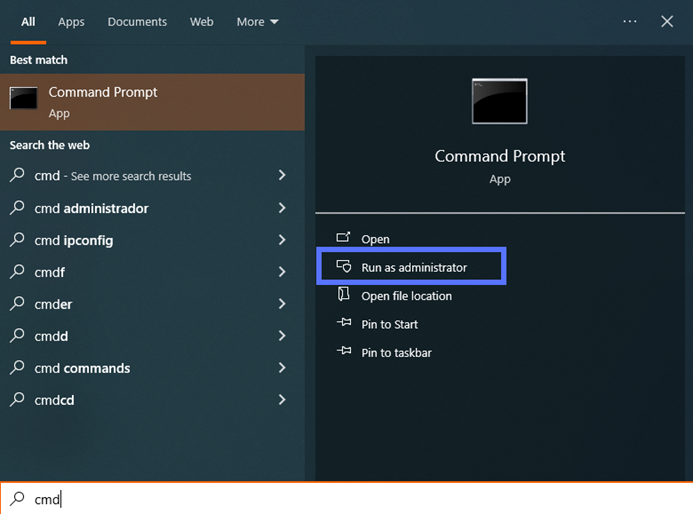
If you’re already logged into your device as Admin, you won’t need to do this step. You can just open the Windows Command Prompt tool normally (i.e., you don’t have to select Run as Administrator).
If you don’t have admin privileges, get in touch with your IT admin to see if your role calls for having upgraded privileges.
5. Navigate to the SignTool.exe Directory
Generally, SignTool is installed in a bin folder, under Program Files. If this is the case:
- In the Command Prompt, type cd C:\Program Files (x86)\Windows Kits\10\bin\SDK version number\x86 and click Enter.
Hint: Replace the part of the file path highlighted in bold with your SDK version number.
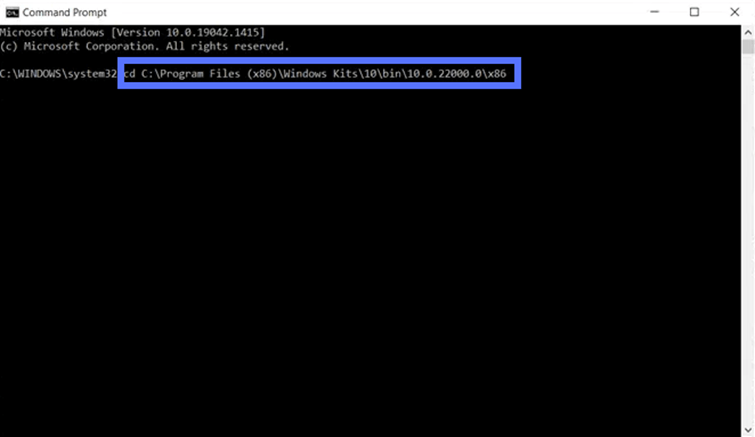
You have installed Windows SDK in another directory? Don’t worry. Use the command below to move to its location on your machine. Make sure you indicate the correct file_path and folder using the following command:
cd C:\file_path\folderIf you’re already logged in as Admin on your device, you may have to enter the two following commands:
cd C:\Program Files (x86)\Windows Kits\10\bin\SDK version number\x86

c:
This will change your directory so you can start using SignTool.
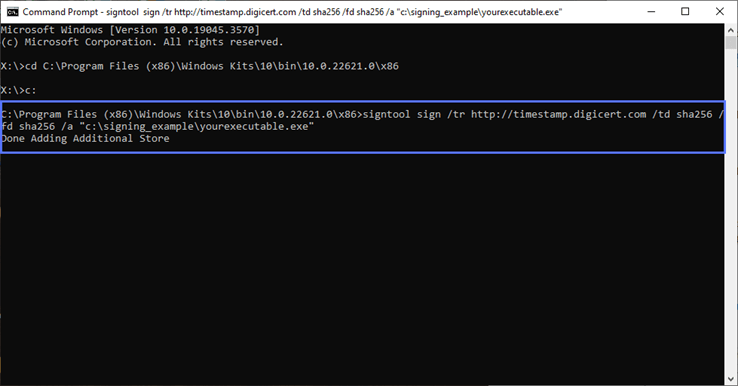
6. Enter the Signing and Time Stamping Command
Now, it’s time to sign your .exe with a digital certificate and add a time stamp. NOTE: Time stamping is an optional step; however, it’ll save you a lot of hassle and extend the life of your digital signature. It permanently preserves the signature so that, even when the certificate you used to sign the executable expires, the user running the .exe won’t get a “Publisher Unknown” warning.
So, from now on, make sure you always add a time stamp to your codes. It takes a few seconds and it won’t cost you a dime. To add a digital signature to your software, type the following command:
signtool sign /tr http://CAtimestampserver.com /td SHA256 /fd SHA256 /a "c:\filepath\myexecutable.exe" Remember to replace the details in bold with the information related to your code signing certificate and file paths, just like we did in the example in the screenshot below. You’ll find the time stamp server information on the CA’s page that issued your certificate. In our example, we’ve used DigiCert’s timestamp server since we’re signing using a DigiCert code signing certificate:
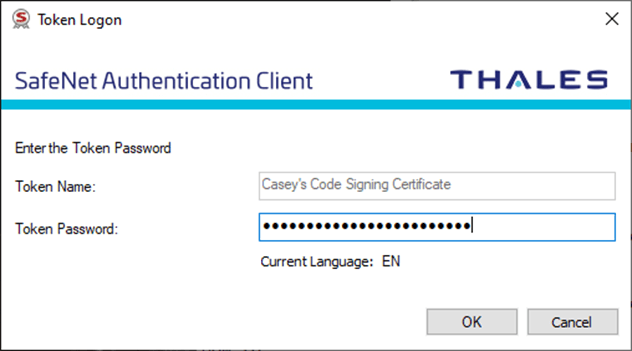
7. Enter Your SafeNet Password
- At the prompt, type the SafeNet password you created when you first set up your USB token into the SafeNet Client window that will pop up (as shown below):
If everything goes well, the Command Prompt will display a message indicating that the file was signed successfully (as shown below).

Congratulations! You’ve now digitally signed your first executable. Really? That was easy, wasn’t it? Don’t close the Command Prompt window yet — let’s double-check the signature, just to play it safe.
8. Verify Your Signature
There are two main ways you can go about verifying your software was digitally signed properly in SignTool.
Basic Digital Signature Verification
In the same Command Prompt window, enter the following command and hit Enter:
signtool verify /pa “c:\filepath\myexecutable.exe”

(NOTE: Don’t forget to replace the bold filepath elements with your information)
This method allows you to verify the basics: that the software’s digital signature is verified, that it’s timestamped, and that it used a specific algorithm (in this case, SHA256). Yes, it’s really that simple.
Want to see more detailed information regarding your software’s digital signature? We’ve got you covered.
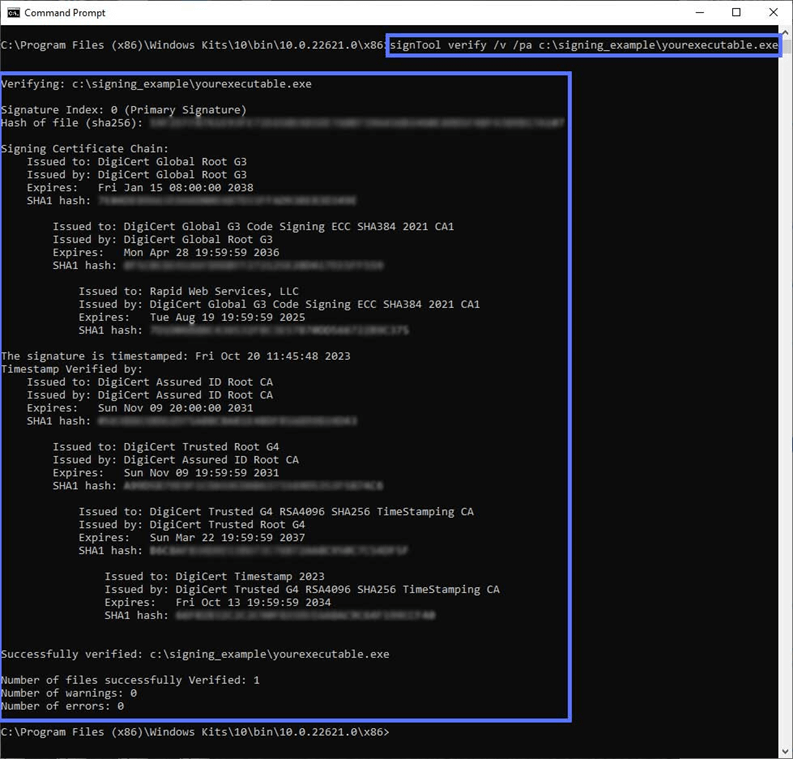
In-Depth Digital Signature Verification
In the same Command Prompt window, type the command signtool verify /pa /v “c:\filepath\myexecutable.exe” and hit Enter.

(NOTE: Don’t forget to replace the bold file path data with your information.)
Do you see something similar to what is shown in the screenshot below? Yippee! Your code has been signed and time-stamped correctly.
Do you find Command Prompt a bit complicated and you’re looking for a more user-friendly process? Here’s what you can do:
- Go to the signed .exe icon and right-click on it.
- Select Properties. A pop-up window will come up.
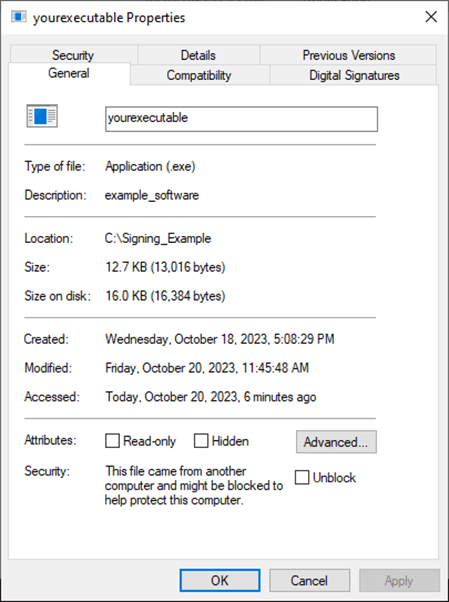
- Click on the Digital Signature tab and then on Details.
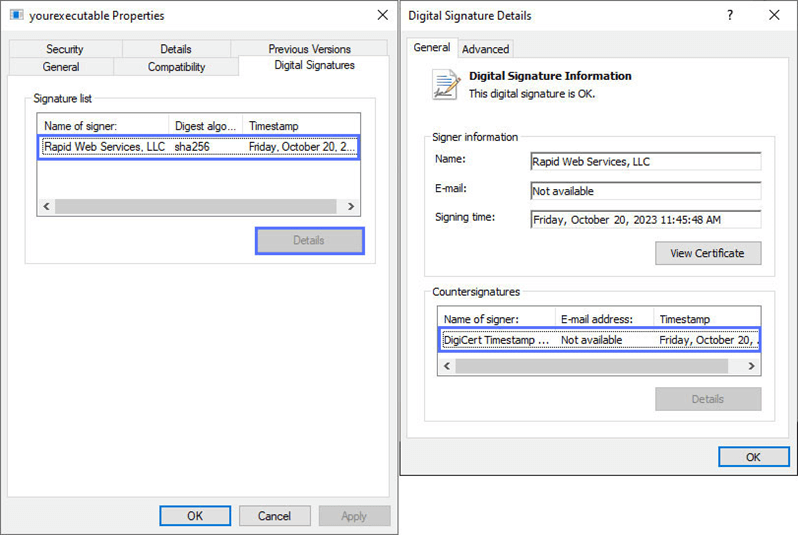
Et voila’. As the last pop-up says, “The digital signature is OK.”
Know what’s the beauty of this process? The simplicity. Your customers can use this technique, too. This way, they’ll confirm the integrity and authenticity of your .exe in a flash.
Final Thoughts on How to Sign an EXE or Windows Application
Now that you’ve learned how to digitally sign your .exe files with a certificate in Windows, be sure to include code signing in your secure software development process (SSDLC). Taking this approach will:
- Protect your software supply chain,
- Enhance your organization’s security,
- Install greater trust in your products, and
- Prove your customers that your .exe files and applications aren’t viruses or malware.
Times can be challenging in the digital world, but as the adage goes: “When the going gets tough, the tough get going.” So, jack up your defenses, sign your .exe files with a digital certificate now.
