

How to Create & Verify a Windows Authenticode Signature

 (6 votes, average: 5.00 out of 5)
The Windows Authenticode signature validates your authenticity as a software publisher and guarantees your code’s integrity to users (which helps protect them against malware infections). Discover how to verify and create an Authenticode signature in a flash.
According to Acronis, in the first half of 2023, malware was the top concern for individuals and organizations. What does this data have to do with Authenticode signature verification?
From a user perspective, the Authenticode signature verification process helps protect your software supply chain and prevents you from installing all sorts of malware-infected executables and code. As a developer or publisher, it helps to prove your software’s legitimacy and protects your reputation by preventing someone from tampering with your files without the changes being discovered.
How does it work? It’s all thanks to the magic of public key cryptography and digital certificates (i.e., code signing certificates). Sounds complicated? No fear; we’ve got you covered. We’ve compiled a comprehensive but easy-to-follow guide that’ll show you how to verify a Windows Authenticode signature without a hitch. (For readers who don’t know how to create one using SignTool and the command line [CMD] — no worries, we’ve got you covered with a section that goes over all of that later in the article.)
How to Verify an Authenticode Signature as a Developer/Publisher
Suppose one of your colleagues just sent you a file to add to your project, and you want to check whether it has been signed correctly. Since you already have Windows SDK (which includes SignTool.exe) installed on your device, you decide to verify the Authenticode signature using SignTool and CMD. How?
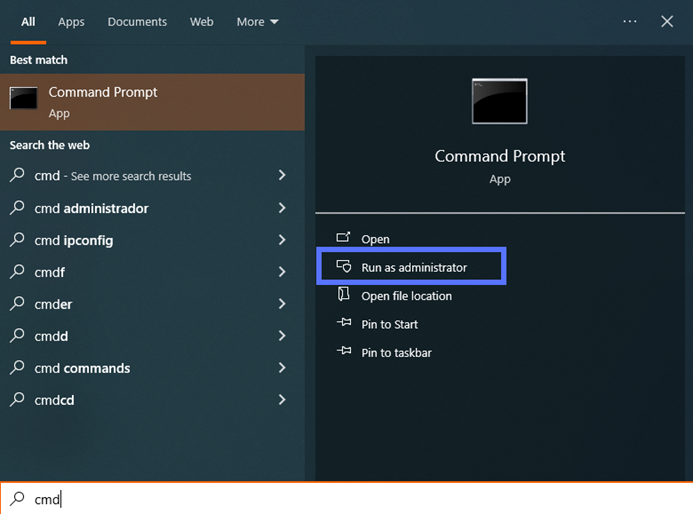
1. Open Windows Command Prompt (CMD) as Administrator
In your Windows search box, enter “cmd” and select Run as Administrator. You’ll be required to type your admin password.
Hint: If you’re already logged in to your device as an admin, you’ll just click on the CMD app. You won’t need to select the “Run as Administrator” option.
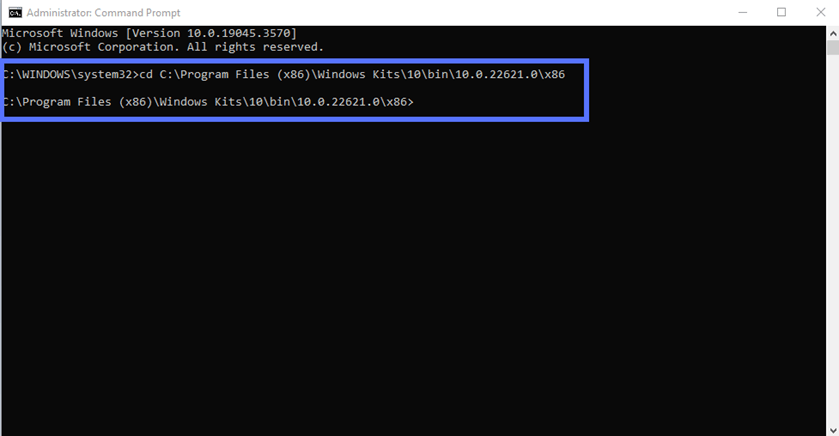
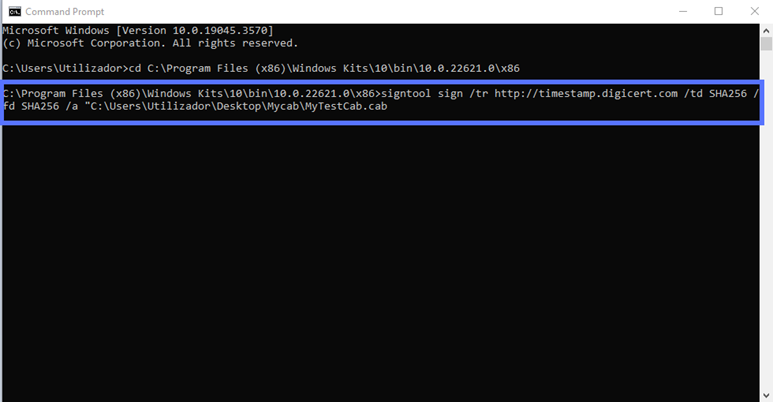
Copy and paste the script below into CMD to go to the directory where SignTool is installed. Before hitting enter, replace the version number used as an example (i.e., 10.0.22621.0) with the one related to your installation. The following is the version of SignTool we’re using for this example:
cd C:\Program Files (x86)\Windows Kits\10\bin\10.0.22621.0\x86This is what it looks like in our case:
Hint: Did you install SDK in a directory different from the default .bin folder? No problem! Change the script to adapt it to your specific file path and folder name:
cd C:\your filepath\your folderHint: If you are already logged into your device as admin, you’ll have to add another step: type “c:” and hit enter.
3. Type the Authenticode Signature Verification Command
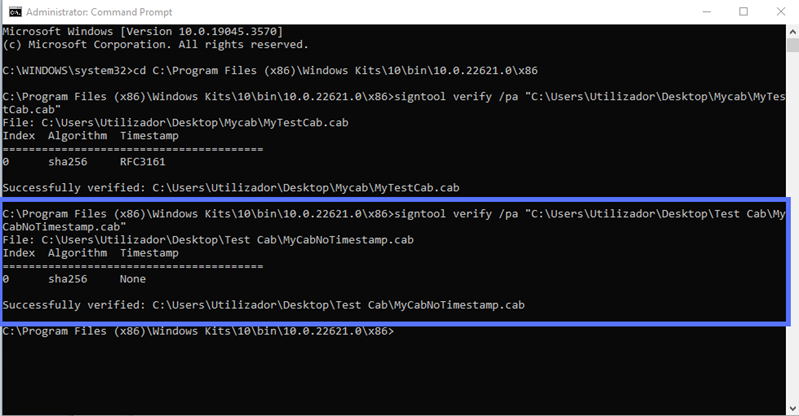
In this example, we’ll check a .cab file (i.e., a cabinet file, which is a type of archive that’s similar to .zip and contains multiple compressed files). In the same CMD window type:
signtool verify /pa “c:\filepath\Mycabfile.cab You should get something like this:
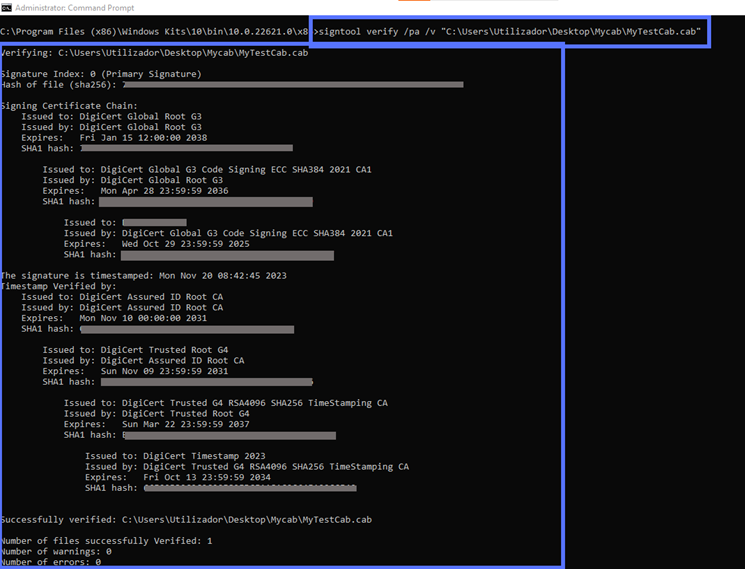
Want to get into the nitty-gritty of the Authenticode signature? Use the verbose command (/v) to pull more detailed info:
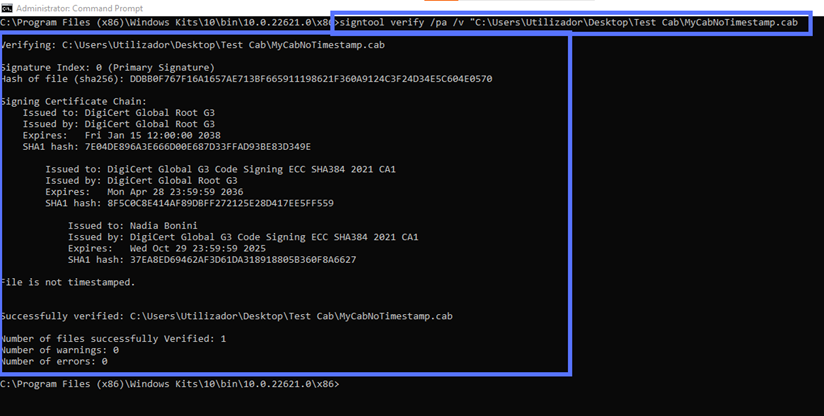
signtool verify /pa /v “c:\filepath\Mycabfile.cab” See what a difference it can make? It’ll display the signature’s ins and outs.
What if your colleague didn’t add a timestamp? The CMD will display something similar to the screenshot below. Can you spot the difference?
So, this is how you can validate Windows Authenticode signatures for .cab files with Microsoft SignTool. But what if you’re a user who isn’t familiar with Windows Command Line and all this technical “mumbo jumbo?” No fear, there’s also a more user-friendly method to verify a Windows Authenticode signature…
How to Check a Software File’s Windows Authenticode Signature as a User
If you downloaded a Windows file or application and want to check its authenticity, here’s the easiest way to view its signature. Once again, in this example, we’ll use the previously mentioned CAB file. Don’t worry, though, this procedure will work the same way for other files and executables.
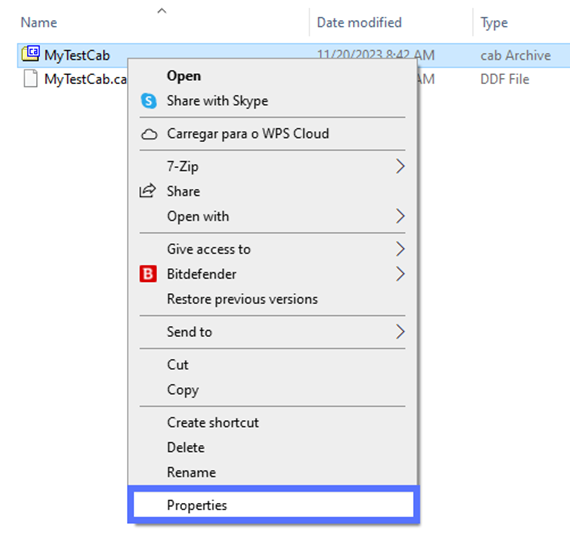
1. Open the File’s Properties
Right-click on your file’s icon and select Properties.
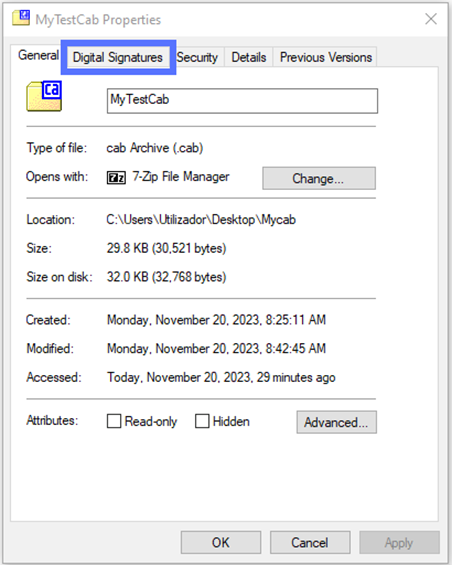
If the file does have an Authenticode signature, you should see a pop-up window similar to the one shown below:
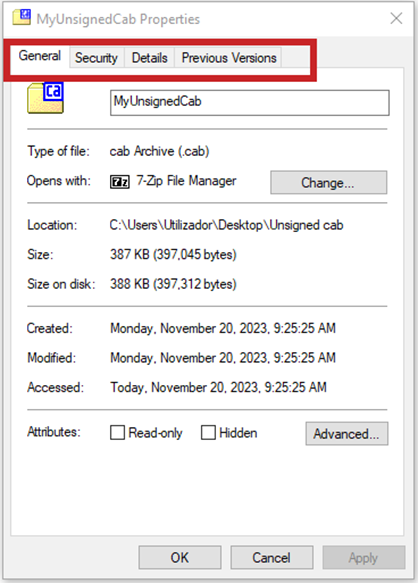
The file’s Properties window doesn’t have a Digital Signatures tab? Cue the alarm! This means the code wasn’t signed by its creator. It’s better to stay away from it so you don’t risk installing malware on your device.
Here is what an unsigned file’s Properties window looks like — no Digital Signature tab in sight:
2. Verify the Validity of the Authenticode Signature
Let’s go back to our signed code example. Select the Digital Signatures tab and click on the Details button. A new window will come up. Under the General tab, check the section labeled “Digital Signature Information.” Does it say, “This digital signature is OK,” as shown in the example below? Perfect! This means the Authenticode signature is valid.
This is how a signed file’s Digital Signature and Digital Signature Details tabs will look:

3. Check the Certificate Utilized For the Authenticode Signing Process
In the same window, click on View Certificate. Boom! The complete details of the code signing certificate are virtually served on a silver platter. Here is an example of how the certificate information will display for digitally signed files:
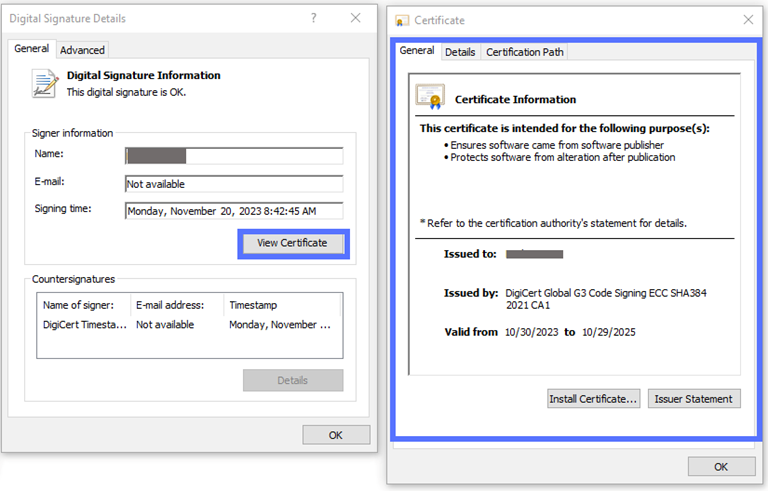
Pro tip: Click on the Details or Certification Path tabs to review additional information about the certificate used to sign the file.
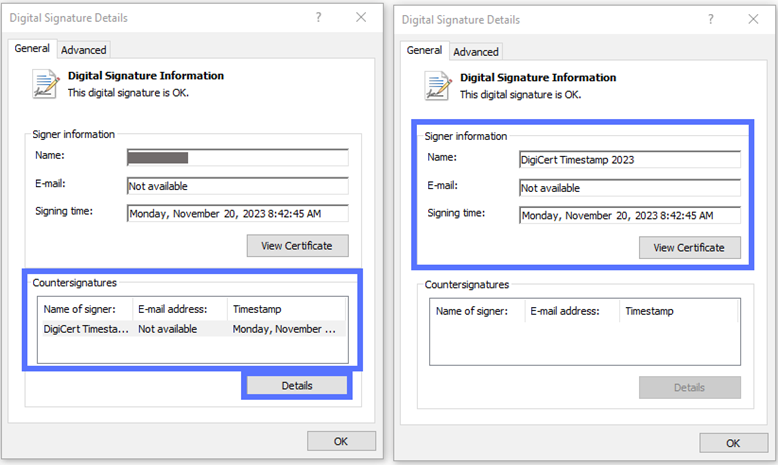
Want to look at the timestamp data (if available)? Hit the Details button under the “Countersignatures” section in the General tab. The screenshot below is an example of what you should see:
For additional security, you can take it a step further and check the file’s hash value and compare that string of hexadecimal characters against the one published by the signing organization. Do they match? If yes, then good, it means your file’s integrity is good.
Got it? Good.
Now that you know how to perform Authenticode signature verification from both a publisher’s and user’s perspective, let’s take a look at the Authenticode signing process for our readers who may not know how to create an Authenticode signature.
In the following example, we’ll walk you through the new signing process you’ll need to follow since the industry’s new Code Signing Certificate Baseline Requirements came into effect on June 1, 2023. The new requirements ensure that the signing process for individual validation (IV) and standard code signing certificates (formerly called organization validation [OV] code signing certificates) now involves the use of secure hardware (e.g., a cryptographically secure token in which you must securely store your private key).
How to Create a Microsoft Authenticode Signature Using SignTool
Let’s imagine you’re a software publisher/developer who has created a new feature for your application. To distribute it to your users without having them re-install the whole app, you’ve packed the feature update into a .cab file.
Let’s imagine that you’ve already made the necessary preparations:
- Purchased a code signing certificate from a publicly trusted (CA).
- Installed the authentication software client and set up your secure hardware token.
- Downloaded and installed SignTool.exe (remember? It comes embedded in Windows SDK).
- Have administrator rights set on your device.
Now, you can start the process of signing and timestamping your .cab file. Of course, you’re aware that timestamping is optional. However, if you want to ensure that when the code signing certificate expires, the signature will remain valid. Timestamping your digital signature can help you do that.
You don’t care about timestamping? Fair enough. Leap to the next section to discover how to sign your CAB file without adding a timestamp. Otherwise, keep on reading.
How to Add a Timestamped Authenticode Signature to Your Code in 4 Steps
Right, it’s time to start signing. For this demonstration, we’ll use:
- A USB token containing a standard Authenticode signing certificate issued by DigiCert,
- The SafeNet Authentication Client, and
- SignTool.exe.
1. Plug-In Your Hardware Token and Fire Up Your Authentication Client
Connect the secure token containing your Authenticode signing certificate to your computer and open the Authentication client (SafeNet for us, since we’re signing using a DigiCert code signing certificate in this example).
2. Open a CMD Window and Switch to the SignTool Folder
To do so, search for CMD and click on “Run as Administrator.” You’ll then enter the command below, as explained in the points 1 and 2 under the section “How to Verify a Signature as a Developer/Publisher.”
cd C:\Program Files (x86)\Windows Kits\10\bin\10.0.22621.0\x863. Sign and Timestamp Your CAB File
In the same CMD window, type the script below. Be sure to enter your CA timestamp’s server information and the correct file path to your .cab file:
signtool sign /tr http://CAtimestamp.server.com /td SHA256 /fd SHA256 /a "C:\filepath\Mycabfile.cab" In our case, the string looks like this when using a DigiCert timestamp server:
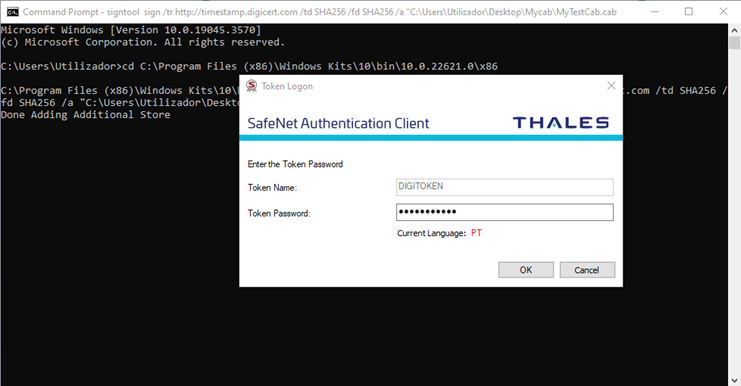
4. Enter Your Authentication Client Password
A pop-up will appear, requesting your authentication software password. Type in your password and click on the OK button, as shown below:
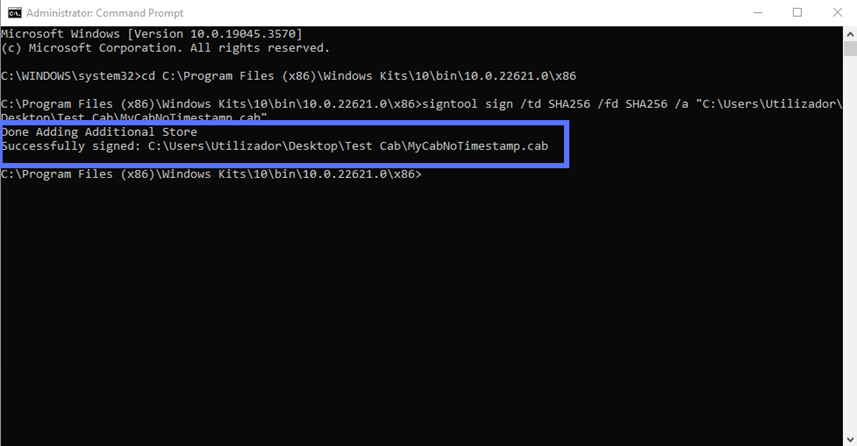
Do you see a message like the one highlighted in the screenshot below? Bravo! This means your Authenticode signature has been successfully applied to your code.

Can’t be bothered to look for your CA timestamp URL, and you`re willing to accept the consequences when your certificate expires? OK, your CAB file, your choice. You’ll need to use a different script to sign your file without a timestamp.
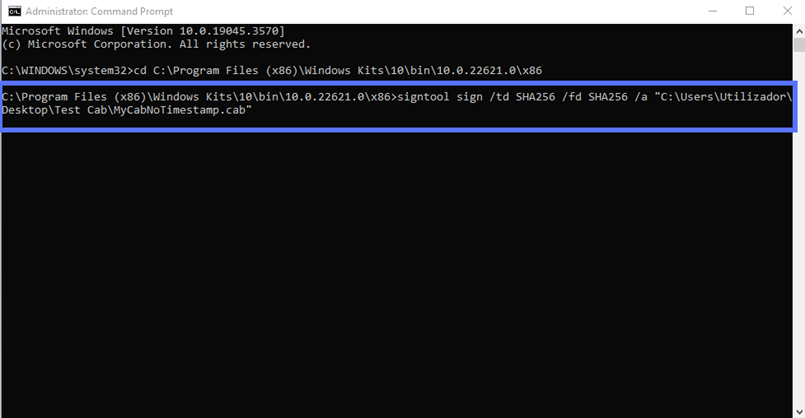
How to Create an Authenticode Digital Signature Without a Timestamp
To simply sign a .cab file without timestamping it, we’ll use exactly the same tools and items described in the previous section. The first two steps are also unchanged:
- Insert your token into your computer,
- Open a CMD window as admin and navigate to the SignTool folder.
Here is where the Authenticode code signing process differs. To apply your Authenticode signature without a timestamp, you’ll have to use a different command:
signtool sign /td SHA256 /fd SHA256 /a "c:\filepath\Mycabfile.cab" As usual, fill in the correct path to the file, and the file name, to suit your purposes:
Remember to type your authentication client password when prompted.
Hit the OK button, and well, what do we have here? A signed .cab file! Good job!

How the Windows Authenticode Signature Verification Process Works Behind the Scenes
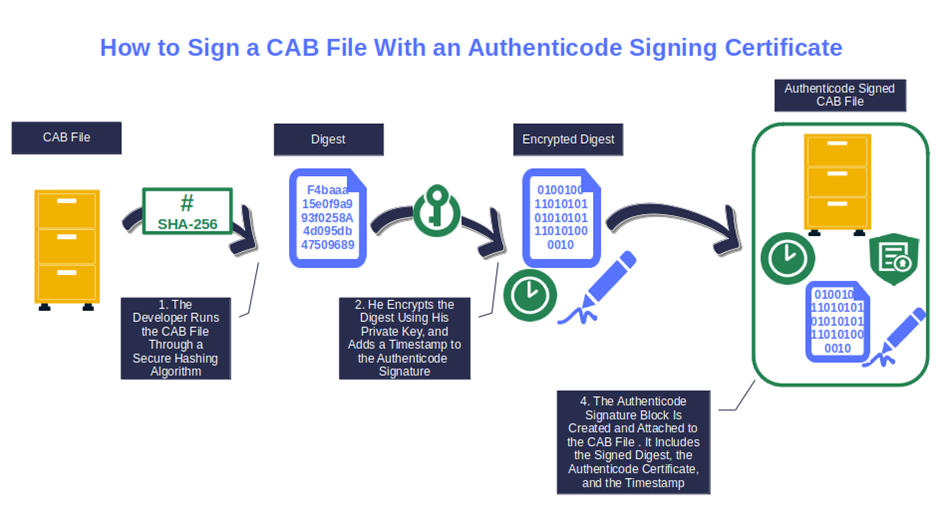
An Authenticode signature is a type of digital signature that developers apply to their Windows software to assert its authenticity, and confirm that the code hasn’t been tampered with. Think of it like a digital equivalent of a traditional wax seal on a letter: if the seal is broken, then you know someone opened your letter and may have tampered with its contents.
When a code is developed and is digitally signed, the author runs it through a complex mathematical function (i.e., a hashing algorithm). This process results in generating an irreversible, fixed-length string of hexadecimal numbers (i.e., a hash value or digest) that’ll be then encrypted with the developer’s private key.
Finally, the
- Encrypted digest,
- Developer’s code signing certificate (more on that momentarily), and
- Hashing algorithm
are bundled together to create the Authenticode signature block, which is then attached to the code.
But how is this signature verified from a user perspective? This is where the public key comes into play.
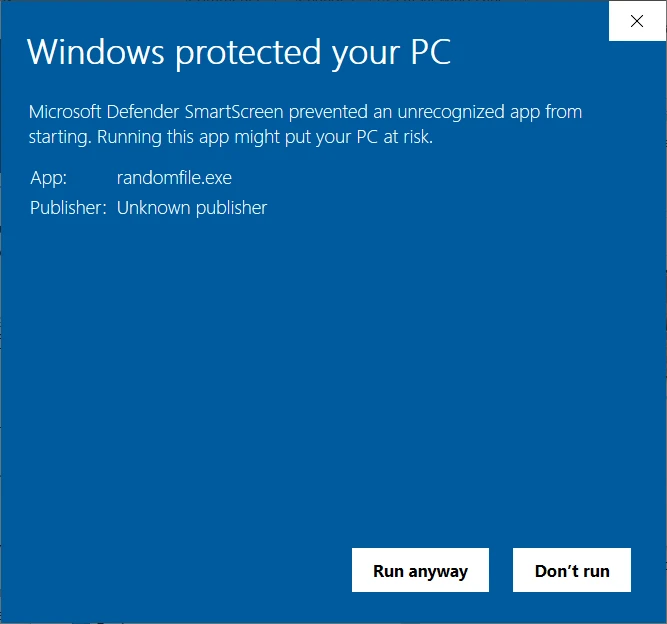
When a user installs digitally signed software, their operating system uses the public key to decrypt the Authenticode signature. It then utilizes the embedded hash function to generate a new digest that’ll then be compared with the original digest. If they don’t match, the user will be notified by a pop-up warning like the one shown below:
The warning message is clear enough, but what if you want to verify the signature before installing or running the software? “Nea bother,” as my Scottish friend would say. Follow the Authenticode signature verification process we walked you through earlier.
Before wrapping up, there are two important things to remember:
- As a user, always check the validity of a software signature before installing it. It’ll keep you away from malware.
- As a developer, you can choose to sign a code or not. You can still publish unsigned files. However, this will reduce the changes of people downloading your software.
Final Thoughts About How to Create and Verify a Windows Authenticode Signature
Now that you’ve become familiar with the Windows Authenticode signature verification process and have learned how Authenticode signing works, you can unleash the power of public key cryptography and publicly trusted code signing certificates.
They’ll shield your users and organization from malware infections, protect your brand and reputation, and guarantee the integrity of your codes. The beauty of it? One single certificate enables you to sign an unlimited number of applications and codes during the certificate’s validity period.
For example, you can use it to bind your identity to your Windows executables and .msi installers. Or, if your CAB archive contains .jar files, you can sign your JAR files, too. On top of that, it’ll enable you to show your customers that the code they’re downloading comes from a trusted source. Does it work with Windows drivers, too? It surely does! Want to know how? Don’t miss our next article to learn how to add your Authenticode signature to your drivers.
