

How to Digitally Sign MSI Installers, Packages & Files With a Certificate

 (8 votes, average: 5.00 out of 5)
Did you create a new MSI package? Since June 2023, the process of digitally signing MSI installers, files, and packages with a certificate has changed. Discover how it works now by following our step-by-step guide
Microsoft software installer (MSI) is often the format of choice of many organizations and developers for large-scale application package distribution, such as enterprise antivirus software applications. MSI files offer a configurable, automated installation process requiring minimal user interaction. It also enables developers to easily maintain, repair, and patch software.
However, .msi files have also become convenient vehicles for malware distribution, with 100,000+ downloads of MSI malicious files in the first three months of 2023. In fact:
- Malicious .msi packages are difficult to identify. Cybercriminals can mask malicious files as legitimate, well-known software, just like the recently identified Stealthy MSI loader does.
- MSI files are executed with elevated privileges. Bad guys can use this access to further compromise targeted systems and install ransomware. The latest DarkGate variant is an example of this method.
- The MSI CustomAction table offers great manipulation opportunities. As demonstrated by TrendMicro, threat actors can capitalize on the commands listed in the table to execute malicious scripts that can be hidden in countless sources (e.g., a database, installed file, or executable).
Want to protect your users and organization from malware and your installation files from tampering? Start digitally signing your MSI files, installers, and packages. Our quick guide will take you through the process in six easy steps.
What You’ll Need to Sign MSI Files
Digitally signing .msi installers, files, and packages will require you to gather a few “ingredients.” Just like when you want to bake your favorite chocolate cake.
- A code signing certificate issued by a trusted certificate authority (CA) that must be stored on secure hardware (as mandated by the new June 2023 industry requirement). In this example, we’ll use a standard DigiCert code signing certificate.
- The client software authentication and hardware installer software provided by the CA of your choice that you used to set up your secure token.
- Microsoft SignTool .exe installed on your Windows device. SignTool.exe is bundled in Windows SDK. To get it, download and install SDK’s latest version.
Do you have all the listed “ingredients” ready? Great. Let’s start the signing .msi installer operations.
Sign an MSI Package, File, or Installer in Six Steps
Although the signing process has slightly changed to meet the new standards, it’s still pretty straightforward. All you’ll have to do is follow the six simple steps below.
1. Insert Your USB Token Into Your Computer
This is easy. Grab the secure hardware where your code signing certificate is stored and plug it into your device.
2. Start Your Authentication Client
Open the client software you used to set up your hardware token. Here, we’ll use a USB token and the SafeNet Authentication Client.
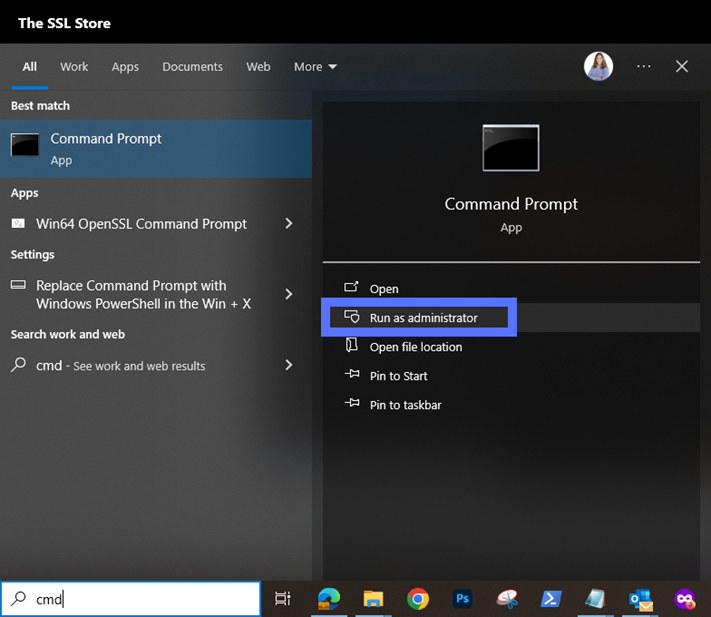
3. Launch a Command Line Window as Administrator
Type “cmd”, select Run as administrator, and enter your admin password. Are you already logged in as an admin? Just click on the Windows Command Prompt (CMD) icon. You don’t have admin permissions? Contact your IT support team.
4. Change Files Paths to the SignTool Directory
Use the command below to switch to the directory where SignTool is located. Don’t forget to type the correct SDK version number you have installed. In this example, we’re using SDK version 10.0.22621.0
- Option one: SDK is installed in the default directory (.bin folder). Use the script:
cd C:\Program Files (x86)\Windows Kits\10\bin\10.0.22621.0\x86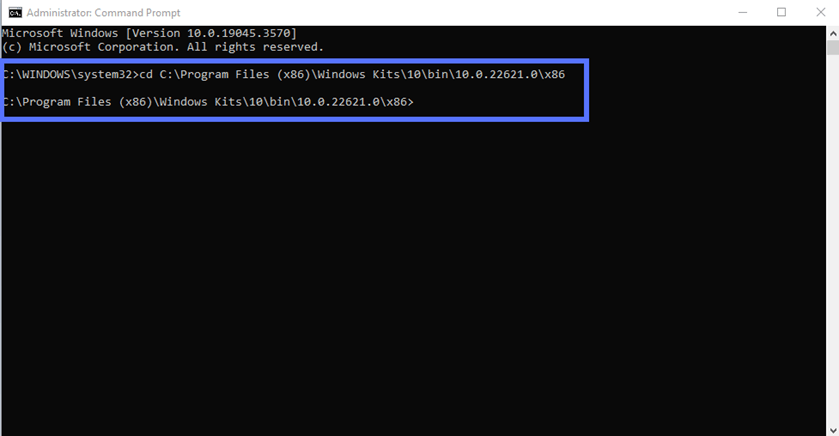
- Option two: SDK is installed in another directory. Navigate to it by typing the correct file path and folder name:
cd C:\your filepath\your folderWere you already logged in as an admin? After using option one or two, type “c:” and hit enter.
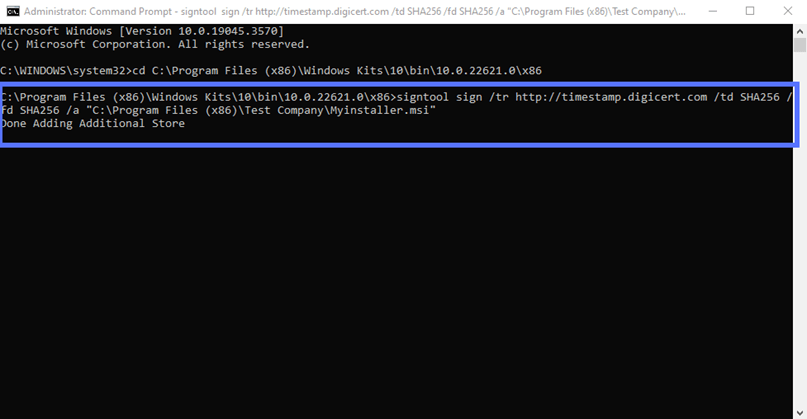
5. Sign Your MSI File and Add a Timestamp to It
Adding a timestamp is optional, however, it’s highly recommended. Once included, the signature remains valid even when the code signing certificate used to sign the .mis package expires. Thus, customers running the installation won’t get an annoying (and highly alarming) “Publisher Unknown” message.
We’ve outlined two approaches below for signing your MSI file. Want to follow our suggestion and boost your signature with a timestamp? Go with option one. Do you prefer to sign your code without timestamping it? Jump to option two.
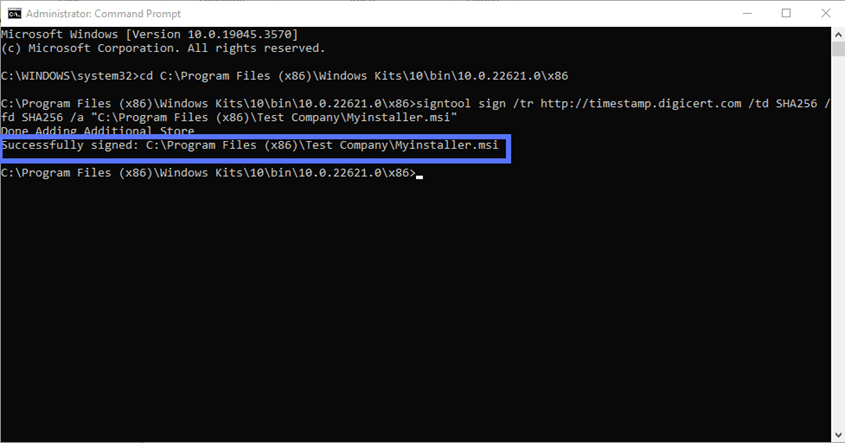
- Option one: Sign and timestamp your MSI installer. Enter the command below. Remember to replace the timestamp server information with those related to your CA and the name and file path to your .msi file.
signtool sign /tr http://CAtimestamp.server.com /td SHA256 /fd SHA256 /a "C:\filepath\Myinstaller.msi"This is what it looks like with our actual file path using DigiCert’s timestamp server information:
- Option two: Sign your MSI installer without a timestamp. Use the command. As explained above, make sure you indicate the correct .msi file path and name:
signtool sign /td SHA256 /fd SHA256 /a "C:\filepath\Myinstaller.msi" 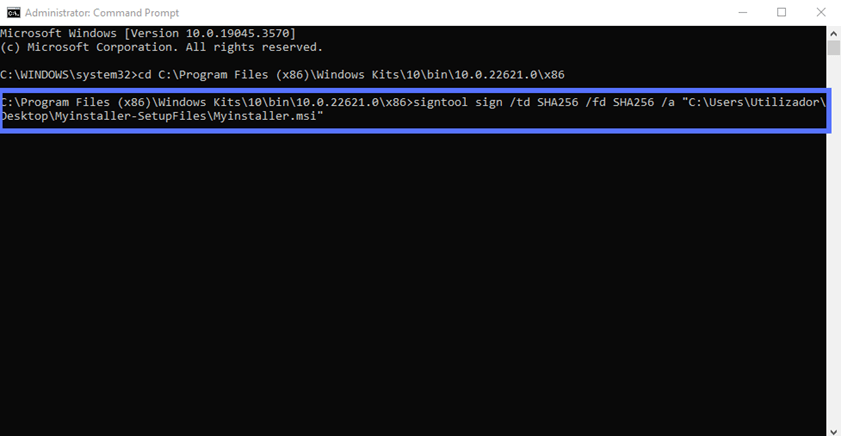
Both of these signing operations will trigger your token’s authentication software to activate.
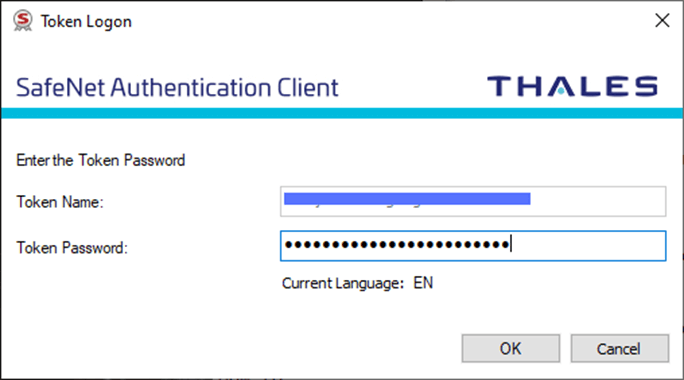
6. Type Your Authentication Service Client Password
When prompted, enter your password for the client software authentication service. In our example, we’ll be required to type our SafeNet password.
Abracadabra! A Command Prompt message like the one highlighted in the screenshot below will appear confirming that the signing of your .msi installer was successful. Well done!
Verify Your Signature
Want to make sure you really did sign your .msi file with a certificate? “Your wish is my command,” as the mythical Genie of the Lamp said. We have three options for you:
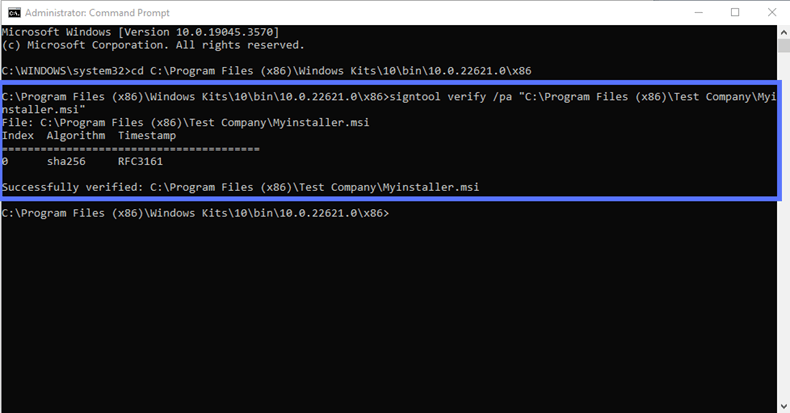
- Option one: The basic verification. Check your signature in a snap of fingers typing in the same CMD:
signtool verify /pa “c:\filepath\Myinstaller.msi”This is what it looks like in our case:
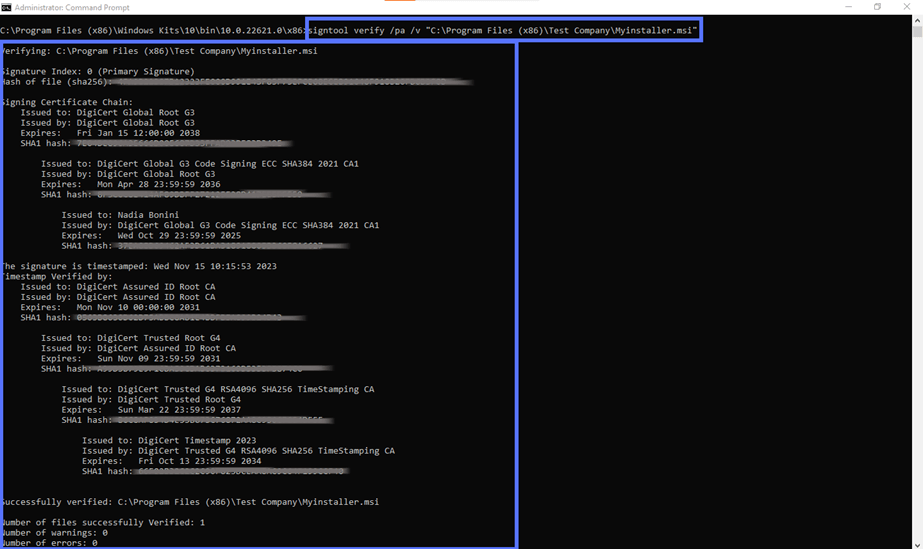
- Option two: The in-depth verification. Get more details by typing:
signtool verify /pa /v “c:\filepath\myinstaller.msi”Don’t forget to hit Enter.
Here is an example of what you’ll get when you use this command string:
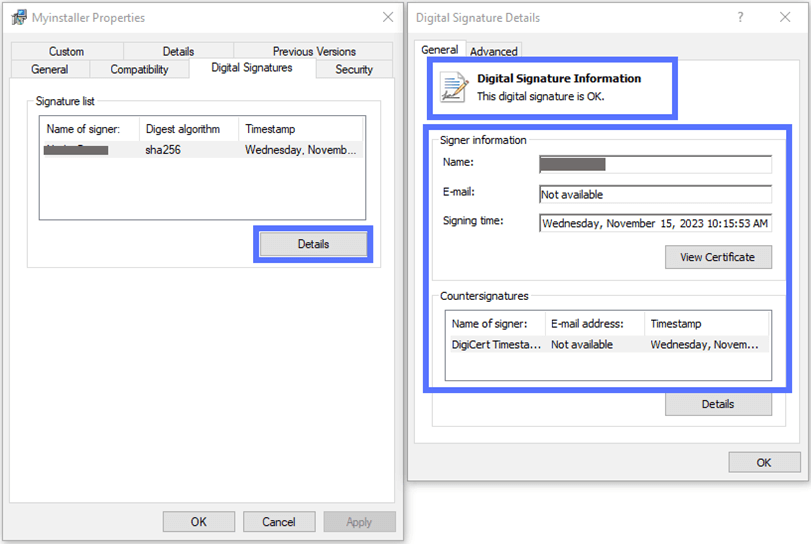
- Option three: The user-friendly check. Right-click on your software and open your .msi file Properties window. Here, you can check the details of the file’s digital signature in the Digital Signatures tab.
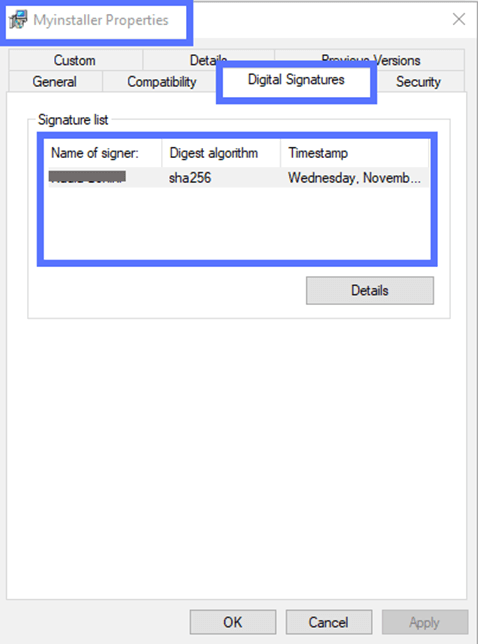
Clicking on the Details button will open a pop-up window displaying additional information. The validity of the signature will also be confirmed, as shown in the screenshot below.
There you have it. Now you know the new steps to follow to sign your MSI files. That wasn’t too different from the previous process, or overcomplicated, right? I know, changes can be painful sometimes but, as Walt Disney once said, “If nothing ever changed, there would be no butterflies.”
Psst! This same approach also applies to Jar files and .exe files. Wondering how to sign them? Check our step-by-step guides on how to sign .jar files and executables.
About the SignTool Options Used in This Guide
Interested in better understanding the SignTool options we’ve used in our commands? Here’s a list and a brief explanation of the most important ones.
- /a automatically selects the first code signing certificate stored in your Windows CertMgr.
- /fd specifies the algorithm used to create the signature file. In our examples, we’ve used the highly secure SHA256, currently recommended by the National Institute of Standards and Technology (NIST).
- /tr indicates a trusted timestamp server compliant with the Internet Engineering Task Force (IETF)’s RFC 3161. This command should be preferred to the general and less secure /t as the latter is utilized to specify Microsoft Authenticode-compatible time stamp servers. In both cases, if the timestamping process fails, a warning will appear.
- /td designates the timestamp algorithm (e.g., SHA256).
- /pa attests that the default authenticode verification policy should be used to sign the .msi file.
Hungry for more? Explore Microsoft’s SignTool information page.
Final Thoughts on How to Digitally Sign MSI Installers, Packages & Files with a Certificate
Undoubtedly, MSI is an efficient and convenient format for software installation package distribution and management. However, it isn’t risk free. Its customizable process and the executable codes included in the packages often run with high Windows privileges, making it an appealing target for attackers.
Digitally signing your .msi installers with a code signing certificate will:
- Prove your customers that they’re from a trusted source,
- Confirm that the packages haven’t been tampered with,
- Protect your customers and users from data breaches and infections by helping secure their software supply chains, and
- Strengthen your organization’s reputation by providing trusted software products that haven’t been altered without your authorization.
Not bad for a simple six-step signing process, right?
