

How to Sign C# Applications With a Certificate in Visual Studio
 (5 votes, average: 5.00 out of 5)
136 hours. This isn’t only the time required to fly from New York to Beijing 7 times; it’s also the average amount of downtime caused by a ransomware attack in 2023. Don’t let attackers hack your time (and applications) away. Discover how to add a digital signature in C# code developed in Visual Studio
Three-quarters of U.S. cybersecurity experts who responded to the June 2023 Deep Instinct survey noticed increased attacks over the previous 12 months. Digital signatures can help you protect your organization and users against maliciously altered software and malware-based attacks using unsigned software.
Through public key cryptography, digital signatures allow customers to verify that your code is authentic and hasn’t been modified. Code signing certificates issued by a trusted certificate authority (CA) and the public key infrastructure (PKI) are the foundational elements of this technology. Once the digital signature bundle is created and attached to the application:
- You’ll be validated as the legit code author, and
- The users will be automatically alerted if any changes are made to the code.
Isn’t it cool? Now, it’s time to explore how you can apply a digital signature in C#. Not sure how to sign an application with a certificate? Keep reading. In this article, we’ll look at a practical example of a digital signature implementation in C# when using Visual Studio. We’ll also explore why the code signing process is essential for Windows app developers and publishers. Let’s go!
Digital Signature in C#: A Quick Overview on Why Code Signing Matters
Let’s imagine you’ve created your new C# app in Visual Studio and signed its manifests using ClickOnce signing. But before you can make the app available for download on your website, you test it and realize that when your customers attempt to install it, they’ll get alarming warning messages from Microsoft Defender SmartScreen.
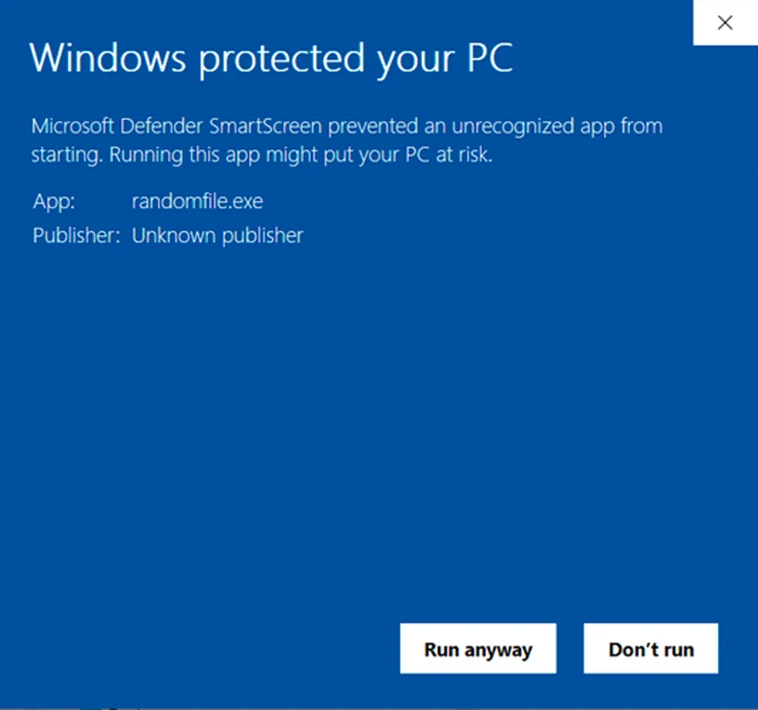
As a result, the number of downloads drops dramatically. Your earnings and brand reputation are dragged along in a dangerous downward spiral. You need a solution, fast. This is where code signing comes into play.
Save Up to 21% on a Windows Code Signing Certificate
Give users a reason to trust your Windows apps by preventing “Unknown Publisher” warnings. You can digitally sign unlimited apps for as little as $211.46/year.
C#: How to Sign Your Application With a Certificate in Visual Studio 2022 in 5 Steps
Digital signatures add a vital component to your Windows apps: digital trust. In case you’re not familiar with the term, digital trust is the underlying everything — the security, compliance, standards, processes, and technologies — that enables users to engage confidently in our increasingly digital world. They need to know that your software is authentic and hasn’t been tampered with since you signed and released it.
In this section, we’ll show you the process for adding a digital signature to a C#-based application with a certificate. For this demonstration, we’ll assume you’ve already installed Visual Studio, set up your publicly trusted certificate’s secure hardware, and signed your C# app’s manifest files.
Need a quick reminder? Before deploying the app, you should have done the following:
- Purchased an publicly trusted RSA code signing certificate from a trusted CA (NOTE: ECC certificates are not recognized in Visual Studio).
- Set up the secure hardware token the CA sent you (if it didn’t arrive pre-configured).
- Strong-named the assemblies (e.g., your deployment manifest) with your private key to avoid collisions and guarantee their integrity.
- Used your secure hardware token and certificate to successfully sign your application’s manifests using Visual Studio.
Now, it’s time to walk you through the process of signing the C# app in Visual Studio using the PowerShell command-line interface and SignTool. For this example, we’ll use Visual Studio 2022.
1. Plug in Your Secure Hardware Token
Insert your secure USB hardware token into the device you want to use for signing your C# app. Make sure you do it before opening Visual Studio. This way, you’ll ensure the token is correctly recognized before the signing process starts.
If you’re not using a physical token, then this means you’re using a hardware security module (HSM). This is because you can’t use a traditional .pfx certificate file and locally stored key anymore. Instead, you’ll need to store your key using secure cloud storage — for example, the DigiCert KeyLocker platform, which is used by GoGetSSL Cloud Signing.
2. Go Back to Your C# Application in Visual Studio
- In Visual Studio, select File, then Open, and click on Project/Solution.
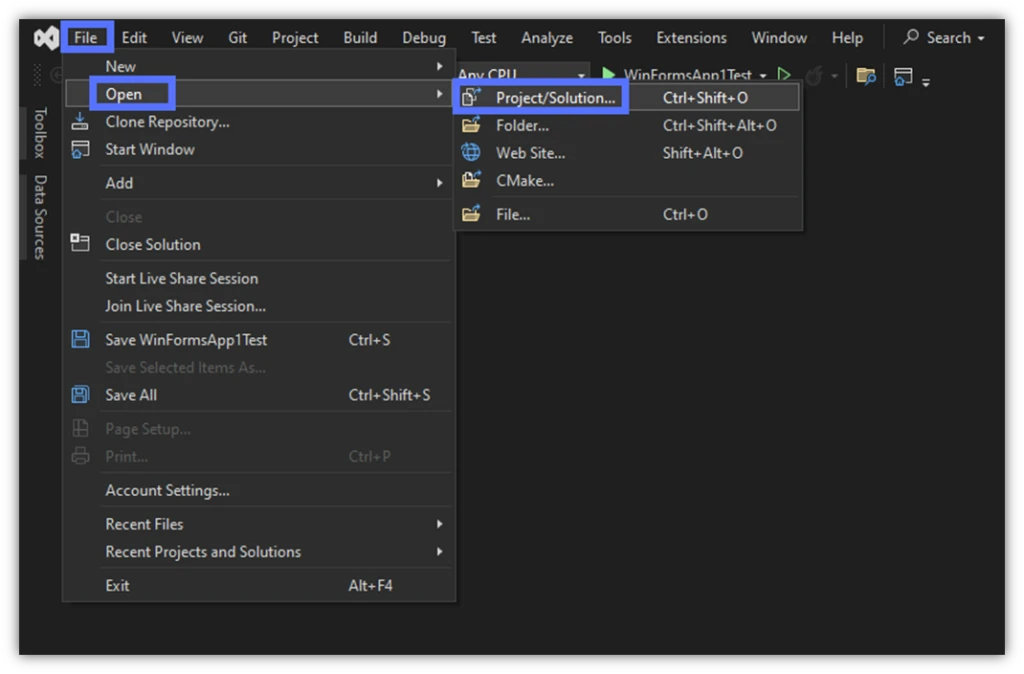
- A pop-up window will show you a list of the applications you’ve created. Select the C# application’s folder you want to sign and click on the Open button.

Image caption: The image shows a list of projects to select and open.
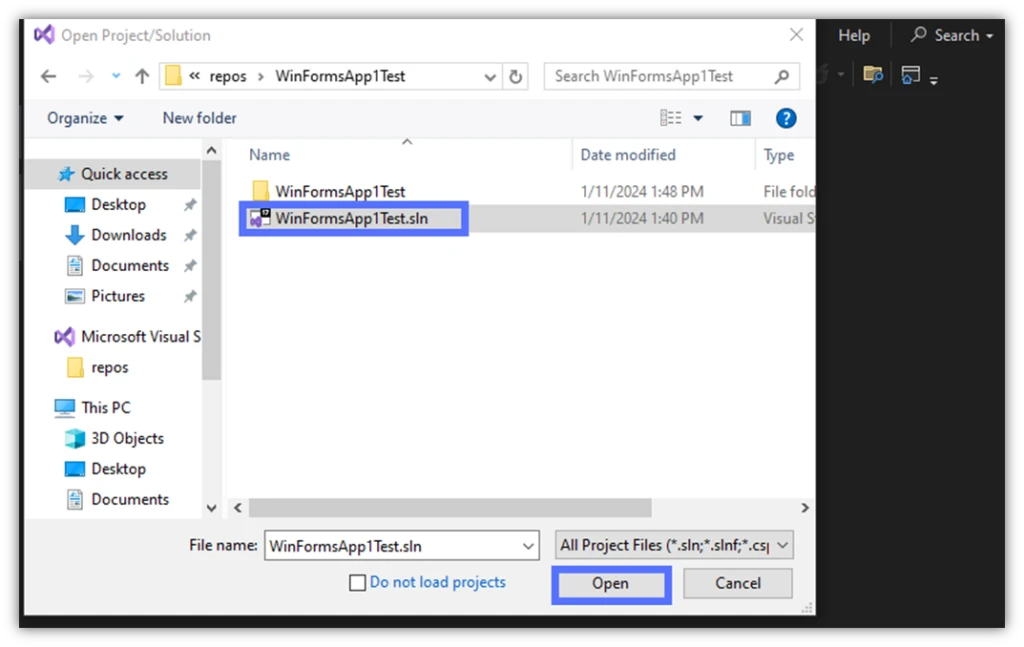
- A new window will come up. Click on the project’s .sln file and hit Open again.
3. Start the Visual Studio’s Developer PowerShell
To open Developer PowerShell, click on Search, select the Feature Search tab, and type “developer” in the search box. A list will be displayed. Double-click on Developer PowerShell.

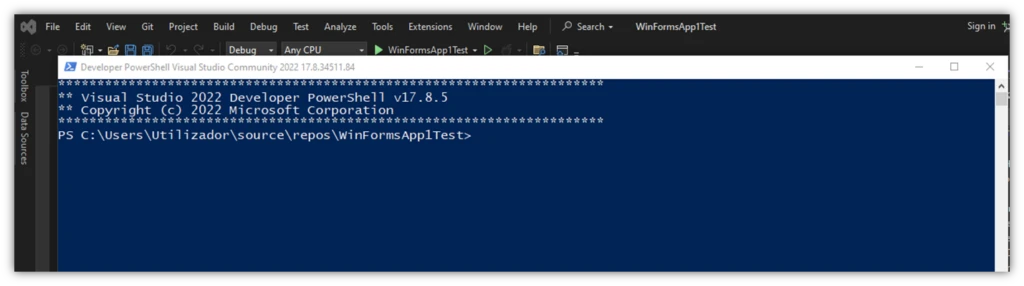
This will open the PowerShell Developer terminal in a new window that allows you to move it wherever you want on the screen.
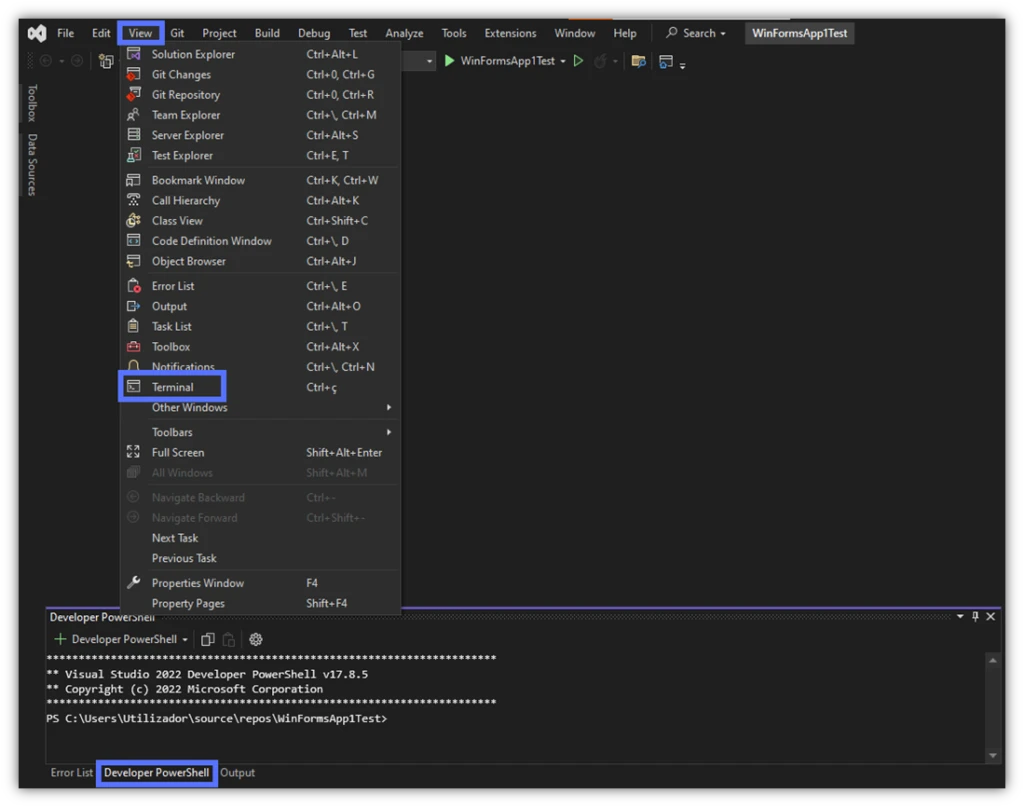
Would you rather work with the PowerShell that’s integrated in the Developer Command Prompt of your Visual Studio window? Click on View and select Terminal, or simply select the Developer PowerShell tab at the bottom of your Visual Studio window.
4. Sign the Executable With SignTool
Microsoft SignTool.exe is part of Visual Studio’s ClickOnce publishing tools feature. Here is when you add your digital signature in C#. Once done, your application will be trusted by any Windows operating system (OS), even if installed through the executable file.
To digitally sign your software using SignTool:
- In PowerShell, enter the SignTool command and hit Enter:
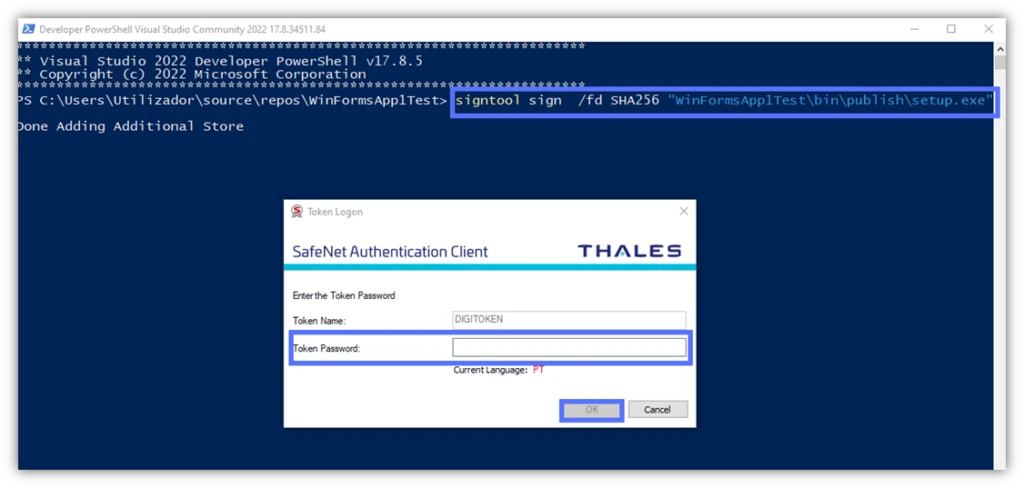
signtool sign /fd SHA256 “Path_to_Your_Setup.exe”
- The Authentication client window will display. Here is where the signing process starts. Type your secure token password and hit OK.
This is how it looks like in our example:
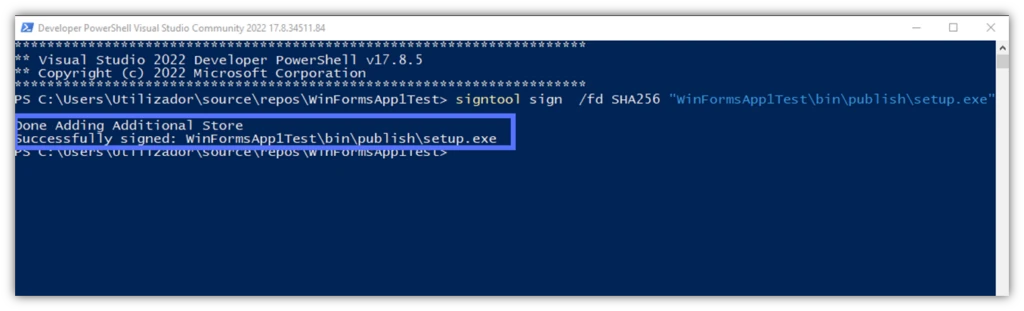
If you did everything correctly, the tool will confirm that the digital signature in C# has been added to the setup.exe file.
Is this the end of the process? In theory, yes, as you’ve signed the setup.exe file. However, it’s important to note that if you stop here, as soon as your code signing certificate expires, the Unknown Publisher message will return.
The solution? Add a timestamp to your digital signature in C#. It’s free, and it’ll take you less than a minute.
5. Add a Timestamp to Your Digital Signature in C# (Highly Recommended)
In the same PowerShell window, type the command below and click Enter.
signtool timestamp /tr https://yourCAtimestamp.com /td SHA256 “Path_to_Your_Setup.exe“
Tip: Don’t forget to replace the details in bold with the correct information related to your CA and application.
Boom. Can you spot the “Successfully timestamped” message?

Yes! You made it. You’ve signed the manifests and the setup.exe file, too. By the way, did you know that you can use this method to sign any other .exe or .dll file?
Wait! Don’t close the PowerShell window yet. Before you publish your application onto your website, let’s confirm that’s really tamper proof. All you have to do is double-check if your digital signature in C# (and timestamping) worked. If someone tries to change the file in any way, the digital signature’s hash value will also change.
Keep Calm and Verify If Your C# App Digital Signature Worked
- Want to know if the digital signature implementation in C# was 100% successful? Let’s check it out in one simple step. In PowerShell, enter the following:
signtool verify /pa “Path_to_Your_Setup.exe” and hit Enter.
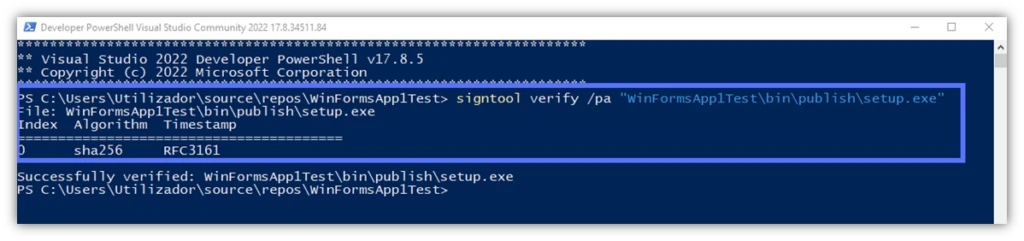
As you can see, the setup.exe has been successfully signed, and it’s now tamper-proof. We’ve used the secure SHA256 algorithm and added a timestamp using an RFC3161–compliant timestamp authority (TSA) server.
From now onward, every user installing your C# application will know that it:
- Has really been published and signed by you (i.e., authenticity),
- Is safe to install as it hasn’t been modified by a malicious third party since it was signed (i.e., integrity),
- Comes from a trusted vendor that has been vetted by a third-party CA (i.e., digital identity and trust), and
- Won’t mess up with their operating system (OS), as it follows the highest security standards (e.g., National Institute of Standards and Technology – NIST – whitepaper).
What more could you want to boost downloads and revenue?
What Happens When You Sign Your C# Application’s .Exe Using a Code Signing Certificate
Yup, signing your application’s manifests isn’t enough to eliminate those dreadful warnings. When the user installs a malware-free C# app (or any app) with only the manifests signed, here’s what happens:
- The system checks the app manifests’ signatures with one it generates to see if they match. The user’s client generates new hashes based on the downloaded software. It then compares them with the manifests’ original hashes.
- The installer (.exe) button is displayed. The user initiates the application installation by clicking on the .exe file.
- The client checks the application’s .exe. Once again, the client attempts to validate the application’s .exe to verify its signature. However, as the file isn’t signed at all, Microsoft Defender SmartScreen warns the user, and the installation stops.
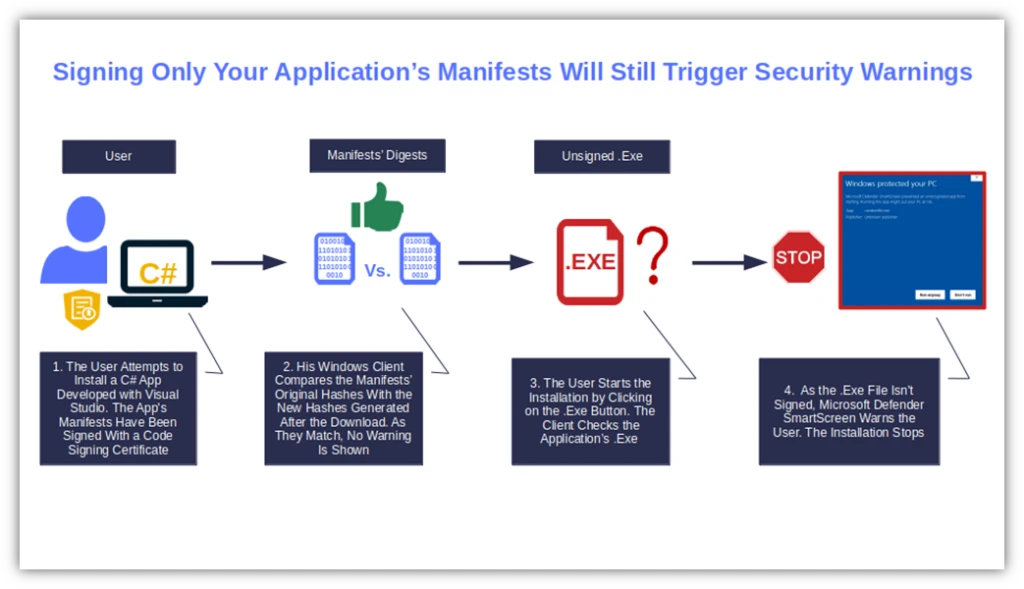
Got it? Basically if, for whatever reason, you haven’t signed your application’s .dll files or .exe file before publication, Windows OS will still consider the app as potentially dangerous (and, therefore, untrusted). As a result, the users won’t be able to install it.
Why You Should Always Sign Your C# Windows Apps
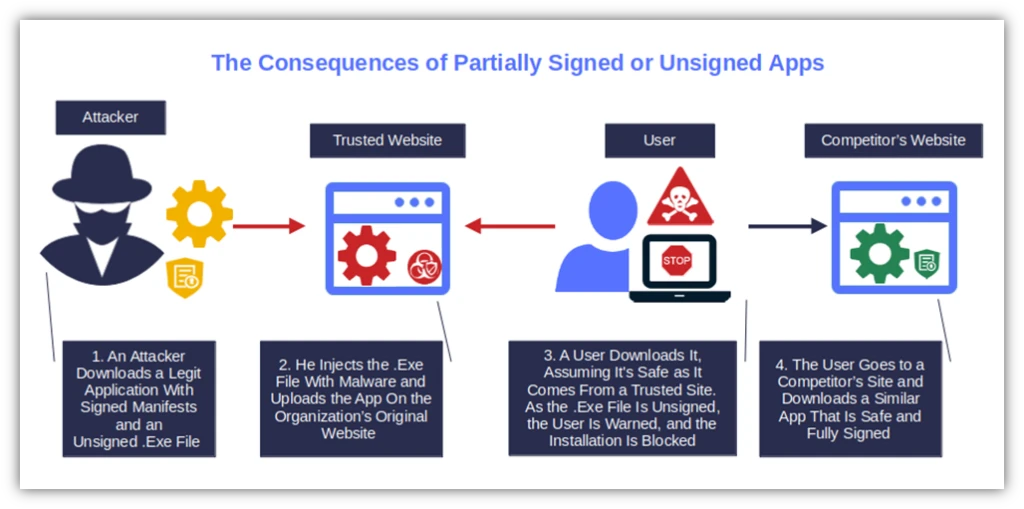
Unsigned critical files like .dll and executables can be easily tampered with or infected by malware. This can impact your supply chains and severely impact users’ perceptions about your company and its reputation.
This threat is magnified by the proliferation of generative AI (GenAI), which could potentially be used to create malware, and ransomware-as-a-service (RaaS). Major cybersecurity agencies have alerted organizations about these concerns. For instance, at the end of January 2024, the British National Cyber Security Centre (NCSC) published “The near-term impact of AI on the cyber threat.” The report predicts that AI will significantly impact the increase of cyberattacks and ransomware in the next two years.
On the other side of the ocean, the feelings aren’t very different. The Cybersecurity and Infrastructure Security Agency (CISA) warned that GenAI will likely amplify the already existing risks to the election infrastructure.
Needless to say, releasing unsigned software is bad for business. Above all, when consider that industry research shows that:
- 53% of customers interviewed by Ernst & Young are very concerned about data security/breaches (which could result from using unsigned software that’s been tampered with).
- 45% of consumers surveyed by Qualtrics who had a bad purchase experience in 2023 spread the word to friends and family.
- 71% of buyers clearly stated in a PwC questionnaire that they wouldn’t buy a thing from a company they don’t trust. (And, really, why should they trust you if you don’t give them peace of mind by digitally signing your applications to offer assurance of their authenticity?)
Signing Using an EV Code Signing Certificate Eliminates Warnings Altogether
Want to save the day and make things a tad more difficult for attackers? Fully sign your applications, no matter which programming language you use. As a heads up, don’t use a self-signed certificate for deployment. Even though you can still use it for testing, it isn’t secure enough for published applications. Microsoft SmartScreen will catch it at the installation. Thus, it’ll keep on considering your app unsigned.
While this is a good thing for customers (i.e., not allowing software perceived to be insecure to run on users’ devices), it isn’t good for your brand’s reputation and standing with users.
Want to take it a step further and make your code stand out from the crowd? Sign your .exe with an EV code signing certificate. Windows OSes will automatically trust your software. So long, warning windows!
Save Up to 27% on an Extended Validation Code Signing Certificate
Bolster trust in your brand and meet the Windows Hardware Developer Center requirement of having an EV code signing certificate. Certificates start at $250.00/year with a 3-year purchase.
Final Thoughts on How to Sign C# Applications in Visual Studio
AI-driven cyber attacks are becoming more prevalent than ever. Code signing certificates issued by a publicly trusted CA will help you proactively protect your applications and users against malicious tampering. (You never want to sign software in production with a self-signed certificate; that should only be used for testing.)
The process is simple and pretty straightforward:
- Purchase a code signing certificate from a trusted public certificate authority (CA).
- Set up your secure hardware token and its authentication client.
- Sign your app or executable using SignTool in Visual Studio.
You’ve learned how digital signature implementation in C# works. Don’t miss this opportunity to reclaim ownership of your codes while shielding your customers and organization from malware.
