

How to Sign a JAR File With a Trusted Certificate and a Secure Token
 (5 votes, average: 5.00 out of 5)
Since the industry’s security requirements for secure code signing certificate key storage have changed, the steps for signing a .jar file have changed along with them. But don’t fret — we’ve got your step-by-step guide for jar signing.
If you’re someone who creates Java .jar files on a regular basis, then you’re likely aware that signing a JAR file is considered a good practice. Even if it’s not done as often as it should be within the industry, digitally signing your files provides assurance to users and protects your code against tampering.
There are plenty of upsides to .jar signing — all of which we’re not going to get into right now. Instead, let’s focus on what you’re here to figure out: how to sign a .jar file with a trusted certificate.
Jar Signing Checklist: Before You Can Sign a Jar File, There Are a Few Things You First Must Do…
Before we get started, we’d like to take a moment to call out a few assumptions we’re making:
- You already purchased a code signing certificate from a certificate provider and have received your hardware security token in the mail. (Storing your key on a secure token is an industry requirement as of June 2023.) Technically, you can use a self-signed certificate if you’re working on your dev server, but if you’re moving to production, then you’ll want to sign it using a publicly trusted certificate.
- You downloaded, installed, and configured the client software provided by your certificate provider and used them to set up your secure USB token for use. We’ll use the SafeNet Authentication Client and DigiCert Hardware Certificate Installer for our examples in this article.
- You already downloaded and installed the Java Development Kit (JDK), which contains Jarsigner.
- You have administrative privileges set where you can access and make changes to the JDK bin folder on your device.
You’ve completed both of these steps? Excellent, then you can keep reading. If you haven’t, you’ll want to take a look at a few of our other resources before continuing any further:
Boost User Trust in Your JAR Files — Save Up to 21% on a Java Code Signing Certificate
Prove your Java apps and JAR files are legitimate by signing them with a Java code signing certificate. You can get one starting at $211.46/year.
- Compare Java Code Signing Certificates
- What to Know When Purchasing Your Next Code Signing Certificate
- How to Set Up Your New Code Signing Hardware Token (A Step-By-Step Guide)
- Oracle: Java Downloads
- Oracle: JDK Installation Guide
Step One: Set Up Your Token Config File and Save It in Your JDK Bin Folder
You’ll need to create a token configuration file that contains pertinent info and enables you to use your secure USB token for signing with Jarsigner.
Open Notepad++ and enter the following three rows of information:
name=eToken
library=c:\WINDOWS\system32\eTPKCS11.dll
slot=X
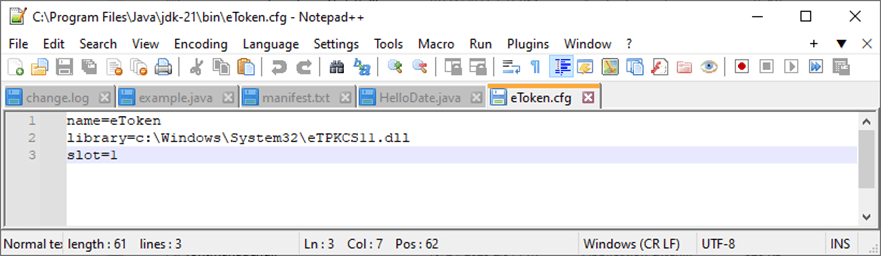
NOTE: Some certificate providers’ tokens use specific slot numbers. If you know your device’s slot number, replace the “X” with the number in the config file row above.
Running into the error “java.security.KeyStoreException: PKCS11 not found” when you tried this? Jump to our troubleshooting section to get an answer to this issue.
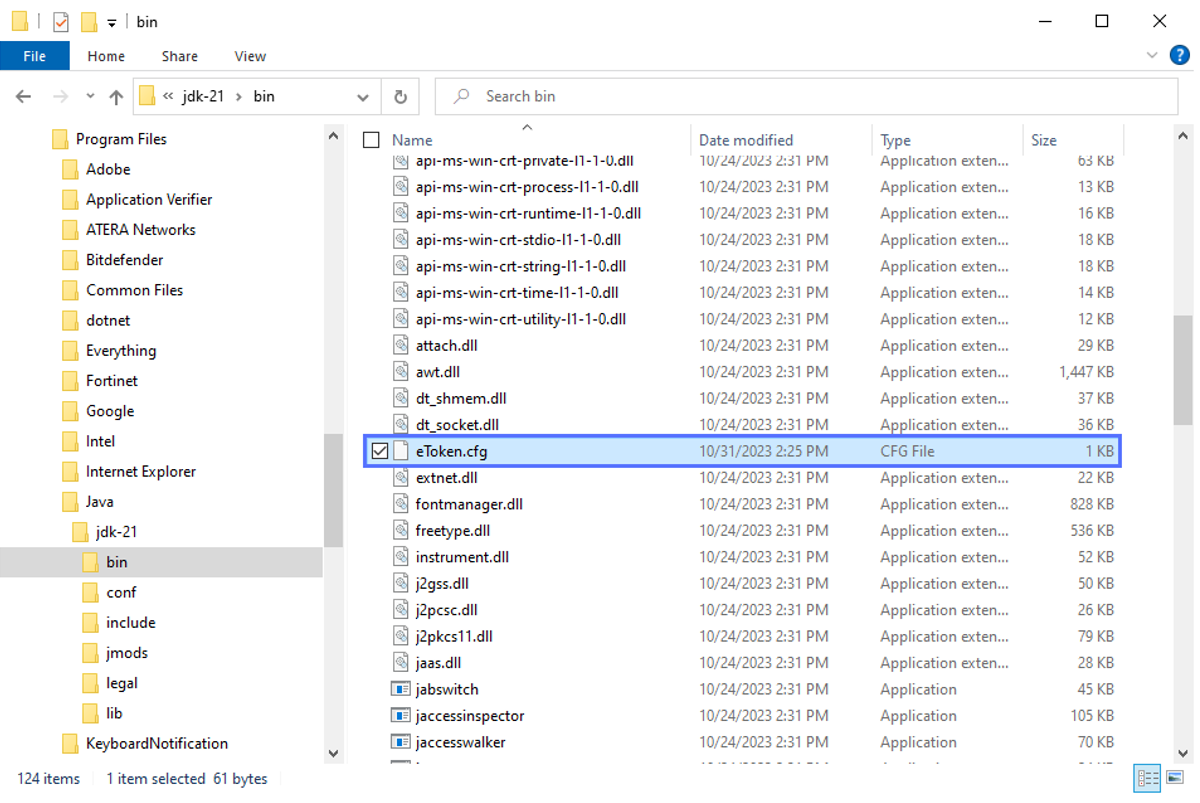
Otherwise, if everything is hunky-dory, move forward with saving the file as eToken.cfg and place it in your JDK bin folder (e.g., C:\Program Files\Java\jdk-21\bin).
Step Two: Find Your Private Key’s Alias
Because your cryptographic private key is required to be generated and securely stored on secure hardware, it means you can’t directly access the key file to take a peek at its alias. Instead, you’ll need to access that data using your command line. To do this, you’ll need to ensure your command line is set to the appropriate file path for the JDK bin folder.
- Option One: Open the command line using that file path directly. Navigate to the Java > JDK-[version] > bin folder and right-click on the bin folder. select “Open Windows Command Line Here” to open the command prompt window. Depending on your Windows operating system version, this option may not be available to you by default.
- Option Two: Open CMD and change the directory to the bin folder. You can do this by entering
cd C:\file_path_to_java_JDK_folder\Java\jdk-[version]\binEnter the following command into your command line:
keytool -list -keystore NONE -storetype PKCS11 -providerclass sun.security.pkcs11.SunPKCS11 -providerArg eToken.cfgNext, you’ll be prompted to use your keystore password. (NOTE: If you type something into the “Enter keystore password” line of the command prompt screen but don’t see anything displaying, don’t worry. It’s just a Windows security measure that stops the password from being seen.)
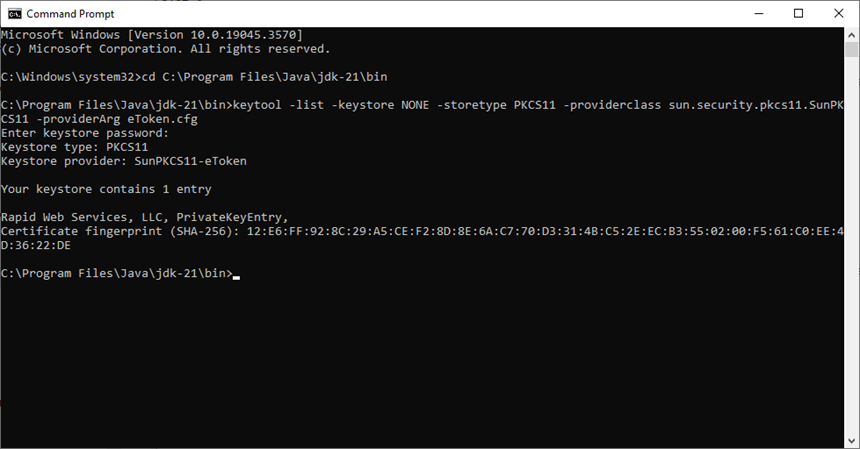
Once you have your cryptographic key’s alias, you can proceed to the next step, which is actually signing your .jar file using Jarsigner.
Step Three: 3 Ways to Sign Your Jar File Using Jarsigner Using a Secure Hardware Token
In this section, we’ll walk you through how to sign your .jar file using Jarsigner while using your secure hardware token. There are a couple of ways you can do this.
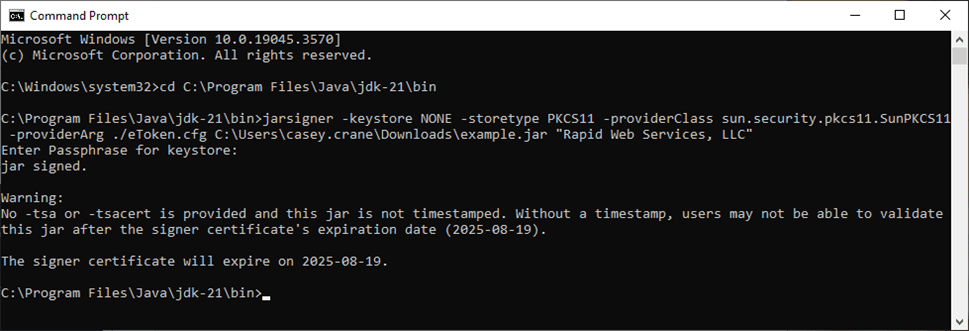
Option 1: Sign Your Code Without Adding a Time Stamp
For just a basic Java digital signature, enter the following command:
jarsigner -keystore NONE -storetype PKCS11 -providerClass sun.security.pkcs11.SunPKCS11 -providerArg ./eToken.cfg C:\Users\file_path_to_your_jar_file\example.jar "Alias Info"Here’s an example of how this looks using real file paths:

Here’s a quick look as well at the warning message you’ll see when you opt to digitally sign a .jar file using Jarsigner without adding a time stamp:
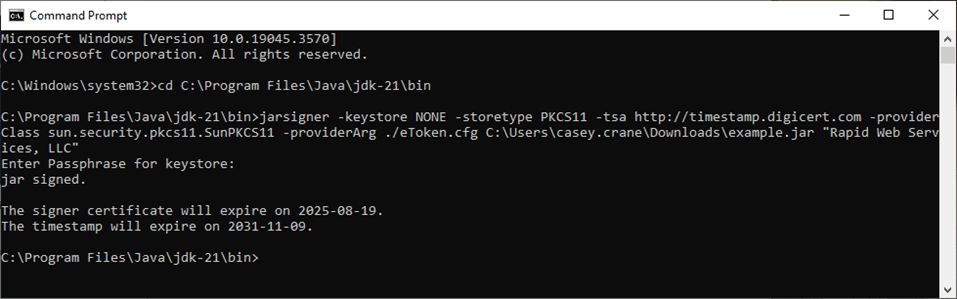
Option 2: Sign Your Code and Add a Time Stamp to Your .Jar File
If you want to digitally sign and time stamp it simultaneously, you can do that using the following string:
jarsigner -keystore NONE -storetype PKCS11 -tsa http://timestamp.digicert.com -providerClass sun.security.pkcs11.SunPKCS11 -providerArg ./eToken.cfg
C:\Users\file_path_to_your_jar_file\example.jar "Alias Info"
Here’s a quick look at how this looks in command line:

Here’s a complete look at what you’ll see in your command line:
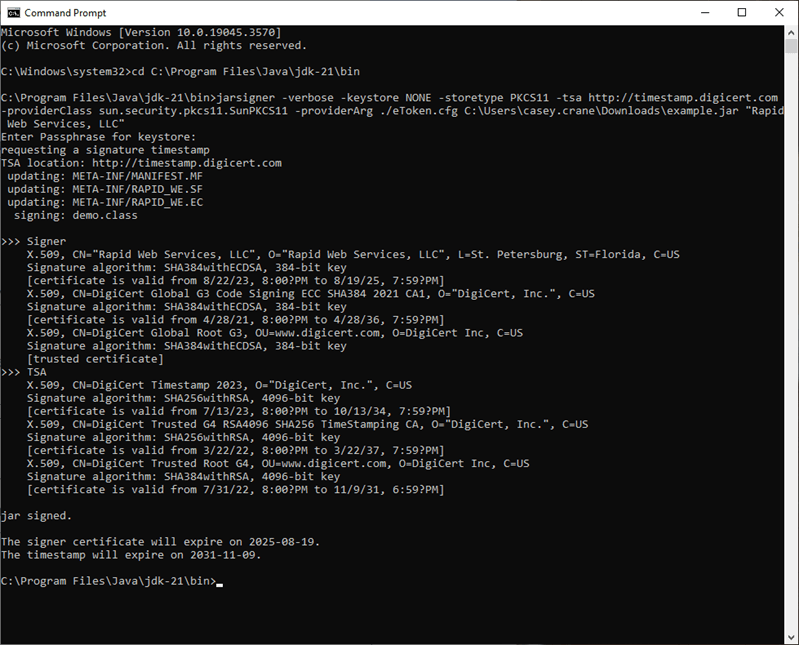
Option 3: Sign and Time Stamp Your .Jar File While Displaying Additional Information
Looking to see additional information about your Java .jar file digital signature and certificate-related information? Use this command instead:
jarsigner -verbose -keystore NONE -storetype PKCS11 -tsa http://timestamp.digicert.com -providerClass sun.security.pkcs11.SunPKCS11 -providerArg ./eToken.cfg C:\Users\file_path_to_your_jar_file\example.jar "Alias info"Here’s a quick peek at how this looks in command line:

This will display additional information about the Java files, signer, and the certificate chain of trust.
That’s it! You officially know how to sign a jar file using Jarsigner and your secure hardware token.
Troubleshooting: Running Into ‘PKCS11 Not Found’ Error? We’ve Got Your Answer
Does the following message look familiar?
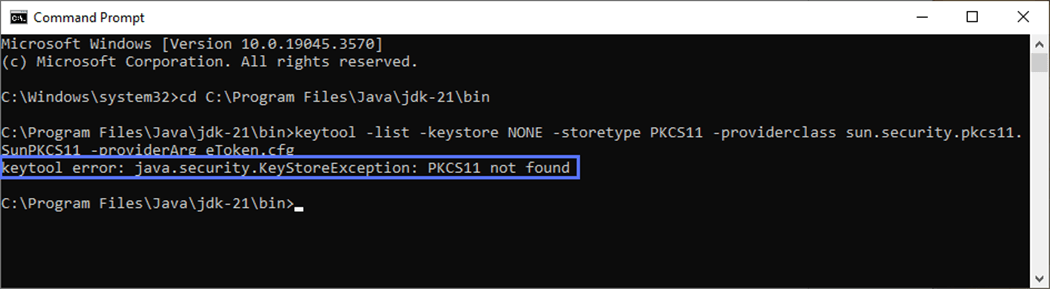
If you tried to get your key’s alias info and you wind up receiving the error message “java.security.KeyStoreException: PKCS11 not found,“ it usually means one of two things:
1. Your token or authentication client driver isn’t properly installed.
2. You need to change your slot number.
To remedy the first possible issue, check to ensure your authentication client drivers are properly installed.
If you discover that everything is good to go with the drivers, try changing your slot number info in the eToken.cfg file. Start with slot=0 and work your way up.
slot=0
slot=1
slot=2
slot=3
To make the changes to the .cfg file saved in your bin folder, go back to Step One (Set Up Your Token Config File and Save It in Your JDK Bin Folder). After you’ve made the change and the file is saved, try running the keytool command again.
Wrapping Up This Article on Jar Signing
We hope you’ve found this article on Java .jar signing useful and informative. Although the process has changed due to improvements to industry standards, being able to sign a jar file still isn’t an overly complicated process. And the good news is that you now have a step-by-step guide at your disposal that will walk you through the process.
To learn more about Java code signing, be sure to check back with our blog over the next several weeks.
