

5 Java Jarsigner Examples of File Signing and Verification Methods

 (6 votes, average: 5.00 out of 5)
60% of firms polled by JRebel plan to hire more Java developers in 2024. To build up your Java code signing expertise, explore five stellar Java Jarsigner examples that’ll help you magnify confidence in the security of your .jar files
Verizon’s freshly published 2024 Data Breach Investigation report shows ransomware ranks among the top threats for 92% of surveyed industries. Web applications are the second cybercriminal’s favorite ransomware vector.
In our Ultimate Java Jarsigner Guide, you learned that web applications seemingly comprise cybercriminals’ second favorite ransomware vector. You also discovered how adding a digital signature to your Java files helps protect your organization and clients against malware and shield your code from tampering.
We’ve put together five Java Jarsigner examples that’ll help you step up your software security game. Let’s learn a few Jarsigner signing and verifying tricks that may help you minimize the chances of attacks.
TL;DR: The Java Jarsigner Signing, Timestamping, and Verifying Process At-A-Glance
Let’s assume you’ve already:
- Purchased a code signing certificate with a USB token or hardware security module (HSM)-based physical or cloud solution.
- Set up your USB token or your cloud signing certificate and keys.
- Installed Jarsigner on your device. Don’t remember if it’s already installed? Follow these steps to verify whether you already have the Java Development Kit (JDK) on your device.
- Given access permission to your secure token to JDK and found your private key’s alias as explained in steps two and three of our quick guide.
- Created a Java .jar file that’s ready to sign.
Boost User Trust in Your JAR Files — Save Up to 21% on a Java Code Signing Certificate
Prove your Java apps and JAR files are legitimate by signing them with a Java code signing certificate. You can get one starting at $211.46/year.
Let’s quickly review the three standard steps to follow to sign and timestamp any Java ARchive file (JAR) (including .jar, .war, .ear, and .sar):
- Open a Command Prompt as administrator,
- Navigate to the Jarsigner folder,
- Sign and timestamp your file using the command below. Replace the parts in bold with the details related to your certificate authority (DigiCert in this example), .jar file, and private key.
jarsigner -keystore NONE -storetype PKCS11 -tsa http://timestamp.digicert.com -providerClass sun.security.pkcs11.SunPKCS11 -providerArg ./eToken.cfg C:\Users\file_path_to_your_jar_file\YourFile.jar "Private Key Alias Name"But you’re already familiar with these, right? So, let’s uncover five Java Jarsigner examples you may not know to show a few tricks that’ll supercharge your signing and signature verifying process.
5 Great Java Jarsigner Examples for Signing, Timestamping, and Verifying JAR Files
Java Jarsigner is a versatile tool that can do more than sign, timestamp code, and verify your files’ digital signatures. The following examples showcase how adding some Jarsigner options to the standard commands can further ensure the security of your organization, users, and code. It also contributes to fostering digital trust in your brand and products.
For all our Java Jarsigner examples, we’ll use a DigiCert Standard Code Signing Certificate, its secure USB token, and the SafeNet authentication client.

Save 27% – DigiCert Code Signing Certificate
Enhance your code’s integrity and boost user confidence through digital “shrink-wrapping” using a DigiCert Code Signing Certificate.
Jarsigner Example #1: View Extra Information During the Signing and Timestamping Process
Adding the -verbose option to the standard signing command will enable you to:
- Verify the certificate and timestamp’s expiration dates, and
- Confirm that the hashing algorithms used for the signature are secure against cyberattacks (i.e., meet the National Institute of Standards and Technology [NIST]’s requirements).
Want to try it out?
- Open the Windows Command Prompt as admin as demonstrated. Enter your administrator password when requested.
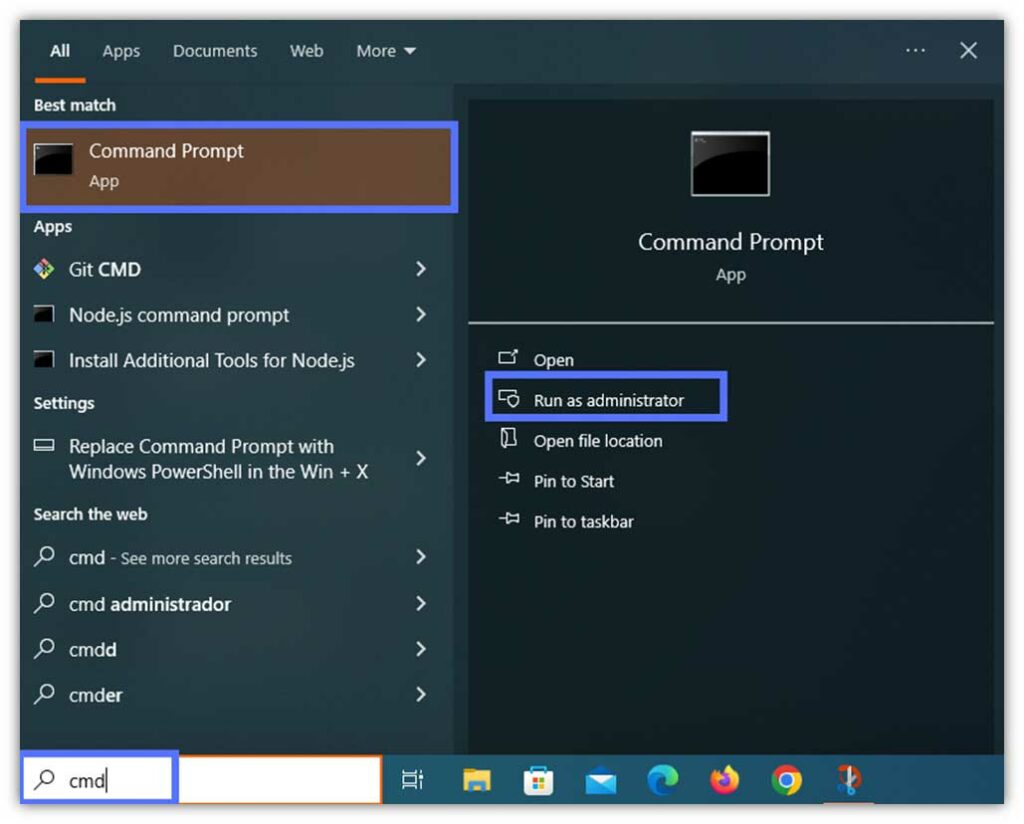
- Use the cd command to move to the JDK/JarSigner’s bin folder. Click Enter. Replace the part in bold with the JDK version installed on your machine.
cd C:\file_path_to_java_JDK_folder\Java\jdk-Your_Version\binHere is what it looks like for us:

- Copy and paste the command below and hit Enter. As usual, substitute the parts in bold with your details.
jarsigner -verbose -keystore NONE -storetype PKCS11 -tsa http://timestamp.digicert.com -providerClass sun.security.pkcs11.SunPKCS11 -providerArg ./eToken.cfg C:\Users\file_path_to_your_jar_file\YourFile.jar "Private Key Alias Name"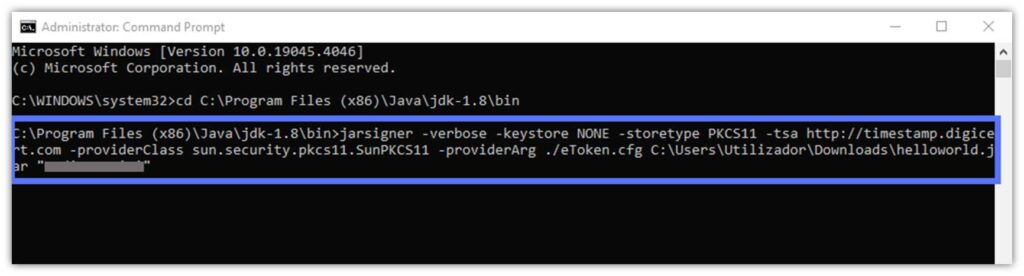
- When prompted: Enter your token password and hit Enter again.
Voila’. Here is our Java Jarsigner example using the -verbose option.
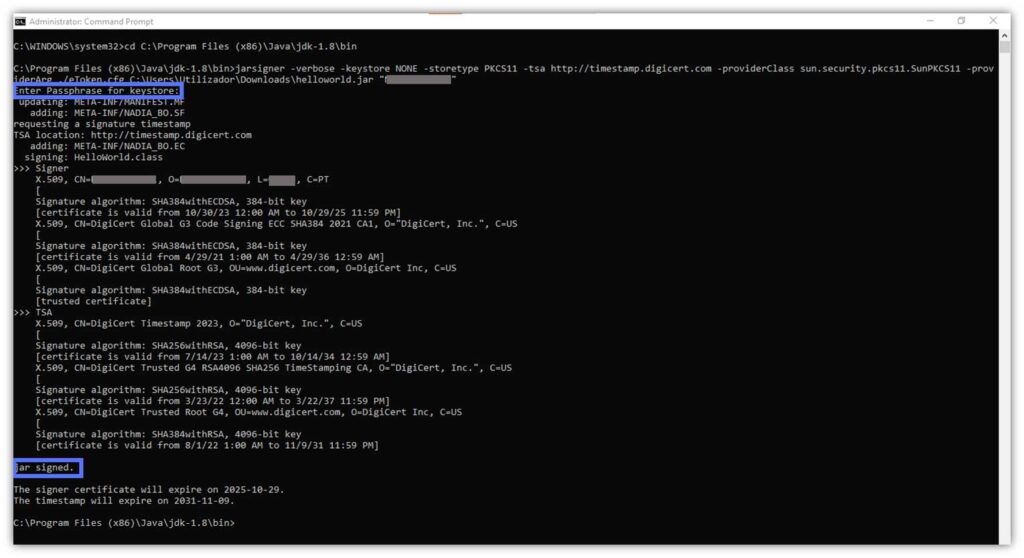
Jarsigner Example #2: Change the Default Names of the Signature Block and File
When you use the default signing command, the signature file (.SF) and the signature block (.EC, .RSA, or .DSA, depending on the algorithm used) are created and stored in the META-INF directory of the signed JAR file.
Their file names are automatically set using the first eight characters of the signer’s private key alias name. (NOTE: If you use a file name longer than eight characters, it will cut off the remaining letters, numbers, or symbols.)
But what if you want to give more appropriate names to those files? Add the option -sigfile followed by a designation of your choice to the signing script (as shown below in the following JarSigner example).
Tip: The new .SF and .EC/.RSA/.DSA tag can only be composed of upper case letters (A to Z), numerals (0-9), hyphen (-), and an underscore (_).
- Add the custom names to your files. In the cmd window, using the JDK/JarSigner’s bin folder file path, key in the following:
jarsigner -verbose -sigfile MyNewChosenName -keystore NONE -storetype PKCS11 -tsa http://timestamp.digicert.com -providerClass sun.security.pkcs11.SunPKCS11 -providerArg ./eToken.cfg C:\Users\file_path_to_your_jar_file\YourFile.jar "Private Key Alias Name"
- Type your password when prompted. Click on Enter to continue.
Done! Our .SF and .EC files now have new, customized names (as shown below).
Jarsigner Example #3: Generate a Signed .Jar File Without Overwriting the Original Unsigned File
Unsigned files are dangerous and can be easily modified without anyone noticing it. However, sometimes you might need two separate .jar files:
- The original unsigned .jar file.
- A copy of the .jar file, digitally signed and labeled with a different name.
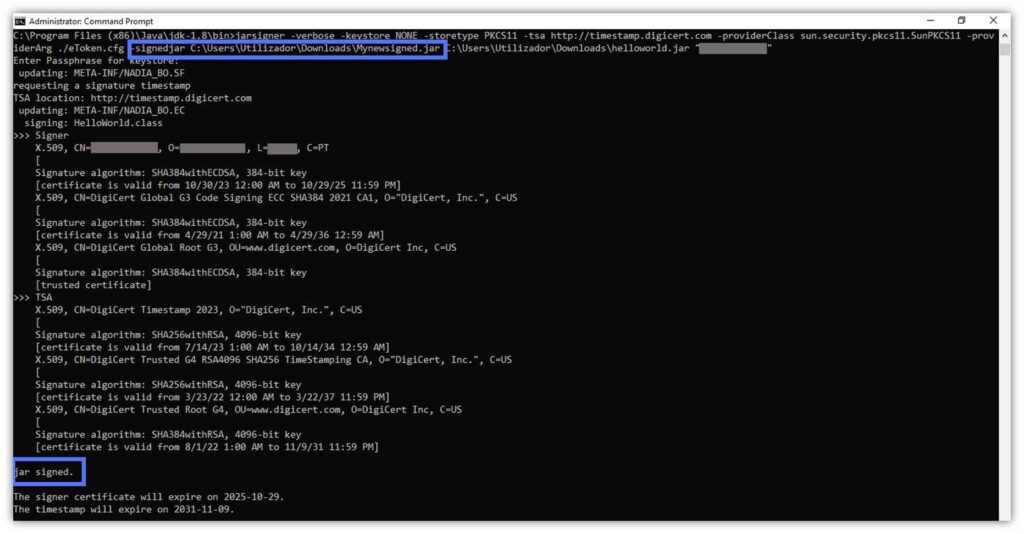
The -signedjar option, followed by a distinctive .jar file name and used in conjunction with the -jarsigner command, will create a new signed .jar file without overwriting the original .jar. Cool, huh?
Here’s how you can incorporate the -signedjar option into the standard signing command:
jarsigner -verbose -keystore NONE -storetype PKCS11 -tsa http://timestamp.digicert.com -providerClass sun.security.pkcs11.SunPKCS11 -providerArg ./eToken.cfg -signedjar C:\Users\file_path_to_your_jar_file\YourNewFileName.jar C:\Users\file_path_to_your_jar_file\YourFile.jar "Private Key Alias Name"
When using a DigiCert secure hardware token to store your cryptographic private key, you’ll be prompted to enter your SafeNet authentication client password. After doing this, you’ll see something akin to the resulting message we received. In this Java Jarsigner example, we’ve chosen to call the new .jar file “Mynewsigned.jar.”
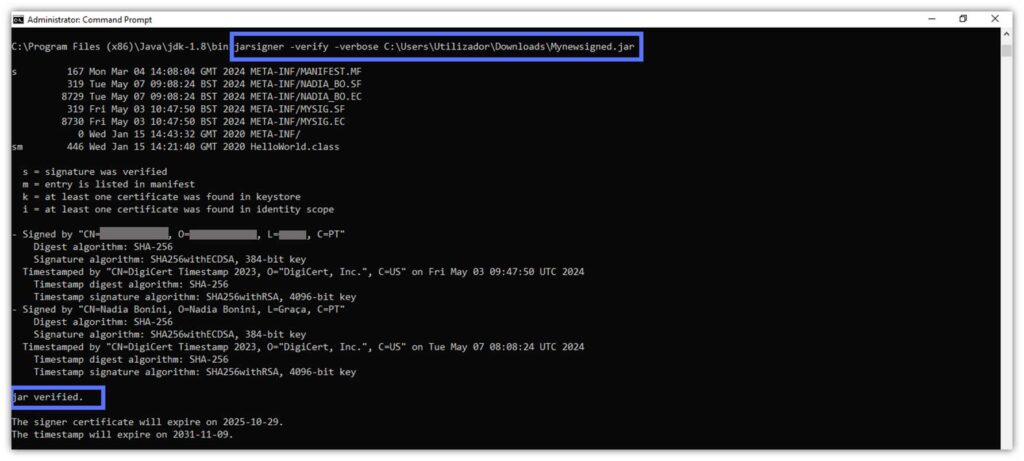
Did the command really produce the Mynewsigned.jar file? There are two ways to verify that the new (secondary) file has been created.
Option #1: Use the -Verify Command
Let’s see if we can verify its signature using the -verify command. Absolutely! From what we can observe from our Jarsigner example underneath, it sure did!
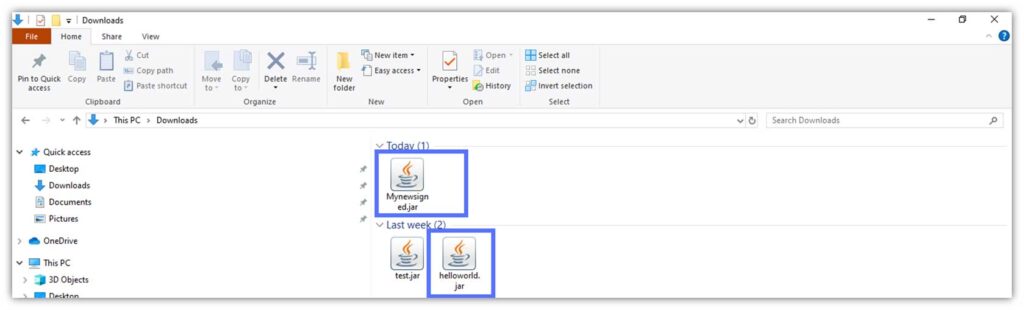
Finally, let’s confirm beyond a shadow of a doubt that your new .jar file was hatched using a simpler method.
Option #2: Check the Folder for the New File Using Windows File Explorer
- In Windows, open File Explorer by clicking the icon on the taskbar or in the Start menu.

- Navigate to the folder where you saved your original .jar file.
Can you see both the original .jar file and its double, as shown below? If so, then you’ve nailed it!
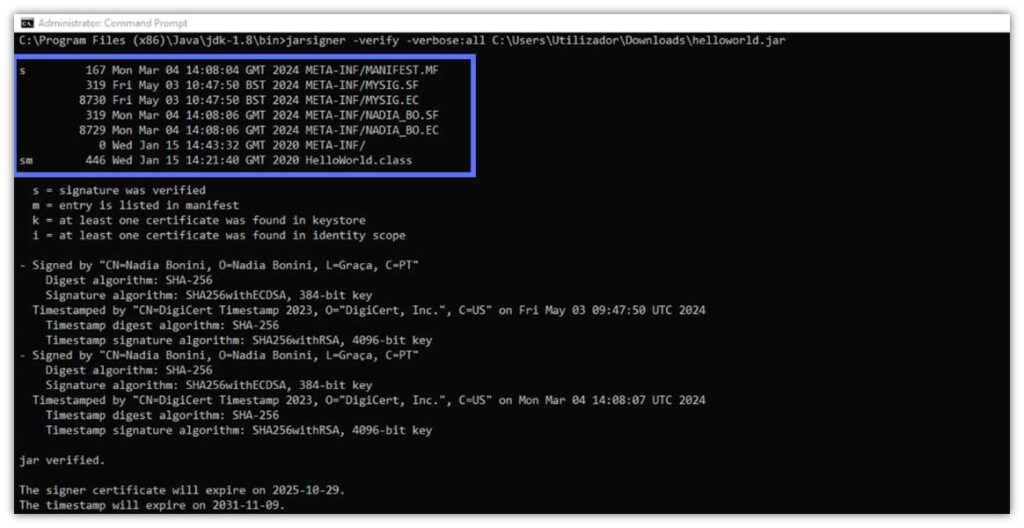
Jarsigner Example #4: Get a List of the .Jar Files and Verify Which Ones Are Signed
Want to see exactly which files are signed and which ones aren’t? The -verbose:all sub-option added to the -verify command will show you the whole lot. Jarsigner will clearly label the signed files with the letter “s” and validate their signature and timestamp.
jarsigner -verify -verbose:all Your_File_Path
Image caption: The screenshot shows our Jarsigner example.
The output will display a complete list of the files in the .jar archive with flags that differentiate the signed and verified files with “s” next to them. In the following Java Jarsigner example screenshot, you’ll see that we verified the following signatures:
- META-INF/MANIFEST.MF. The verification is indicated by “s”.
- HelloWorld.class file included in the manifest. Marked by the letters “s” and “m” (the latter of which stands for “manifest”).
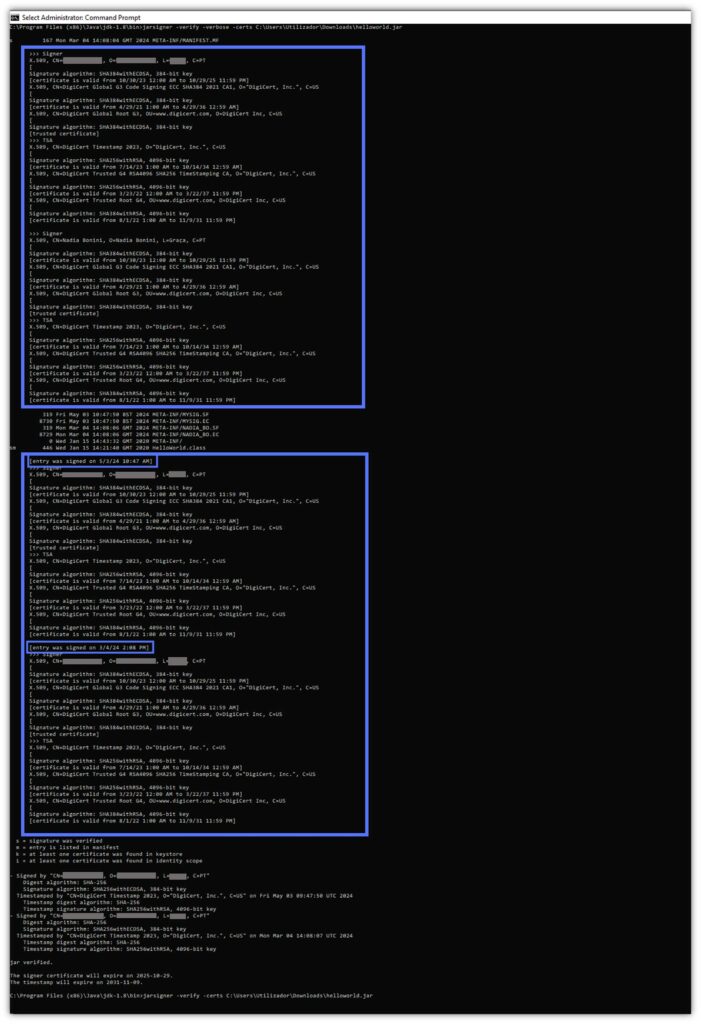
Jarsigner Example #5: Check Whether the Digital Signature Can be Trusted
OK. Now we know how to check a .jar file signature, its validity, and the validity of the code signing certificate that was used to create the digital signature. But how do you know whether the certificate is from a trusted source? You don’t — at least for now.
Once again, the -verbose option comes to the rescue. When paired with the -verify command and the -certs option, it’ll:
- Show you the code signing certificate’s complete chain of trust.
- Assert the certificate’s type saved in the signature block file and the signer’s name.
- Display the signer’s alias name.
Has the file has been signed more than once and by different people? This option will list the information about them, too.
jarsigner -verify -verbose -certs Your_File_Path
There you have it. It’ll give you peace of mind. The signature can be trusted.
It’s your turn to harness the power of Java Jarsigner. Put into practice what you’ve just learned from these Jarsigner examples and leave no stone unturned the next time you sign a Java file or verify its signature.
Save Up to 21% on a Java Code Signing Certificate
Digitally sign unlimited JAR files and applications for as little as $211.46/year.
Wrapping Up These Java Jarsigner Examples for File Signing & Verification
A trusted Java code signing certificate will improve your brand’s reputation and transform pesky pop-up warnings into positive messages. However, elevating the way you digitally sign or verify your Java files will strengthen your security posture and further reassure your customers that your code can be trusted.
Furthermore, knowing how to do the following will give you and your customers peace of mind by knowing that your Java apps and their software supply chains are more secure:
- Verify that the signature and timestamping process have been completed correctly,
- Check additional code signing certificate information, and
- Validate the level of trust of a digital signature.
Reduce the chances of malware infections and unauthorized Java code modifications in your files. Put to good use the Java Jarsigner examples we’ve just shown you to ensure your JAR files are as secure as possible.
