

9 PowerShell Code Signing Best Practices for Signing Your Script
 (1 votes, average: 5.00 out of 5)
74% of security incidents Sophos analyzed in 2021 were based on PowerShell. Don’t skimp on security — arm yourself with information! Here are nine easy ways to protect your PowerShell scripts against cyber threats to make your IT system and data safer now!
PowerShell can be a very powerful tool for system administrators and developers alike. It helps you automate monotonous and time-consuming tasks and deliver better quality software faster. Last but not least, by code signing scripts, you can further integrate security into your organization’s development life cycle (i.e., DevSecOps).
But nothing is ever secure enough in cybersecurity. In fact, with 45% of attacks exploiting PowerShell scripts, code signing alone may just be not enough anymore. (Although it’s still better than not signing it at all!) This is where implementing PowerShell code signing best practices can really help.
So far, in our series of three articles dedicated to PowerShell you’ve learned:
Now, in this last article of the series, we’ll show you how to take the security of your scripts to the next level. Do you want to know how? Discover nine PowerShell script signing best practices that’ll provide your scripts with ultimate security in these turbulent times.
9 PowerShell Code Signing Best Practices
Did you know that the number of data breaches recorded by the Identity Theft Resource Center (ITRC) saw a 68% increase in 2021 compared to the previous year? Nowadays, any organization can fall victim to a cyber attack. It doesn’t matter whether you’re big or small, or if you have a full-fledged cyber security team — any organization can be a target for sensitive data-hungry hackers.
Don’t be discouraged, though. Implementing the following PowerShell script signing best practices will help you make a difference. Get ready to transform your day! Move from a major security breach that could cost your business money and reputation to “just another day at the office.” Now, enough with the theory and numbers. Let’s get down to business!
| Best Practice | Example |
|---|---|
| 1. Ensure You Have Installed the Latest PowerShell Version | Your version of PowerShell isn’t the latest? Take a few minutes to update it. |
| 2. Timestamp Your Scripts | Add the following at the end of your Set-AuthenticodeSignature command:
-TimeStampServer https://TIMESTAMP_SERVER |
| 3. Use a Trusted Code Signing Certificate | You can choose between:
|
| 4. Check Your Script Before Signing It |
|
| 5. Use a Hardware Security Module (HSM) |
|
| 6. Implement Signing Keys Policies |
|
| 7. Don’t Sign All Your Scripts With the Same Key |
|
| 8. Make Your Script Signing System Flexible |
|
| 9. Log Your Script Signing Actions |
|
Save Up to 27% on a Standard Code Signing Certificate
Assert your organization’s verified digital identity to increase trust in your software and updates. Boost your sales and download rates for as little as $195.00/year (with a 3-year certificate).
1. Ensure You Have Installed the Latest PowerShell Version
Ensuring that your software is up to date may seem obvious, but apparently, this isn’t always the case. The latest Ivanti report shows a 29% growth of unpatched vulnerabilities that caused a ransomware attack in 2021. Considering that Ivanti also reports that 91% of ransomware vulnerabilities remain unpatched, leaving a large attack surface for cybercriminals to target, this shows why bad guys love exploiting old vulnerabilities as much as the new ones.
Do you have the latest version of PowerShell installed on your machine? If you don’t, you should download it as soon as possible. You don’t want to miss the two PowerShell security updates released by Microsoft in the first eight months of 2022.
Not sure how to check the version of PowerShell installed on your device? It’s easy:
- Open your PowerShell by clicking on Start.
- Search for the app by typing powershell in the search box.
- Select Windows PowerShell App.
- Click on Open.
- Type the following command: $PSVersionTable.PSVersion
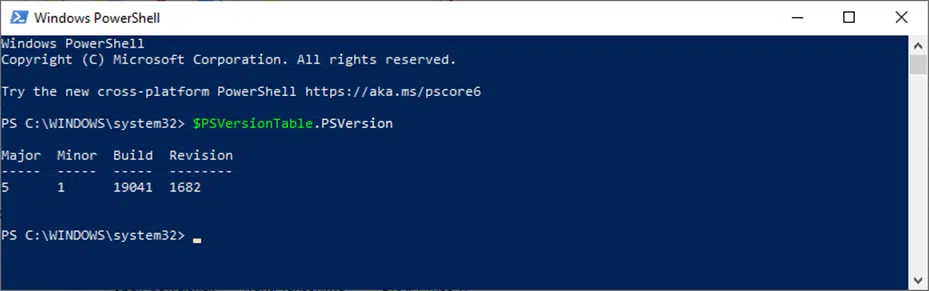
Your version of PowerShell isn’t the latest? Take a few minutes to update it.
2. Timestamp Your Scripts
Code signing certificates are a bit like dark chocolate: they expire after a set amount of time (in this case, a maximum of three years). However, just like how you can still eat dark chocolate after it’s expired, there’s also a way to extend the life of your certificate in one regard. How? By adding a timestamp when you first sign your script.
Timestamping your digital signature ensures that your users can still run it without getting a warning. This is because a timestamp adds the exact date and time when a digital signature was applied using a CA-issued (and, therefore, verifiable) code signing certificate.
Do you want to give it a try? Next time you sign your script with PowerShell, add the following at the end of your Set-AuthenticodeSignature command:
-TimeStampServer https://TIMESTAMP_SERVER
This is what it’ll look like with an example where the stand-in example text is replaced with real information:
Set-AuthenticodeSignature -FilePath C:\PS\powershell_script.ps1 -Certificate $cert -TimeStampServer https://timestamp.digicert.com
Make sure you replace:
- C:\PS\powershell_script.ps1 with the path to your script, and
- https://TIMESTAMP_SERVER with your trusted certificate provider (e.g., https://timestamp.digicert.com). You’ll find it on its website.

Check to see whether your signing and timestamping were successful:
- Right-click on the script’s folder.
- Select Properties.
- Click the Digital signatures tab.
If it worked, the date and time of your signature should be visible under the Timestamp column, as shown in the graphic on the right.
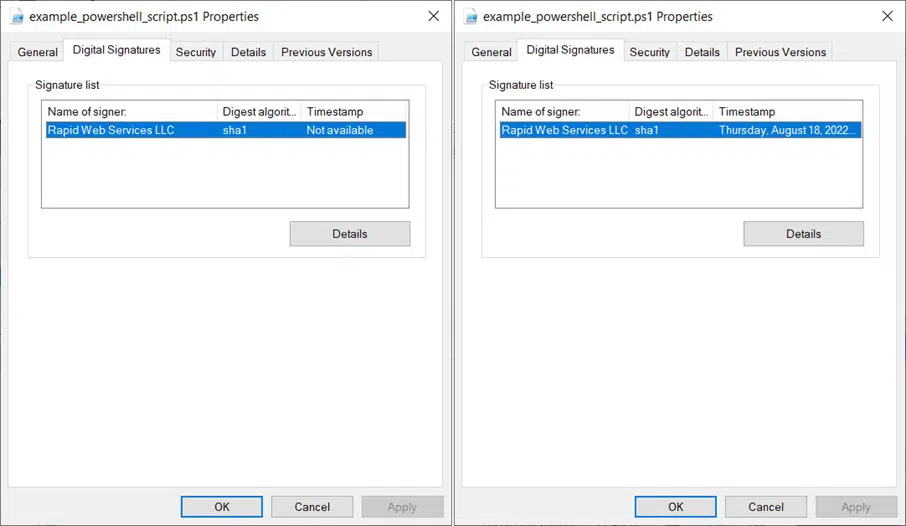
Cool, huh? Don’t forget, though, that while timestamping will preserve the integrity of your signature after your certificate expires, you’ll still lose something. Yup! Like expired dark chocolate loses flavor, an expired code signing certificate loses the possibility to sign new scripts, even with timestamping.
3. Use a Trusted Code Signing Certificate
In addition to costs, there’s another fundamental difference between self-signed code signing certificates and those issued by a trusted certificate authority (CA): the level of security and identity they offer.
Let’s check out the difference between a self-signed code signing certificate and a code signing certificate issued by a publicly trusted certificate authority (CA). First up is an example of a publicly trusted code signing certificate:
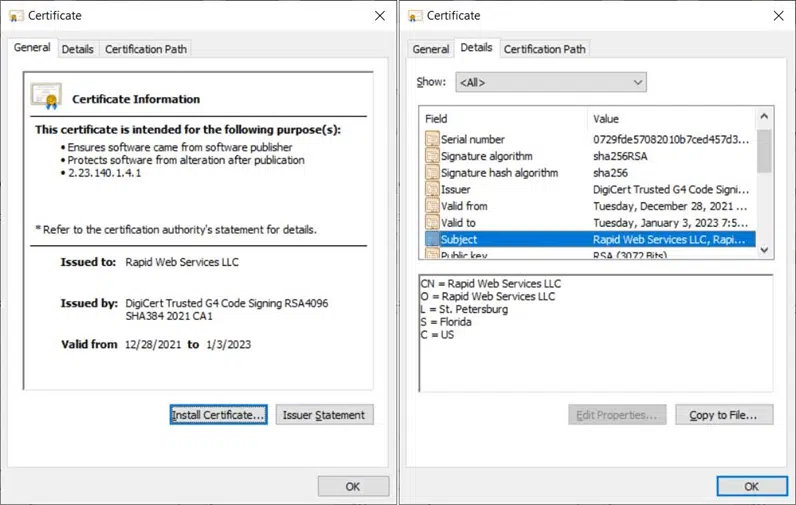
Now, let’s compare this to the usage information and subject details of a self-signed code signing certificate:
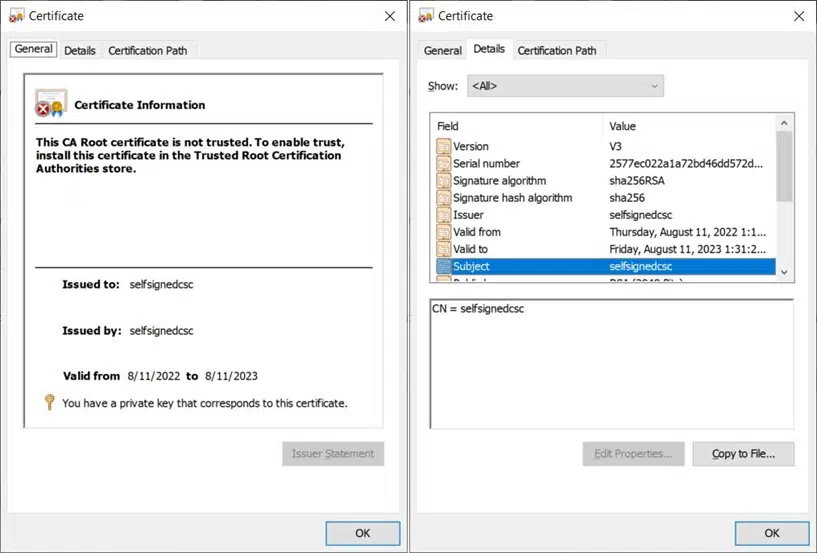
Which one would you trust more? I guess we both know the answer.
Self-signed can be an acceptable solution for internal testing environments as they don’t require high-security standards. However, they’re absolutely a no-go for scripts that’ll be available to the public. Why? Because, unlike a self-signed certificate, a CA-issued certificate:
- Is issued by a trusted third party. Both standard validation (i.e., organization validation – OV) and extended validation (EV) code signing certificates are issued only after validation of the identity of the organization that requested it. In the case of EV certificates, an additional rigorous background check following CA and Microsoft guidelines is also performed.
- Meets the latest security standard. OV and EV code signing certificates are issued following the latest industry guidelines and best practices promoted by the CA/Browser Forum. This ensures that their code signing certificates are always using the strongest algorithms and latest hashing techniques available.
- Is secure as your private key is stored on a hardware token. Until now, only EV certificates were delivered with the private key stored on a separate hardware token (e.g., a FIPS 140-2 compliant USB stick). Starting Nov. 15, 2022, OV certificates will also require the use of the same secure hardware technology to store cryptographic keys as EV code signing certificates. This will significantly decrease the chance of your private key being compromised by a malicious third party, even if you can’t afford to splash out on an EV certificate.
- Can be revoked in case of a compromised key. All certificates issued by a trusted CA can be easily identified and revoked by them in case of a breach. Can you imagine looking for the right certificate to revoke in an organization where literally everyone can issue a self-signed certificate? It’ll take years. And by the time you find it (if you find it), the damage will be already done.
Bottom line, do you want to secure your scripts? Do yourself and your organization a favor: get an OV or EV code signing certificate. Yes, it’ll cost you some money up front, but this investment in security will be money well spent as it may save you from a costly supply chain attack or data breach later on.
4. Check Your Script Before Signing It
Errors, unauthorized changes — anything could happen to your script before it’s ready to be released. How can you avoid all this?
Analyze Your Script for Errors
Making mistakes when writing a script, no matter what language you’re using, it’s easy. Forget a comma there, type a word wrong here or simply name the variable you called $a as $A and you’re done. Instead of spending hours looking for the error or just signing your script without thoroughly checking it, make sure you scan it with PowerShell Script Analyzer (PSScriptAnalyzer). It’s a static code checker included in the Windows Management Framework. Once installed, you can:
Go through the common names of the available rules using the command
Get-ScriptAnalyzerRule | Sort-Object RuleName | Select-Object CommonName

- Check your script for mistakes by running the command below.
Invoke-ScriptAnalyzer .\SCRIPT_PATH

Don’t forget to replace SCRIPT_PATH with the path to your script.
Did you receive no output after running the command?? That’s great! It means that your script syntax is perfect!
Scan Your Script for Suspicious Issues
Do you want to sign a script you wrote a while ago or have you just finished writing it after spending weeks working on it? After checking it for syntax mistakes, ensure you also scan it for obfuscated scripts (i.e., malicious scripts that are very difficult to understand) or other modifications that could harm any device that runs it. How?
Use Windows Defender:
- Enable Windows Defender on your device.
- Paste your script into Notepad.
- Click Save. If the script contains any malicious code, Windows Defender will immediately alert you with a pop-up.
Or, if you have Windows 10, use Windows Antimalware Scan Interface (AMSI):
- Run the script in PowerShell. AMSI will automatically detect any malicious code and display a red warning directly in your PowerShell window.
Remember! Your reputation and the security of your organization are on the line. You don’t want to be the one that brought your organization (or any customers’ organizations) down by signing a script that was modified without your knowledge.
Do you want to know more about obfuscation detection? Black Hat made a great video about it:
Get Your Script Validated by Peers
Four eyes (or more) can always see better than two. Before you release your script, ask at least one colleague to review and validate it. Do you have a PowerShell expert on your team? Ask him or her to go through your script and confirm that it’s ready to go. Make sure you include comments in your script so that every reviewer will be able to understand what it’s supposed to do.
5. Use a Hardware Security Module (HSM) or Token to Keep Your Cryptographic Keys Secure
Starting Nov.15, 2022, implementing this best practice will be even easier as OV code signing certificates will also be delivered via a secure hardware token, or you’ll have to store your keys on an approved HSM. The idea here is that using these devices will keep your cryptographic keys more away from prying eyes.
If you own an EV certificate, you should already be familiar with secure cryptographic hardware devices as one (usually in the form of a USB hardware security token) has been sent to you by the CA when you purchased the certificate. But these aren’t the only devices you can use to protect your keys. While hardware security tokens are intended for individual use, other crypto hardware, such as HSMs, are intended for use by authorized employees across your organization.
For example, an HSM as described by the National Institute of Standards and Technology (NIST), is a tamper-resistant and FIPS-validated device specifically designed to protect, process, and manage cryptographic keys. It allows the usage of keys without requiring employees to have direct access to them. Individual developers can also store their keys on hardware security tokens or trusted security modules on their individual devices.
Are some of your existing code signing certificate private keys stored elsewhere (e.g., on a computer)? Ensure you save them on an HSM. Once done, don’t forget to delete them from the computer they were originally stored on.
6. Implement Signing Keys Policies
Now that your private keys are safe and sound, it’s time to double up on security and implement some strict signing keys policies. Which ones? Let’s find it out.
Regulate Access Control
Think about it: does everyone in your organization really need to have access to all code signing keys at all times? Most definitely not. Therefore, make sure that you have access permissions and a policy that clearly explains:
- Which users can have access to which keys, and
- When each user is allowed to access the keys to sign scripts.
This will minimize the risks of unauthorized access and script manipulation.
Require and Implement Strong Authentication
Every person who needs to digitally sign a script should use a strong authentication method (e.g., multi-factor authentication). But that’s not enough. To ensure that your scripts will be signed only using a device approved by your organization (e.g., a company laptop), you should add a policy requiring authentication of each device used to sign the code.
Why? This will make the life of an attacker more complicated as he’ll also have to hack one of your organization’s devices before being able to do anything with your script. Are you thinking of authenticating your machines via IP addresses? That isn’t sufficiently secure, either. Use a trusted platform module (.e.g., a microcontroller used to authenticate devices) instead.
Publish Your Checksums
A checksum is a unique value (i.e., a short string of alphanumeric characters) that can be used to check whether the original script has been altered. Adding a policy that requires your developers to publish your script’s checksums will give you the possibility for your users to verify the hashes and see whether they match.
Do you want an example? Check out any VMware’s product download page. You’ll see that it always includes the product’s checksum.
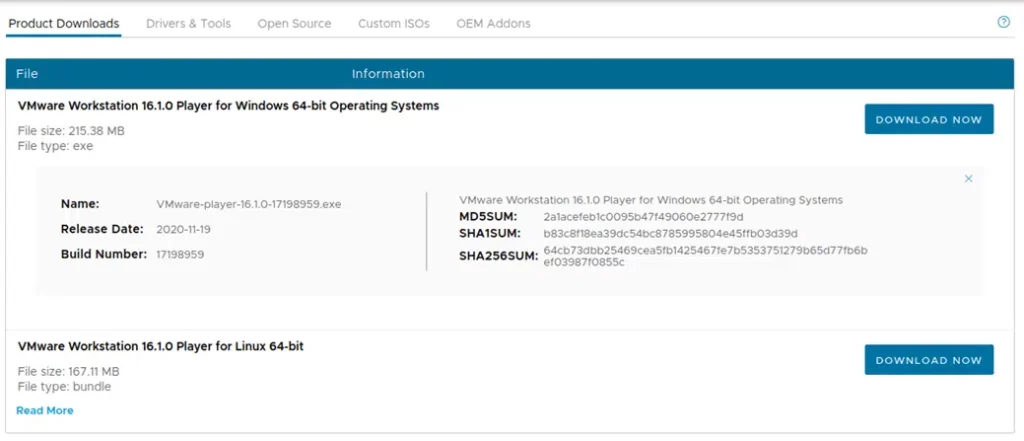
By adding a checksum, your users or customers will have a way to verify whether the file they downloaded is authentic and unaltered or has been tampered with. How? By comparing the two checksums using:
- The checksum tool that’s available on the command prompt app,
- A third-party checksum calculator (e.g., Microsoft’s File Checksum Integrity Verifier or GtkHash), or
- A simple bash command (if they are using Linux).
Do you want to know, for example, how a user can check an MD5 checksum using PowerShell? Discover how easy it is in our article “How to Check an MD5 Checksum.”
Have a Specific Script Signing Policy for Each Key
Do you have more than one signing key? Not all signing keys should be used for the same scripts and by the same people (more on this in a moment). Adding a specific policy to each different key, dictating how it should be used, will help you minimize errors and vulnerabilities. This will help minimize the risk of software supply chain attacks (wherein a hacker gets access to the code signing infrastructure and sign malware without needing to steal or directly access your keys).
Each policy should include guidance, such as:
- Which algorithms the code signing key should use
- Which approval process(es) to follow before signing the script (e.g., other team members, a team leader).
- What kind of authentication is required to use the key
- Which devices can be used to sign the script
- Who will have to be notified when the script is signed
Does your organization have employees living in other countries? You may also add the list of countries approved to use the key. These are just a few examples of policy specifications, of course. Make sure you pick or add regulations depending on your situation and needs.
Do you want more examples of key signing policies? Don’t miss NIST’s cybersecurity white paper on Security Considerations for Code Signing.
7. Don’t Sign All Your Scripts With the Same Key
While using just one key for all your needs is cheaper and easier to manage, above all when time is tight and you can’t afford to waste even one minute looking for the right key, it’s often not a good idea. You’ll likely end up paying a much higher price than spending only a few extra minutes (and bucks) to get the right key.
So, how do you avoid key compromise-related issues?
Use a Dedicated Key For Each Software Application
It’s much safer to use the same key to sign one piece of software and its subsequent updates/patches, and another key to sign a different application and its subsequent updates and/or patches. Why?
- A compromised certificate offers no trust. Trust is everything when it comes to digital identity and security. When your key becomes compromised, it breaks that “chain of trust” that’s at the heart of public key infrastructure.
- A lost or stolen key will force the issuing CA to revoke your existing certificate. Everybody loses things, it just happens. But you’re done if you lose the only key you used to sign all your scripts (or, worse, it gets stolen). You’ll have to go through a certificate revocation by the issuing CA. But this isn’t an instant process; there’s a period of delay in which anyone who has access to your key can use it to sign malicious software that will be trusted.
- A revoked certificate will impact all your scripts. Your code signing certificate has been hacked? The CA who issued it can revoke it, thus limiting the damage. Did you use the same code signing certificate and keys to sign all your scripts? Too bad. Once the certificate is revoked, you’ll have to re-sign all your scripts again because the digital signatures will no longer be valid (unless you applied a timestamp to your signatures when you signed the scripts).
Rotate Your Keys to Give Hackers Less Time to Crack Them
Defining for your keys what the National Institute of Standard and Technology (NIST) calls a “cryptoperiod” will help you limit the time an attacker has to compromise your key. The longer each key is active, the more time will have an attacker to try to breach it. Even if there seems to be some kind of disagreement within the industry about rotation (e.g., whether to do it, and how frequently) NIST has issued some useful recommendations about it.
The maximum cryptoperiod of a certificate’s private signature key should:
- Last between one and three years.
- Be shorter than its public key’s cryptoperiod (ideally).
8. Make Your Code Signing System Flexible
“Things get damaged, things get broken,” says Depeche Mode’s song “Precious.” Algorithms are a bit like that, too. And once they’re broken by cybercriminals or deprecated, they have to be replaced with stronger ones. (Think of what happened to the SHA-1 algorithm a few years back.) This requires some flexibility and quick response capabilities.
Therefore, to make your code signing system as flexible (and secure) as possible, make sure:
- The algorithm used to sign your scripts is always the most secure in the industry.
- Your code signing system is flexible enough to be updated with new algorithms different from the previous ones.
- Your code signing system is easy to scale and modify based on new requirements or needs.
9. Log Your Script Signing Actions
If you have worked in cybersecurity long enough, you’ll know that logs and monitoring tools are your best friends. They’re incredible resources for efficiently addressing or preventing (e.g., nearly real-time event log monitoring) security incidents. So, what PowerShell code signing best practices can you implement to do that?
- Monitor script signing. Do you remember all the key signing policies we listed under point six? Monitor everything related that point (e.g., accesses, script signatures) with tools like Kibana, Grafana, or Tableau and you’ll be able to identify suspicious behavior or any anomalous activity in minutes.
- Log key usage. The same tools can be also used to meticulously log and store the details related to all code signing keys usage (e.g., who used them, when and with which device). This will enable you to have enough information to identify potential unauthorized uses even if the incident occurred a few days before.
- Audit your logs. Regularly auditing your logs will help you keep the signing process under control, identify potential threats and address them before they become critical.
This is our list of the best nine PowerShell code signing best practices that we believe every IT administrator should know and use. Does implementing all of them sound, though? Maybe, but it’ll be well worth it when you consider all the time and headaches you’ll save yourself in the future.
Are you still not sure about it? Okay, let’s see if we can find a reason good enough to prove to you how important PowerShell script signing best practices can be for an organization…
Why Should I Implement PowerShell Script Best Practices Within My Organization?
I know what you’re thinking: Code signing may already be viewed as a burden on IT administrators and development teams. And you’re afraid that adding best practices and policies to it may just irritate them more and slow down the development and signing processes.
However, if implemented correctly, the best practices we’ve explored in this article will enable you to:
- Ensure that the burden of securely signing scripts won’t fall all on the single developer or administrator. By getting colleagues and other teams involved in the review and approval process before signing the script (point 4), and implementing key signing policies (point six), ensuring secure script signing will become a shared responsibility.
- Find the right balance between security and developers/administrators’ needs. Security doesn’t have to be a roadblock for your projects or a burden. These best practices will help you implement a secure script signing process that’ll enable developers and administrators to securely sign any script without disruption or delay.
- Avoid releasing a script with errors and a bad impression on your peers and customers. Imagine that you’ve worked on a complex script for weeks and, today, you finally managed to finish it. You sign it quickly and release it without a second thought. Then, the first feedback: the script doesn’t work. Can you hear somebody in your head saying: “Ha Ha! It didn’t work!” like Nelson (the iconic character from The Simpsons) was used to say? If you’d followed the best practice under point number four, this wouldn’t have happened.
- It will protect your scripts and organization from data breaches (thus, saving you money and time). Have you ever heard about Emotet (a stealthy malware stealing sensitive data) and Qakbot (a sophisticated banking Trojan)? They both use PowerShell as a new technique to infect devices. And these are just two examples. In its latest report, WatchGuard found out that PowerShell accounted for over 99% of script-based malware in Q1 2022. From this perspective, the hassle of implementing best practices for signing your scripts becomes far less burdensome and more worthwhile, doesn’t it?
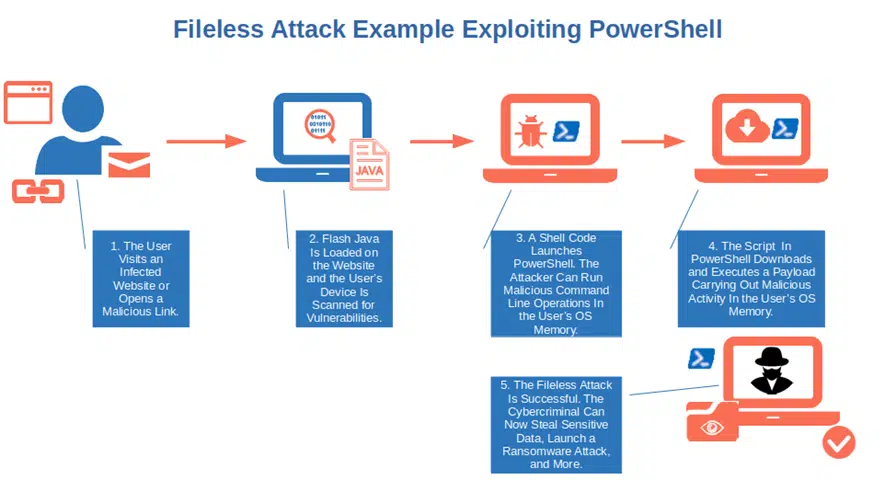
At the end of the day, it’ll be up to you if you want to put into practice what you’ve learned in this article. But remember, no pain no gain. With fileless malware attacks (attacks using legitimate system tools like PowerShell to execute a cyber attack) becoming more frequent, monitoring and protecting your script signings can be your only safety net.
Final Thoughts on 9 PowerShell Code Signing Best Practices for Signing Your Script
These PowerShell code signing best practices should give you a foundation on how to further secure your scripts. It’ll help you extend your security radar beyond your code signing certificate by enabling you to cover other aspects of your entire script signing process.
A few of the PowerShell script signing best practices we’ve explored in our article include:
- Never using a self-signing certificate to sign scripts that will be used outside of a testing environment,
- Implementing secure code signing keys policies,
- Using a secure key storage device, and
- Having a flexible code signing process.
Use them all or pick the ones you prefer, it’s up to you. You got the power now. Design a super secure PowerShell code signing system that can handle all use cases and integrate with your organization’s tools and platforms by following our PowerShell code signing best practices. Ensure you secure your scripts against all the odds now!
