

How to Sign Packages with an Azure Key Vault Signing Certificate
 (5 votes, average: 5.00 out of 5)
Azure Key Vault code signing will protect your keys, certificates, and apps in one go. Discover how to use it to shield your organization and customers from software-based attacks by signing your app packages in Visual Studio
Microsoft Azure was the second most used platform by developers participating in the 2023 Stack Overflow Developers Survey. Azure Key Vault cloud service is part of that platform. It provides a single interface to securely store, manage, and access secrets, certificates, and cryptographic keys.
In our previous articles, we’ve shown you how to use a code signing certificate and its keys stored on secure hardware (e.g., USB tokens) to sign:
- ClickOnce Application and deployment manifests.
- C# applications.
- .Exe and .dll files in Visual Studio
Today, you’ll learn the ins and outs of Microsoft Azure Key Vault code signing using Visual Studio. We’ll discover:
- How to use this secure cloud storage in lieu of a pricey on-prem hardware security module (HSM) for storing code signing private keys.
- What you need to start using Azure Key Vault code signing to add a digital signature to apps and packages.
- How the Azure Key Vault code signing process works in Visual Studio.
How to Sign Packages With Azure Key Vault Code Signing in Visual Studio
Are you looking to distribute your universal Windows platform apps (UWP) and desktop application packages across channels other than Microsoft Store (e.g., your own website)? You’ll have to:
- Generate a .msix file, and
- Sign it with a trusted code signing certificate.
Sounds complicated? Not anymore. In Visual Studio 2022, the Create App Package wizard has been enhanced. Now, you can generate and sign your .msix files with an Azure Key Vault code signing certificate directly in Visual Studio. However, there are a few conditions that must be met.
Azure Key Vault Code Signing: 5 Things You Can’t Do Without
Assuming that you’re using a recent version of Visual Studio 2022 and have an app package ready to sign, here are five actions that’ll help you set up the base of Azure Key Vault code signing in Visual Studio.
Do you prefer to skim through the article, or have you already completed some of the steps listed below? Click on the actions you’re interested in to view more information, or directly jump to the step-by-step Azure Key Vault code signing Visual Studio guide.
- Get an Azure account.
- Set up your Azure Key Vault.
- Purchase an Azure Key Vault certificate.
- Import your code signing certificate into Azure Key Vault.
- Configure the Azure Key Vault policy.
Save Up to 27% on a Standard Code Signing Certificate
Assert your organization’s verified digital identity to increase trust in your software and updates. Boost your sales and download rates for as little as $195.00/year (with a 3-year certificate).
Ready to start signing your app in Visual Studio using your Azure Key Vault signing certificate? Here’s what to do:
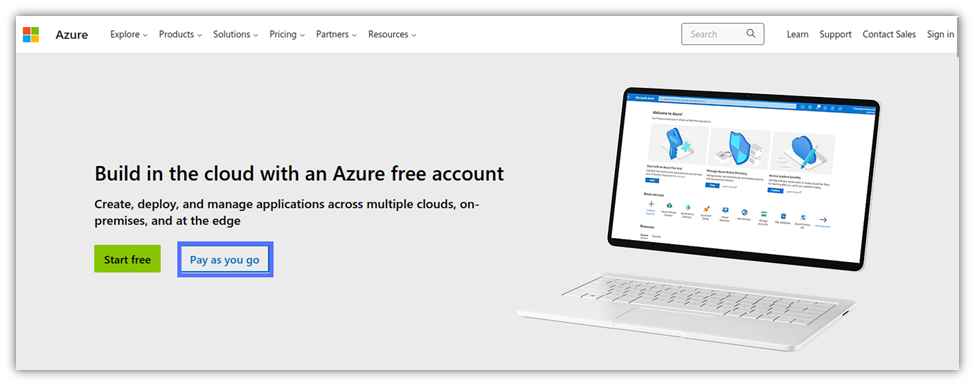
1. Get an Azure Account
Do you already have an Azure “Pay as you go” account? Spring to the next step. Otherwise, go to the Microsoft Azure website and create one by clicking on the “Pay as you go” button (as shown below).
Wondering whether you can use a free account? Not in this case. With a free account, your secrets, keys, and certificates will be only software-protected by encryption algorithms and specific key lengths.
The Premium tier account, on the other hand, offers the ultimate protection. All your keys, secrets, and certificates are stored on a secure HSM that meets the CA/B Forum’s latest Code Signing Certificate Baseline Requirements for the industry.
2. Set Up Your Azure Key Vault
It’s time to forge your new Azure Key Vault. The easiest way? Generate it directly in the Azure Portal. Follow Microsoft’s instructions, or check out the how-to video below. As previously advised, don’t forget to select the “Premium” pricing tier during the set-up. (If you don’t, there’s a risk that your certificate may be revoked because it’ll no longer be compliant with industry baseline security requirements.)
Pro Tip: Are you an advanced user who prefers working with Bash? Use the Azure command line interface (CLI). Would you rather use PowerShell commands? You can do that, too. To create your Vault, install the Azure PowerShell module on top of Windows PowerShell, or use Azure Cloud Shell directly on your browser.
3. Purchase an Azure Key Vault Code Signing Certificate (i.e., Digital Code Signing Certificate)
Now that your vault is up and running, all you need is an Azure Key Vault code signing certificate issued by a known and publicly trusted certificate authority (CA), along with its corresponding key pair. Choose one of the following two options when selecting your certificate:
- Standard (OV) code signing certificate. This requires your organization to undergo standard business validation, meaning that the CA will cross its T’s and dot its I’s before issuing you a certificate.
- Extended validation (EV) certificates. This type of digital certificate requires more stringent validation from the issuing CA to ensure you and your organization are who you claim to be. Using an EV certificate is also a requirement for kernel mode driver signing.
Save Up to 27% on a Standard Code Signing Certificate
Assert your organization’s verified digital identity to increase trust in your software and updates. Boost your sales and download rates for as little as $195.00/year (with a 3-year certificate).
Beware! Not all CAs will issue code signing certificates compatible with all HSMs. Therefore:
- Check the certificate delivery method options available before picking the CA, and
- Select Install on an existing HSM as the delivery method when inputting your order.
Here is what it looks like when you order a DigiCert (a trusted Azure Key Vault partner) certificate from our website:

Pro Tip: Connect your CA account to your Key Vault by adding it as an Azure Key Vault CA Partner. You’ll be able to generate, renew, and manage any type of digital certificate (e.g., code signing and SSL/TLS certificates) using that CA directly in the vault.
No matter where you order your certificate from (i.e., a website or within the Azure Key Vault), you must submit a certificate signing request (CSR) with your order that’s generated by the HSM (in this case, the Azure Key Vault).
How to Generate a Certificate Signing Request (CSR)
- Go back to Azure Key Vault and select Certificates in the left action bar.
- Click Generate/Import.
- On the “Create Certificate” page, select or enter the following:
- Method of Certificate Creation: Generate.
- Certificate name: Enter your certificate name.
- Type of Certificate Authority: Select non-integrated CA if you’ve purchased your certificate from outside Azure Key Vault (e.g., a website). Otherwise, pick the Certificate issued by an integrated CA.
- Subject name: Enter CN=your company name.
- Click on Advanced Policy Configuration, and set the parameters requested. When ready, hit OK. Be sure to enter the following details:
- Extended Key Usages (EKUs): 1.3.6.1.5.5.7.3.3. It’ll indicate that the certificate is an Azure Key Vault code signing certificate.
- Exportable Private Key: No.
- Key Type: RSA-HSM.
- Key Size: 3072. This is the minimum value required by the CA/Browser Forum (CA/B Forum). For DigiCert code signing certificates, the minimum RSA key size is 4096.
- Certificate Type: Standard certificate or EV certificate.
- Click on Create.
Did you connect your CA account to your Azure Key Vault and buy the certificate through the vault? Jump to point 4. You didn’t? Keep on reading.
- Go to the Certificates tab. Click on the certificate listed under the “In progress” section.
- Select Certificate Operation and, in the pop-up window, hit Download CSR.
- Save the CSR file on your device.
- Add the CSR file to your order.
4. Import Your Azure Key Vault Code Signing Certificate
As soon as the validation process is completed and the CA has verified that you’re using a secure HSM, the Azure Key Vault code signing certificate will be issued (via download or email, the process may vary depending on the CA, and the order method chosen).
Got your certificate? Go back to the Azure Key Vault Certificate Operation tab and select Merge Signed Request. Don’t log out of Azure Key Vault just yet. You’ll need it for the next step.
5. Configure the Azure Key Vault Policy
Before using the Azure Key Vault code signing certificate to sign apps and packages, you’ll have to enable the Resource log policy. What this will do is allow you to keep a record of who accesses your key vault, when they do so, and what they access. This will aid future investigations in the event of a cyber security incident or event involving your Azure Key Vault.
To enable your resource logs:
- In Azure, go to the policy page. Select Assign Policy.
- Under Policy definition, select Resource logs in Key Vault should be enabled in the drop-down menu.
- Click Add, Review & Create, and Create.
The Resource Compliance screen should display the following:
- Resource compliance state should be compliant.
- At least one resource must be compliant.
- No exceptions are permitted.
Ta-da! You’re now ready to start signing your first app or software package using your Azure Key Vault code signing certificate and Visual Studio. How? This is what we’re going to learn next.
Pro Tip: Spend a few minutes configuring the certificate and key access policies in Azure Key Vault. The access policy enables you to specify which user(s), application(s), or group(s) have the authority to perform operations on the certificates, keys, and other secrets in your Key Vault.
While this step isn’t compulsory, it’s strongly recommended to increase your vault’s security by applying the principle of least privilege (POLP). You don’t want every Key Vault user to be able to access every certificate, secret, and key stored on it, right?
How to Use Your Azure Key Vault Code Signing Certificate to Sign Packages and Apps in Visual Studio
Got your Azure Key Vault and code signing certificate sorted? Let’s get the ball rolling and start signing in Visual Studio. Remember. Azure Key Vault and Visual Studio have worked together only since Visual Studio 2022.
Do you have an earlier version on your machine? Download and install the latest available version now before continuing any further.
Are you ready? Let’s go.
1. Open the Package/App You Want to Sign in Visual Studio With the Azure Key Vault Signing Certificate
- Type “Visual” in the search bar and click on Open.
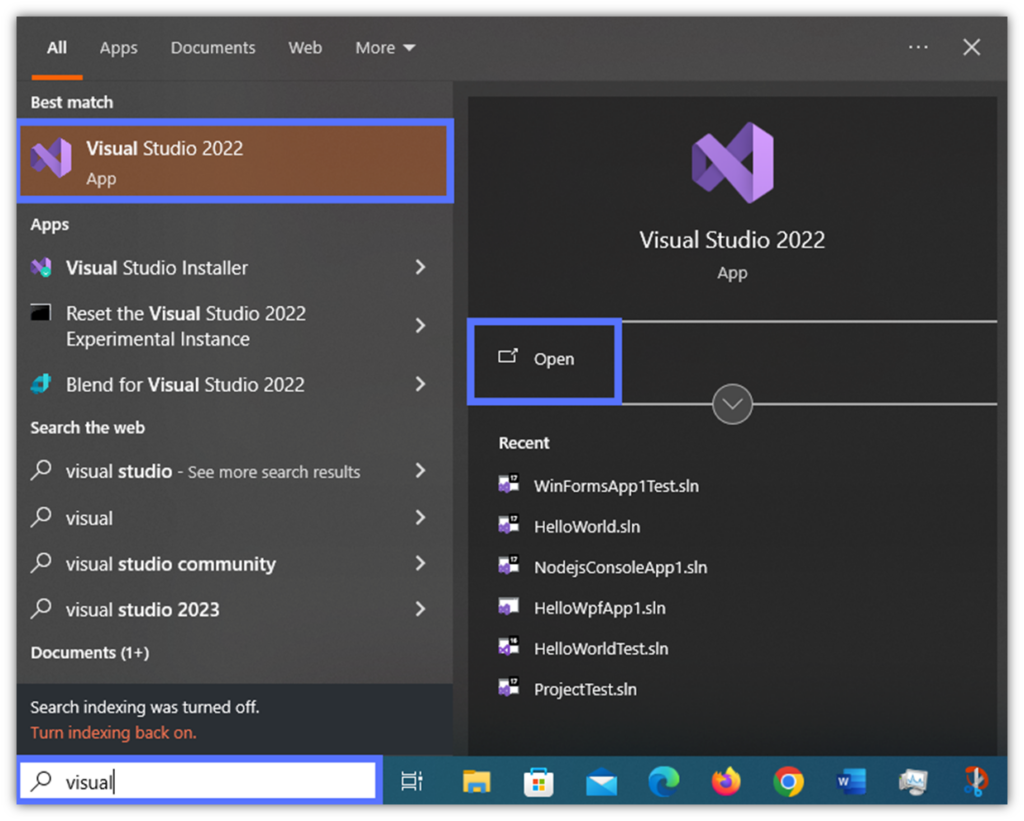
- Select Open a project or solution, toggle the code you want to sign, and hit Open. Click on the project’s .sln file to open it. The solution selected doesn’t have a Windows application packaging project yet? Add it now. As soon as you have generated and configured the empty .msix package, you can move to step two.
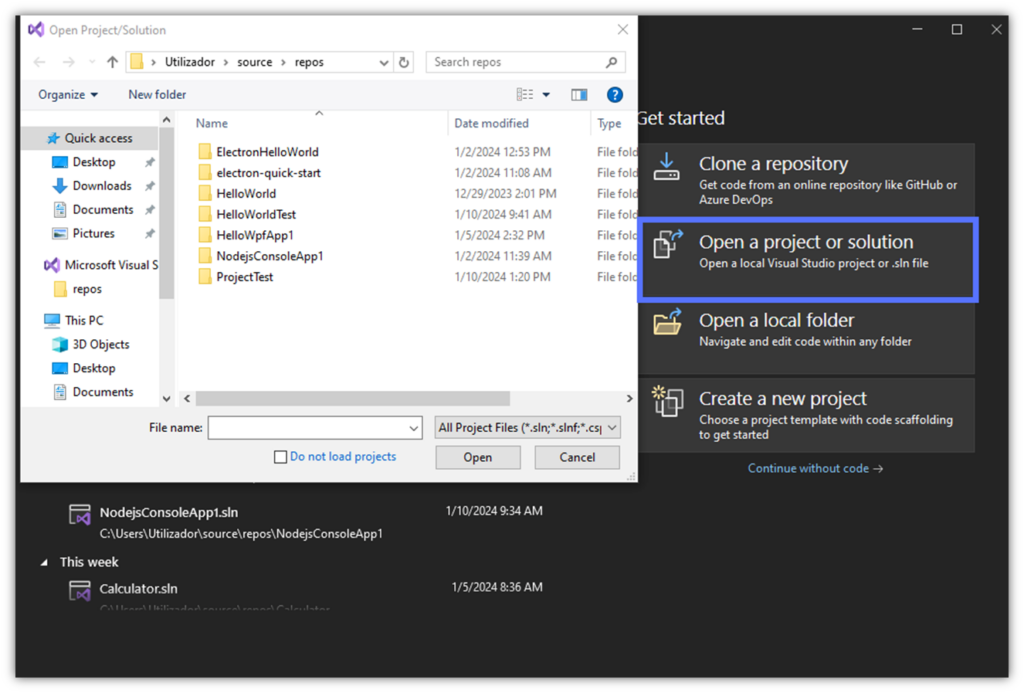
Image caption: The screenshot shows the pop-up window that’ll be displayed when you click on the “Open a project or solution” section.
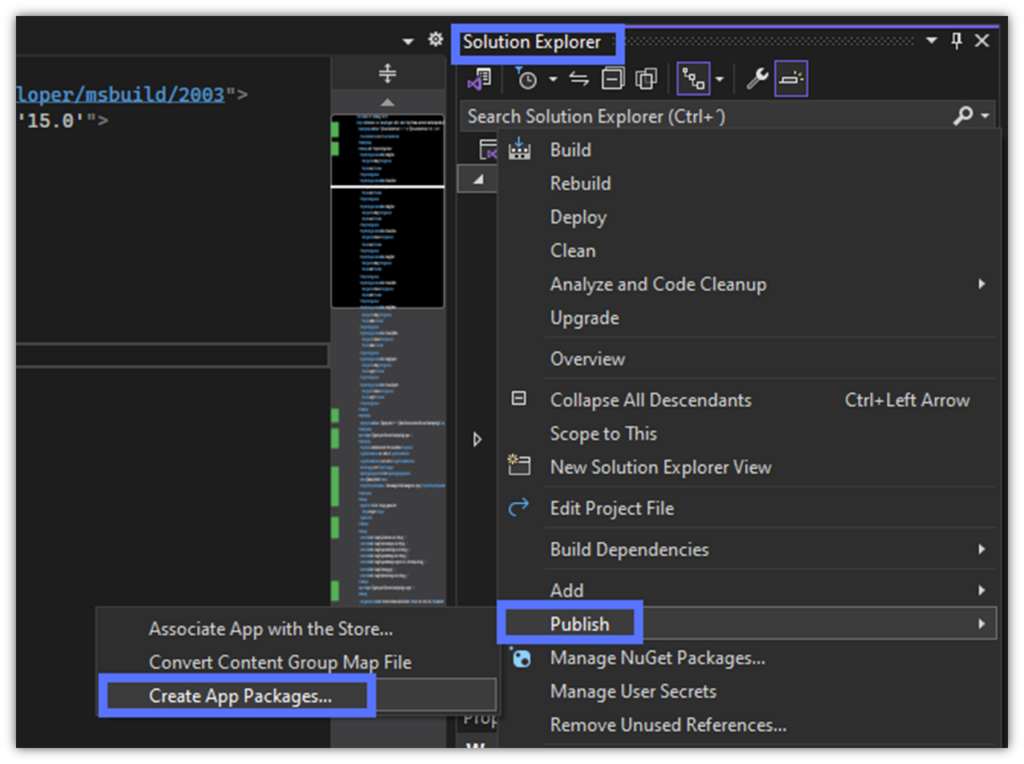
2. Open the Create App Packages Wizard to Set Your Signing Preferences and Add Your Code to the Package Project
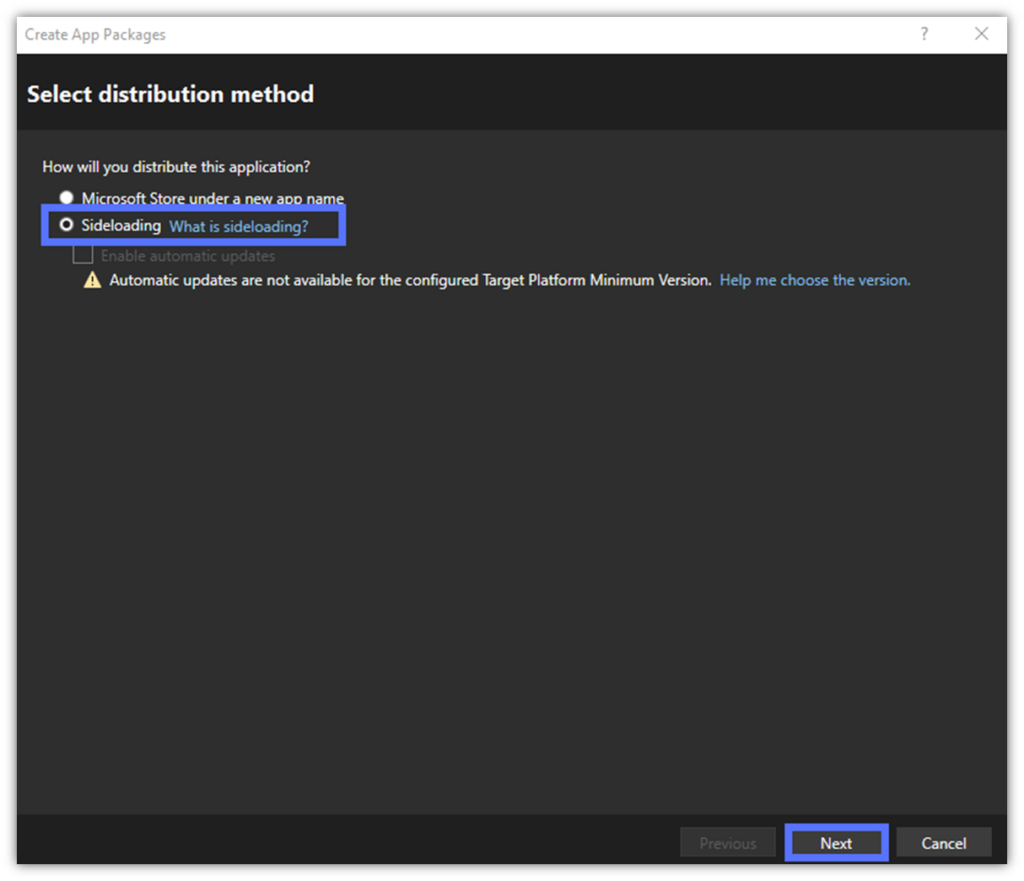
- Under Solution Explorer, right-click on the project. Select Publish and click on Create App Packages… The wizard will launch.
- In the Select Distribution Method window, click on the Sideloading radio button. It’ll tell Visual Studio to generate an .msix file for distribution outside the Microsoft Store. Click Next to move on to the next step.
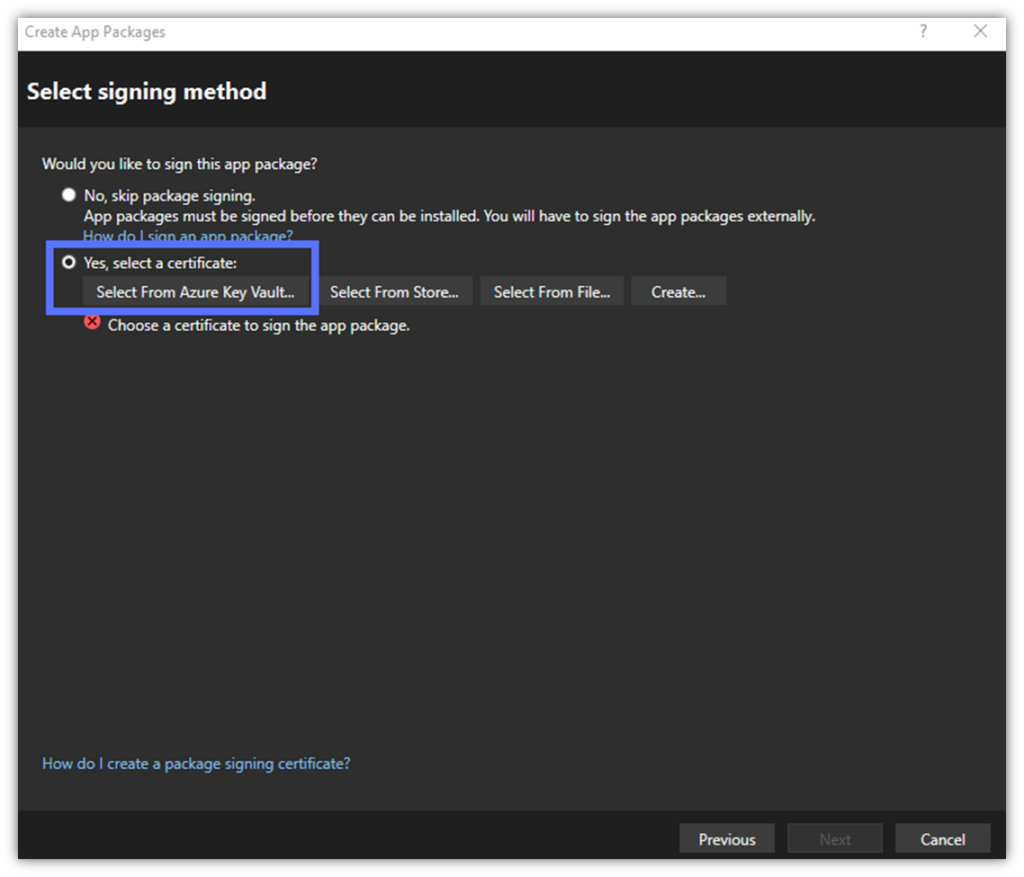
- In the “Select signing method” box, click on the Yes, select a certificate radio button, and hit Select From Azure Key Vault… (as shown in the following screenshot). The dialog screen titled Select a Certificate From Azure Key Vault will display.
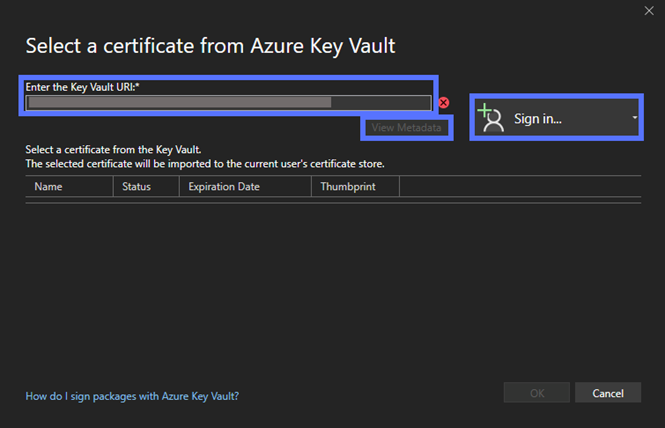
3. Select Your Azure Key Vault Code Signing Certificate and Sign Your App
As shown in the following screenshot:
- Select your Azure Key Vault account using the “Sign in” drop-down menu account picker.
- Enter the Key Vault’s URI. You’ll find it on the Key Vault Overview page.
- Once the option is enabled, click the View Metadata button.
- Select the Azure Key Vault code signing certificate you want to use.
- Click OK.
4. Sign (and Timestamp) Your App in Visual Studio
The wizard will display your Azure Key Vault code signing certificate. It’ll also give you the option to add a timestamp. Want a suggestion? Take the extra two seconds to sign it. It won’t cost you a dime, and it’ll keep your digital signature valid long after the certificate expires. When ready, hit Next.
Here’s how it looks for us when performing Azure Key Vault code signing using a DigiCert code signing certificate and timestamp:

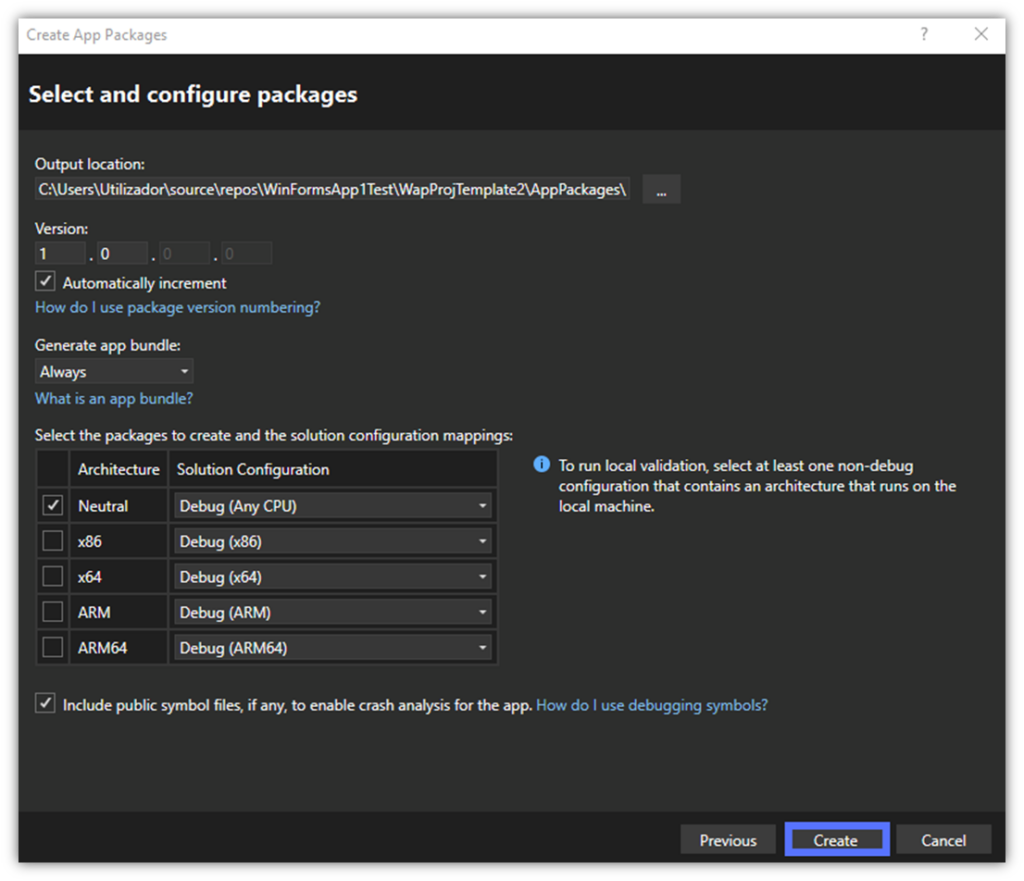
- Last but not least, select and configure your package as you see fit (we’ve included an example of what this may look like below). Hit Create to complete the Azure Key Vault code signing process.
That’s it. You’ve now populated your package project and added your digital signature without leaving Visual Studio 2022 and while using an Azure Key Vault code signing certificate. Completing this process adds a seal of authenticity and integrity that’ll protect your organization, users, and software from nasty malware infections, and data breaches.
If you don’t feel comfortable storing your precious keys and code signing certificates on a personal USB key but also want to add a digital signature to your apps.
- Get an Azure Key Vault code signing certificate,
- Save it to your vault, and
- Follow our certificate and key management best practices.
We all have secrets; it’s crucial to ensure that they remain that way.
Final Thoughts on How to Sign Visual Studio App Packages Using Azure Key Vault
Using an Azure Key Vault code signing certificate to add a digital signature to your Visual Studio apps and packages will:
- Guarantee your customers that you’re a legitimate (and trusted) software publisher. Remember? A third-party CA verified your identity before issuing the certificate.
- Confirm the integrity (and safety) of your software. The users will be automatically alerted if the software is modified or corrupted after it has been signed because the digital signature will be removed once the app’s hash value changes.
- Build trust and increase revenue. How? By offering a smoother customer experience by removing (EV certificate) or reducing (standard certificate) pesky security warnings by asserting your verified digital identity.
Moreover, using an Azure Key Vault code signing certificate will enhance your organization’s data protection and compliance with the latest CA/B Forum requirements. According to Microsoft, the Azure Key Vault Premium tier stores all cryptographic keys and code signing certificates on FIPS 140-2 Level 3 compliant HSMs. On top of it, it’ll remove the burden (and costs) associated with maintaining your own on-prem HSM.
Put to use what you’ve just learned to start using Azure Key Vault code signing for your apps. Grow your brand thanks to the winning combo of trusted code signing certificates and Azure Key Vault.
