

How to Sign a Windows App in Electron Builder

 (3 votes, average: 5.00 out of 5)
Fed up running around like a headless chicken, looking for a guide explaining how Electron code signing for Windows apps works? Check out our tips! Learn how to code sign your Electron app now using a code signing certificate private key that’s stored on secure hardware
2024 marks a new year with new threats. In its 2024 Threat Prediction report, Fortinet anticipates that cybercriminals will dramatically expand the collection of tactics, techniques, and procedures (TTPs) they utilize in cyber attacks.
Could your Electron-developed Windows apps be within their targets, too? Absolutely. Give attackers a hard time with Electron Builder code signing. The beauty of using a certificate to code-sign your Electron-built app? It’ll also:
- Allow users to confirm your identity as a software developer/publisher,
- Reassure users that the app they’re downloading hasn’t been modified and comes from a trusted source, and
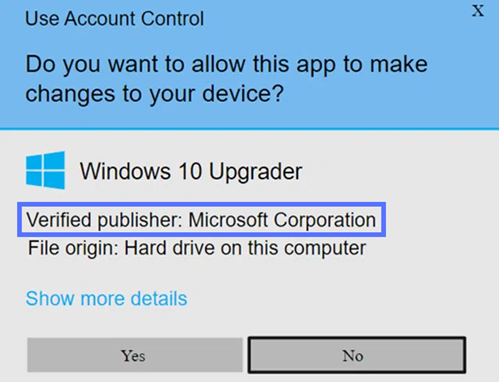
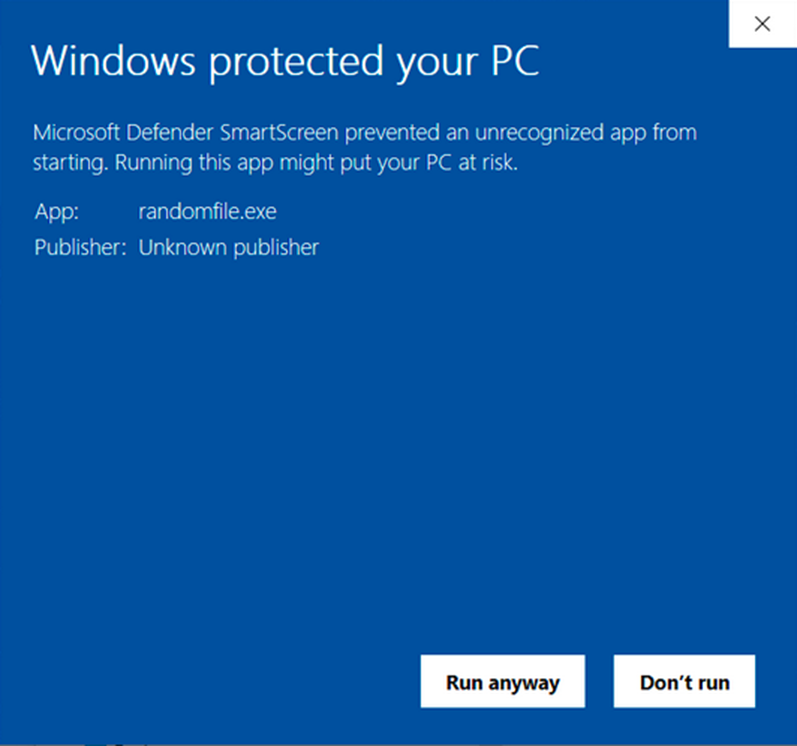
- Remove the infamous “Unknown Publisher” and the “Microsoft Defender SmartScreen prevented an unrecognized app from running” warnings.
Discover how to code sign your Electron apps for Windows using a code signing certificate and a secure hardware token.
Electron Builder Code Signing Prerequisites
Do you use Electron Builder to develop your Windows applications and want to add a digital signature to your applications during the building process? Great — and we’re here to help you do precisely that. Just for our readers who may not be familiar with it, Electron Builder is an application development, packaging, and publishing tool that:
- Supports macOS, Windows, and Linux operating systems and several file formats (e.g., zip, tar, .mas, .deb, .nsis).
- Enables developers to create applications for multiple platforms using the same code and publish them on GitHub (through GitHub releases), and cloud providers like Amazon S3.
- Supports auto-update out of the box.
- Can be integrated in Visual Studio and other IDEs.
But before going through a practical Electron Builder code signing example, a few criteria must be satisfied. To code sign an Electron app for Windows, you’ll need:
- A code signing certificate issued by a trusted certificate authority (CA). Like all other Windows applications, apps built with Electron Builder can be signed with a standard (OV) certificate or with an extended validation (EV) code signing certificate. The fundamental difference? The first one will display your organization’s details in the User Account Control pop-up window, while the latter will completely remove any warning because Windows inherently trusts it.
- A secure hardware token. This is where your certificate and keys will be stored (more on that in a moment). It can be a secure USB hardware token or a FIPS 140-2 Level 2, Common Criteria EAL 4+ (or equivalent) hardware security module (HSM).
- Electron Builder. A free, open-source framework that lets you build a standalone application for Windows, Linux, or Mac operating systems.
Save Up to 21% on a Windows Code Signing Certificate
Give users a reason to trust your Windows apps by preventing “Unknown Publisher” warnings. You can digitally sign unlimited apps for as little as $211.46/year.
How to Code Sign a Windows Application in Electron Builder
Before June 2023, adding a digital signature to your Windows app in Electron Builder was pretty straightforward when using a standard certificate. All you had to do to sign any apps (e.g., everything from .nsis and .appx to .msi, .zip, and .dir) was:
- Export your certificate as a .p12/.pfx file,
- Specify the path to it (i.e., set the CSC_LINK variable),
- Add your private key password (i.e., CSC_KEY_PASSWORD variable), and
- Save them both into your configuration file.
That was it. Job done.
However, things changed with the advent of the Certificate Authority/Brower Forum’s (CA/B Forum’s) new industry standard. Industry leaders thought it prudent to increase code signing certificate security and rolled out a new regulation. As such, all code signing private keys are now required to be stored on secure hardware, regardless of which certificate is used.
As a result, the Electron Builder code signing process we’ve just described has been remodeled to reflect this change. Annoying? Maybe. Is it worth the hassle to code sign your applications? You bet it is.
Adding a digital signature to your Electron Builder Windows applications will enable you to prove to your customers that your apps are tamper-free and authentic. And this is just one of the numerous benefits.
Now, enough procrastinating. Let’s explore the Electron Builder code signing process, from A to Z.
1. Start By Purchasing a Code Signing Certificate
Do you already have a code signing certificate issued by a trusted CA? Jump to step three. If you don’t have it, it’s time to buy one. Pick a trusted third-party CA, and choose between the standard or EV certificate.
Save Up to 27% on an Extended Validation Code Signing Certificate
Bolster trust in your brand and meet the Windows Hardware Developer Center requirement of having an EV code signing certificate. Certificates start at $250.00/year with a 3-year purchase.
Hint: Both will increase trust in your brand and guarantee the integrity and authenticity of your Windows apps. However, the latter (EV) will make the software automatically trusted by Windows SmartScreen Defender, giving the user a higher level of confidence and knowledge that they’re dealing with a legitimate software developer/provider.
Once you’ve placed your order, the CA will do a background check to confirm your identity and that you’re a trusted vendor. OK, we know you are, but adding an official seal of trust validated by an established third party will definitely boost your brand’s prestige.
The vetting process will be more or less rigorous depending on the certificate requested, and it’ll last upwards of four days. Immediately after, your certificate will be issued, and a secure hardware token (e.g., USB) will be physically mailed to you, if you select the default delivery method.
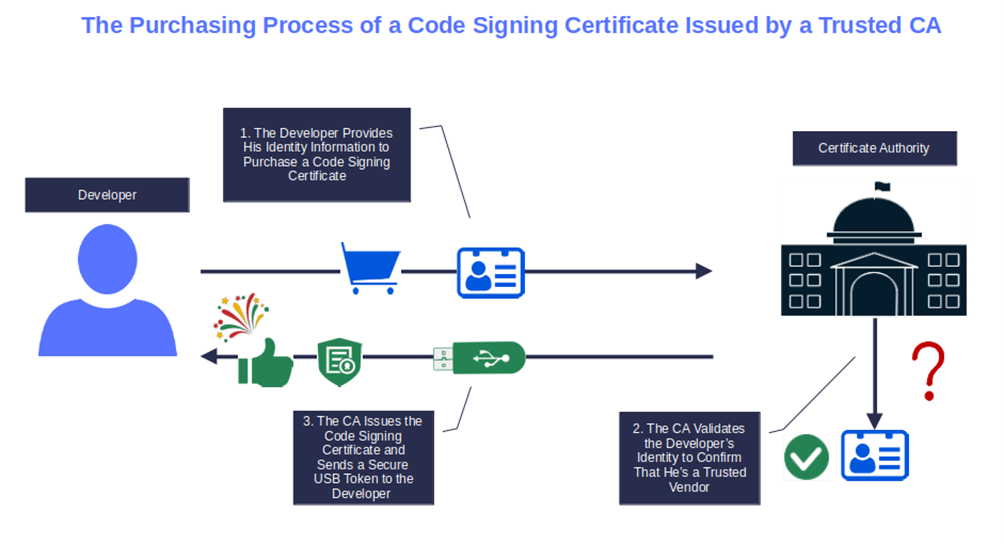
Image caption: The graphic shows how a CA issues a code signing certificate.
2. Set Up Your Secure Hardware Token
Now that you’ve been certified as a trusted developer/publisher and have received your code signing certificate (via email) and token (in the mail), it’s time to configure the device.
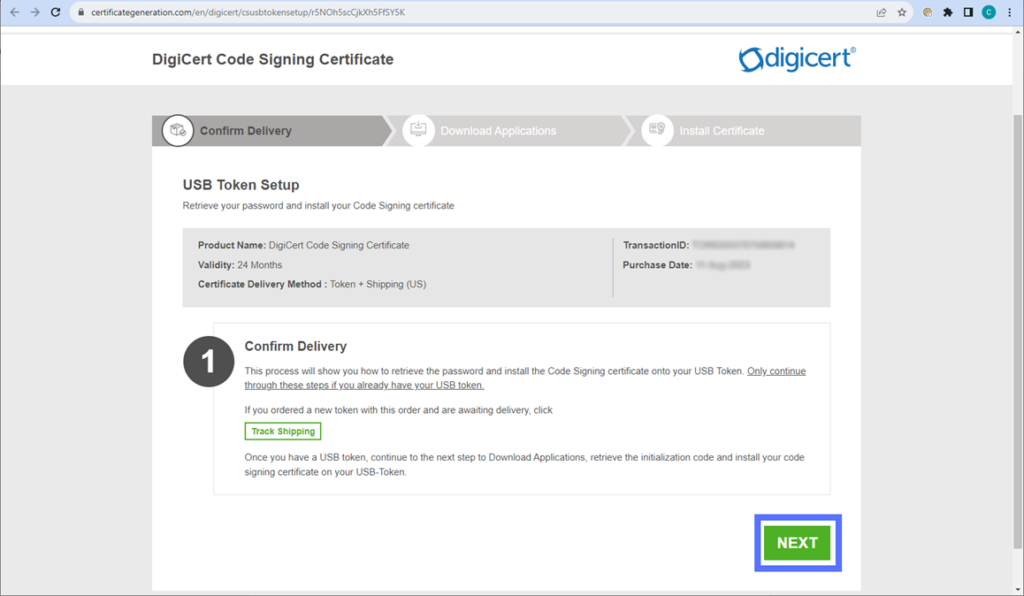
Note: This is a one-time operation that you’ll have to go through only if the CA of your choice has sent you a blank USB token (e.g., DigiCert and GoGetSSL).
Is this your case? Fear not. As an example, we’ve prepared a comprehensive step-by-step guide that’ll take you through the process of setting up a DigiCert code signing certificate USB token received from CodeSigningStore.com.
Done? Good. Don’t unplug your USB token just yet! You’ll also need it for the next steps, when you use Electron for code signing in Windows. However, when you’re not using the device, you must store it in a secure location. If you don’t… well, 2023 was dubbed the “Year of the Lost Keys” by Keyfactor for a reason. (Spoiler: People aren’t as responsible as they should be with their cryptographic keys.)
3. Configure Electron Builder Code Signing for Windows Apps
We’ve now reached the juicy bit of this article… This is when the Electron code sign “how-to” process takes place.
- If not already done, insert your USB token into your device.
- Ensure your authentication client (e.g., SafeNet Authentication Client for DigiCert code signing certificates) is running.
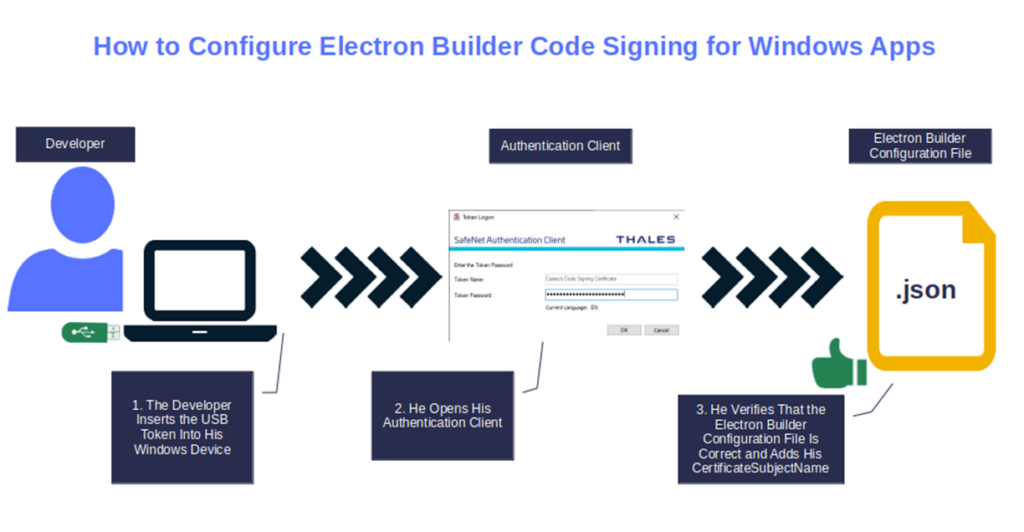
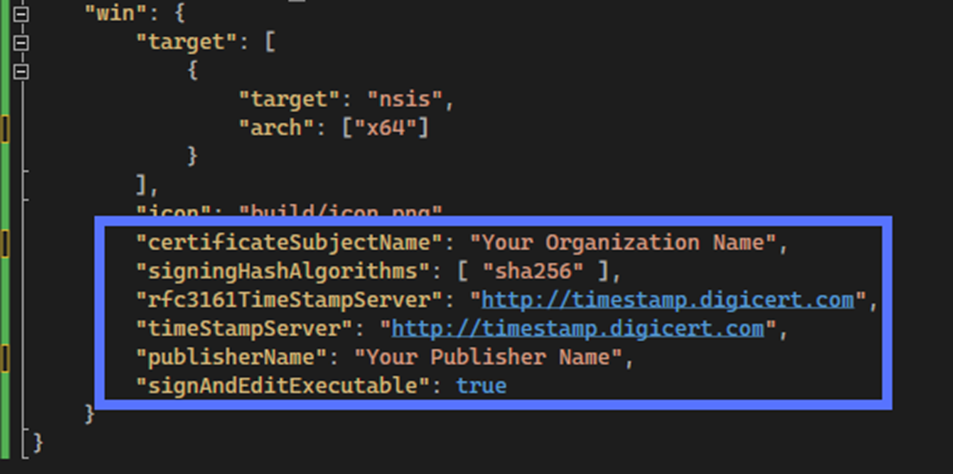
- In the package.json file (i.e., build configuration file), under the win key (i.e., the section including the Electron Builder’s instructions to create the Windows app), add your certificateSubjectName (i.e., the name of the organization the certificate has been issued to) and the CA’s timestamp server URL (this step is optional but very useful, as it’ll extend your signature’s life).
4. Code Sign Your Electron App for Windows
- Build your Electron app as usual. For example, if you’re using Visual Studio, click on Build. Electron Builder will automatically find your code signing certificate to initiate the signing.
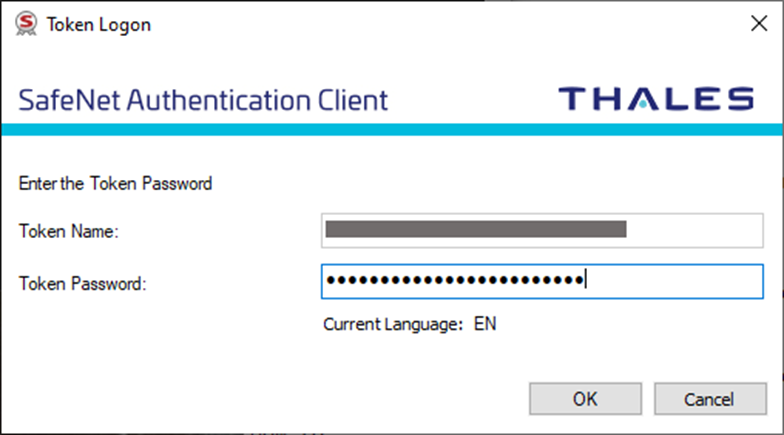
- At the prompt, enter your token password to authenticate and prove you’re the one signing the software.
Yippee! Your Windows application has now been code signed using Electron!
Now, let’s verify the signature and its timestamp. You can do this by right-clicking on the app’s icon and selecting the Digital Signatures tab. When you click Details, does the new pop-up window say, “This digital signature is OK”? Can you see the timestamp information?
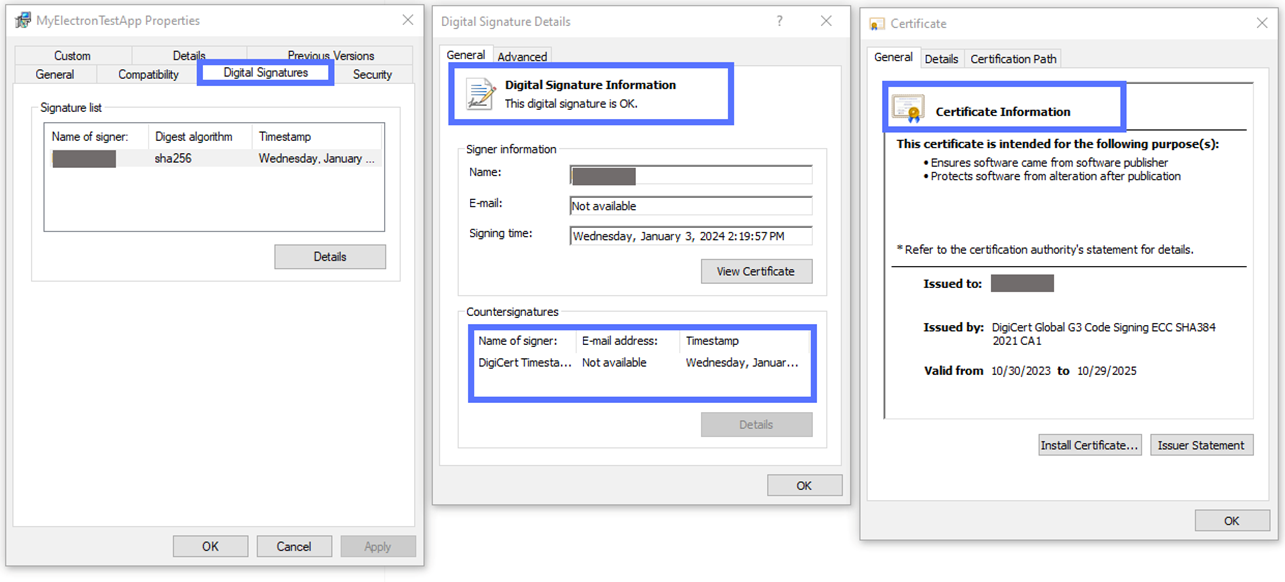
If the answer to both questions is “yes,” then your digital signature is confirmed. This means the Electron code signing Windows process was successful, and the alarming “Unknown Publisher” warning (as shown below) is gone for good!
Do you prefer to code sign your Electron apps using a more user-friendly graphical user interface (GUI)? No problem! You can do so by downloading the DigiCert Utility for Windows, and selecting all the application files you want to sign. It’s fast, and it won’t cost you a dime!
Final Thoughts on How to Sign a Windows App in Electron Builder
I get it. Changes to security requirements like the CA/B Forum’s updated Code Signing Certificate Baseline Requirements can be a big headache for organizations and developers alike. This is particularly true if the documentation is sparse, like in the case of Electron code signing for Windows applications.
We hope this small guide helped you clarify some doubts about the actual Electron Builder code signing process.
Don’t feel comfortable signing your app while building it in Electron? (This is understandable — one comma gets forgotten and you’ve messed up your app’s configuration!) No worries. You can still sign your executables manually following the standard SignTool process.
Doing this will keep you from:
- Condemning your users to bombardment by browsers and Windows operating systems (OS) with nasty warnings.
- Facilitating malware infections.
- Impacting your credibility as a brand and reducing your revenue.
