

SignTool Error: No Certificates Were Found That Met All the Given Criteria
 (3 votes, average: 5.00 out of 5)
Did you try to sign your code and got stuck on the ‘No certificates were found that met all the given criteria’ error? Find out what causes this mysterious issue and discover the solution that’ll enable you to wave goodbye to it
Since its release in 1997, Visual Studio conquered the hearts of developers worldwide. Twenty-six years later, in 2023, it’s still considered by many to be the best-integrated development environment (IDE) for software development.
Why? Visual Studio makes the developers’ lives easier. It can be used for practically all programming languages, it’s easy to use, and offers a lot of add-ons and powerful libraries. That is, until it gives you a cryptic error, ‘SignTool error: no certificates were found that met all the given criteria’ while you’re trying to sign your code.
Wondering what is it all about? Let’s decrypt this error message together and explore the solutions available. Errors happen, but if you don’t understand them, then you’ll struggle to fix them.
The Meaning of the SignTool Error: No Certificates Were Found That Met All the Given Criteria
Why is SignTool suddenly uttering like Yoda, the Grand Jedi Master of Star Wars?
That’s what I thought the first time I was confronted with this error message: ‘SignTool error: no certificates were found that met all the given criteria.’ While it was clear that it was something related to signing certificates, what was less clear is what criteria it was referring to. Initially, I had no idea, but I finally found the answer to my question after a few hours of frantic research on the internet.
Did you try to sign a code or an app using Windows SignTool.exe or Visual Studio (SignTool is embedded within it) and got the same puzzling error message? There are many reasons why it may have occurred. Among them:
| No Certificates Were Found That Met All the Given Criteria – Root Causes | Examples of How or Why These Causes Occur |
|---|---|
| 1. You Have No Code Signing Certificate |
|
|
2. There Is a Problem With Your Code Signing Certificate |
|
| 3. You’re Using an Incorrect Certificate |
|
You’ve selected the wrong certificate type (e.g., SSL/TLS certificate for server authentication instead than code signing certificate).
Want to find out how to resolve this issue so that you can keep on working on your project rather than running around like a headless chicken, looking for a solution? ‘Close your mouth and open your ears, you must,’ as Master Yoda would say.
How to Address the SignTool Error ‘No Certificates Were Found That Met All the Given Criteria’ in Visual Studio
With ransomware attacks increasing by a staggering 25% in the second half of 2022, many organizations are adding a layer of protection to their software by signing their codes.
Some use Microsoft SignTool.exe, and others do it directly in Visual Studio. No matter which tool you use, being unable to sign a code because of a mind-boggling message can be really a time-consuming showstopper.
We’ve discovered the possible causes behind the ‘no certificates were found that met all the given criteria’ notification — now it’s time to learn how to fix them. Your boss can’t wait anymore for the code to be published? ‘Patience you must have, my young Padawan’, as Yoda would say.
To make things easier for you, we’ve summarized the four solutions in the table below.
| Root Causes | Solutions For How to Resolve This SignTool Error in Visual Studio |
|---|---|
| 1. Add a Trusted Code Signing Certificate to Your Visual Studio Project (Recommended) |
| 2. Add a Testing Certificate (Recommended Only in Select Cases) |
| 3. Uncheck the ‘Sign the ClickOnce’ Manifest (Not Recommended) |
| 4. Change Your Private Key’s Permissions (Check With Your Administrator First) |
1. Add a Trusted Code Signing Certificate to Your Visual Studio Project (Recommended)
Let’s start by checking the certificates that are available in your Windows Certificate Manager. You can do this by:
- Typing ‘certificate’ in the Windows Start menu and selecting Manage user certificates.
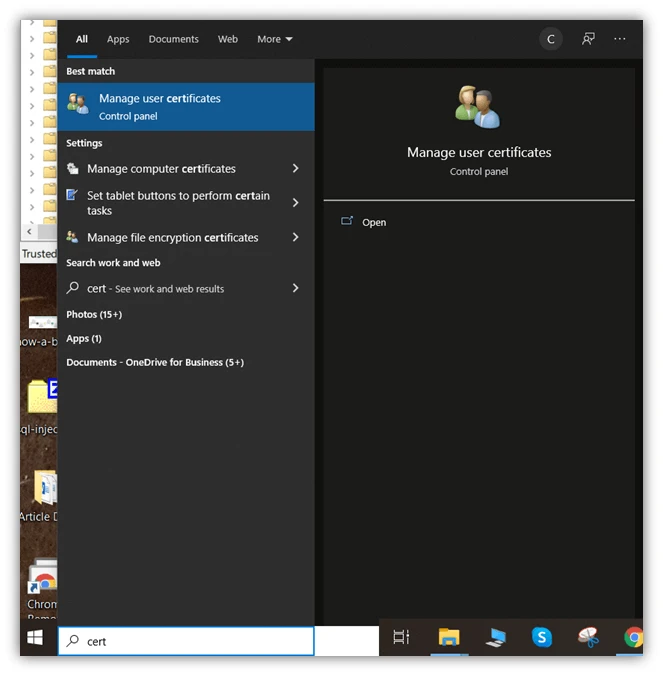
- Navigating to the Certificate folder under Personal (or to the folder where you’re used to saving your certificates).
Once you’ve done that, does anything seem amiss? For example:
- You don’t have any code signing certificates installed on your device
- The original code signing certificate used to develop the application and sign it for the first time is missing or expired
- The imported certificate isn’t the original file received from the certificate authority (CA)
- You’ve selected the wrong certificate type (e.g., SSL/TLS certificate for server authentication instead than code signing certificate).
The best solution is to add a valid code signing certificate issued by a trusted CA.
- Install the code signing certificate on your device. If you don’t have a valid certificate or the certificate has expired, purchase a new one from a trusted CA. Depending on your needs and budget, you’ll be able to choose between the organization validation or the extended validation certificate.

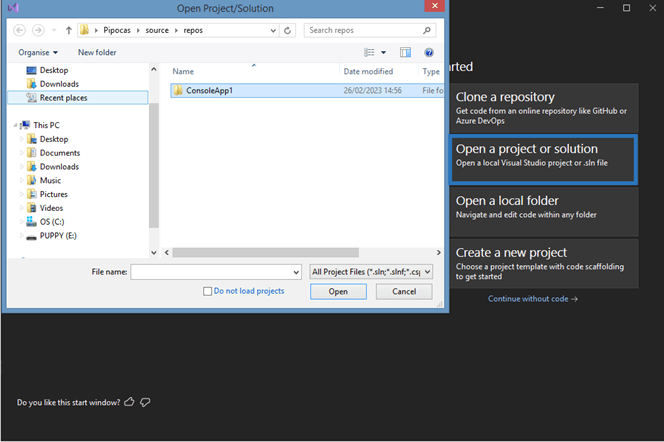
- Click on Open a project or solution and select the project or the .sln file you want to sign.
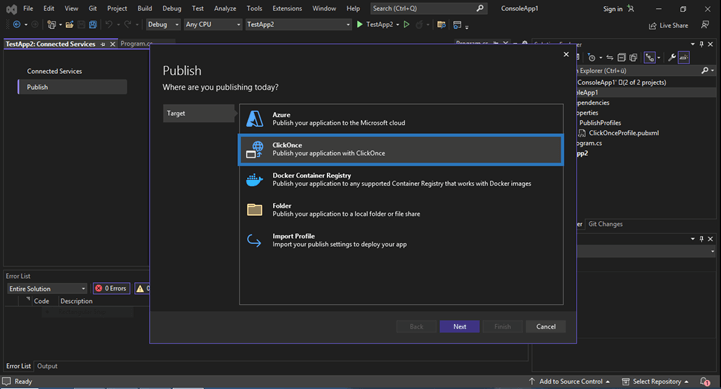
- Once you’ve opened the correct item, select Build in the top navigation and hit the Publish selection in the drop-down menu.

- A pop-up window will come up. Select ClickOnce from the list and click on next.
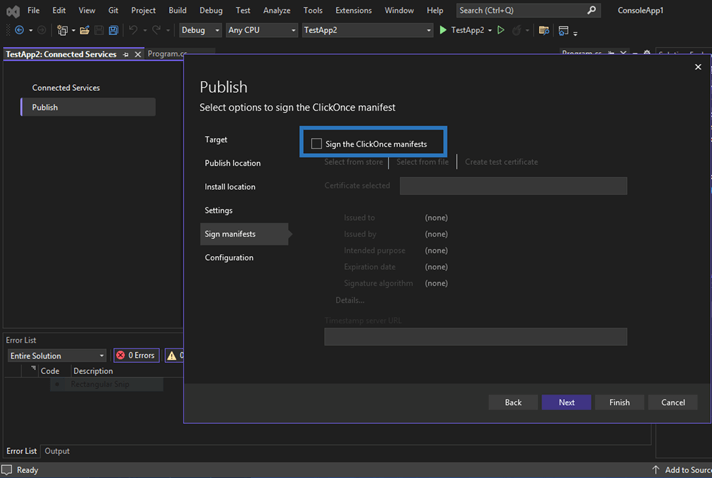
- As usual, select your publish and install location, and fill in your preferred settings. Once you get to Sign manifests, check that the Sign the ClickOnce manifests box is selected. If it isn’t, select it.
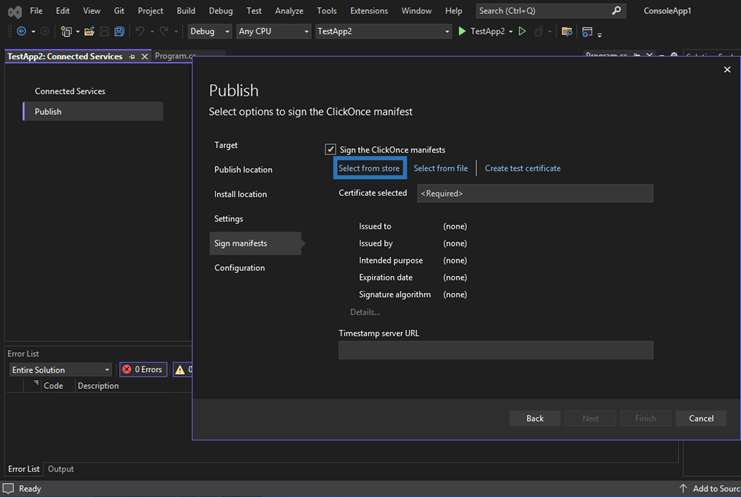
- Click on the Select from store link and pick the certificate you want to use to sign your application. Make sure that:
- You select a code signing certificate,
- The file you selected is the original file sent to you by the CA, and
- The certificate hasn’t expired.
Do you already have a valid code signing certificate but, you haven’t installed yet? Click on Select from file to install it.
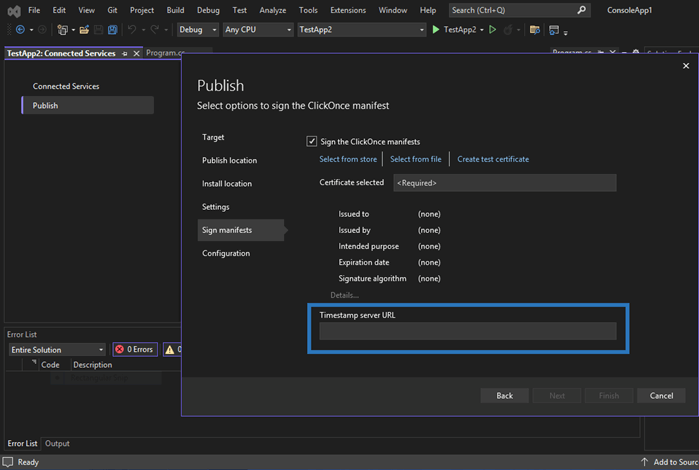
- Want to make sure that your signature will be valid even after your code signing certificate has expired? Add your CA’s timestamp server URL address in the box. For example, if you’re using a code signing certificate from DigiCert, its timestamp URL is https://timestamp.digicert.com.
And it’s done! Now, you can sign and publish your application without fault. Your boss will be happy, and your organization will be more protected from data breaches and other cyberattacks.

2. Add a Testing Certificate (Recommended Only in Select Cases)
Do you want to sign your application only for testing or debugging, and for whatever reason, you don’t have a valid (i.e., not expired) code signing certificate? In this case, you have another option. This one, won’t cost you a dime.
- Follow steps 2-6 listed in the previous section ‘Add a Trusted Code Signing Certificate to Your Visual Studio Project.’
- Once done, click on the Create test certificate link to create a new certificate for testing purposes (i.e., a self-signed certificate). NOTE: You’ll only want to do this in testing environments; never use these self-signed certificates in production.
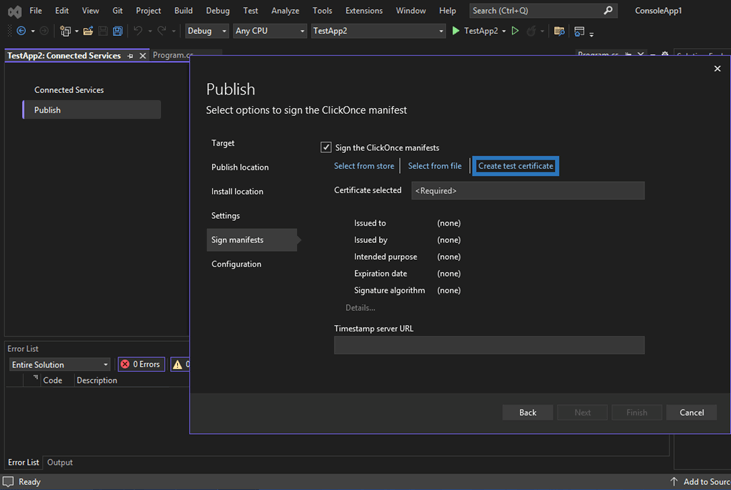
- In the dialogue box, enter a strong password. You can also select the algorithm you want to use for your certificate. The tool will automatically display the actual most common and secure hashing algorithm which is SHA-256 at the time of writing this article.
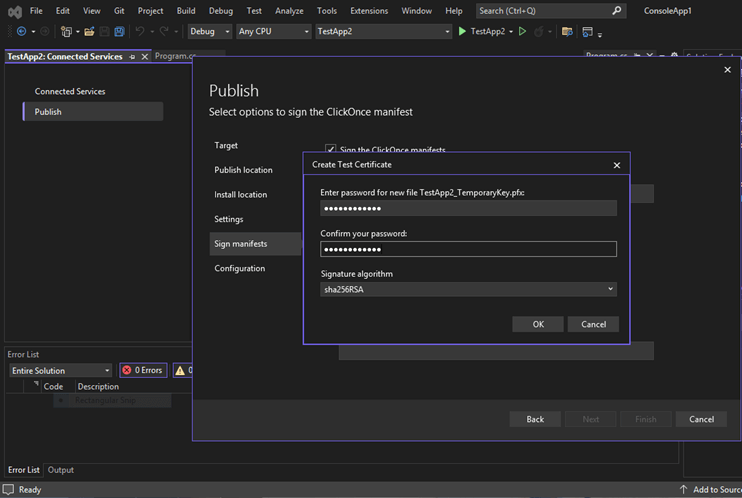
Now, you just have to follow the last steps of the process as usual and sign your code.
There we go. No more SignTool error ‘No certificates were found that met all the given criteria.’ And as an added bonus, you didn’t even have to open your wallet to pay for a new certificate!
But remember that self-signed certificates should be used only for testing and debugging purposes. Don’t cut corners! Never use a testing certificate to publish an application. That usage is reserved for publicly trusted code signing certificates only.
You can’t stop the development and wait for the CA to send you a new code signing certificate? Keep on using the self-signed certificate during the development process. Just be sure to replace it with the trusted code signing certificate issued by the CA before moving the project to production.
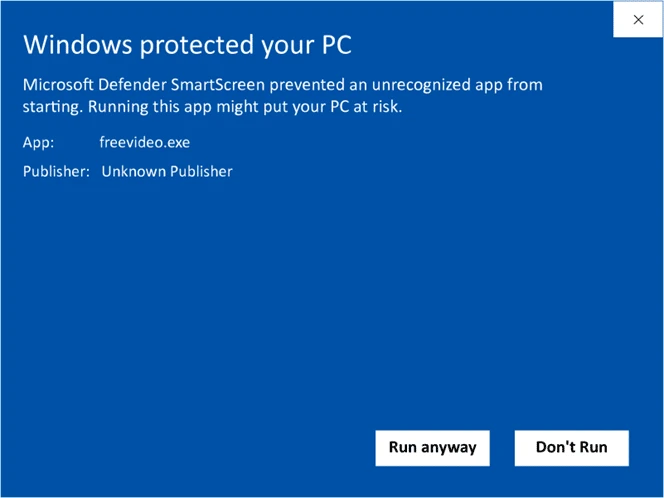
What Happens If You Forget to Swap Out the Test Certificate for a Publicly Trusted Certificate?
Don’t forget to make the swap, though! Because if you use a test certificate in production:
- Users trying to install your application will see the Windows “Unknown Publisher” warning. Yup. As the test certificate is signed by you instead of being issued by a trusted CA, it won’t be trusted by Windows or major browsers like Google or Safari. This will not only damage your reputation, but it’ll also affect the number of downloads as many customers will be put off by the warning and run away.
- Customers will be unable to verify the integrity of the file and the identity of the publisher. CA-issued code signing certificates confirm to users that you, as a publisher, are who you say you are (i.e., you’re not an imposter trying to con them). It also guarantees that your software hasn’t been altered or corrupted after being signed. These two features will boost confidence in your products and minimize security risks. Test certificates simply can’t do that.
- In case of a breach, a CA won’t be able to revoke the certificate. What if your code signing certificate is stolen by an attacker? It happened to GitHub in December 2022. Cybercriminals gained access to some of its repositories and stole a few code signing certificates for its applications Atom and Desktop. Luckily enough, those certificates were issued by a trusted CA that revoked them as soon as it was informed. If GitHub used a self-signed certificate, it wouldn’t be able to revoke the compromised certificate.
3. Uncheck the ‘Sign the ClickOnce’ Manifest (Not Recommended)
This is a quick workaround more than a solution, and it can be applied to all use cases. You’ll basically ditch the annoying error by not signing the application at all. How?
After you’ve followed the steps from 2 to 6 listed in the previous section ‘Add a Trusted Code Signing Certificate to Your Visual Studio Project’, you’ll just have to uncheck the option Sign the ClickOnce manifests.
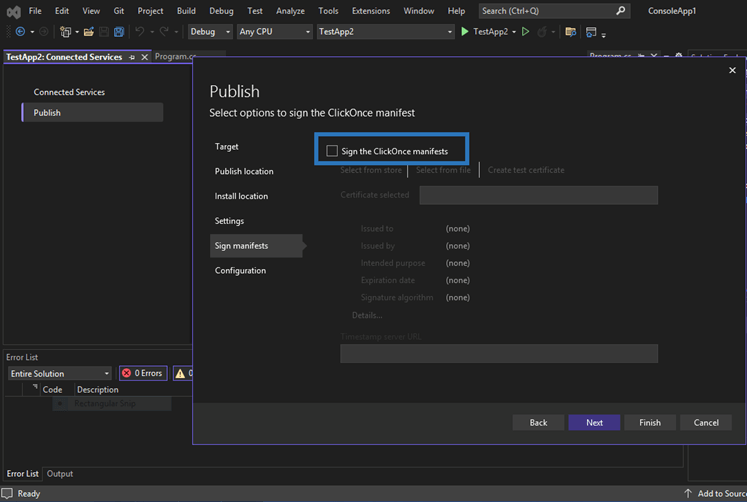
That’s it. Cheerio, ‘no certificates were found that met all the given criteria’ error!
Even if this looks like the easiest solution, it isn’t cybersecurity professionals’ favorite option and should be applied only as a last resort (i.e., possibly never). Why? Because publishing unsigned code is dangerous and serves as a bonanza for hackers. It prevents you from asserting your verified digital identity in your code or software.
And as Yoda said: ‘If you choose the quick and easy path, as Vader did, you will become an agent of evil.’ OK, maybe you won’t be joining the Dark Side anytime soon, but by not signing your software, you’ll risk enabling cybercriminals to do evil things in your name. For example:
- Your software updates and codes could be replaced by malware. An unsigned code is easily replaced by an infected one with the same name and no one will notice it. What if your users or customers download it, assuming that it’s genuine and safe? Their devices may be infected with malware and they’ll blame you for it. This is a disaster for any organization. You think you’re safe? You’re very optimistic. 91% of the 556,107 unique files from the most diverse sources analyzed by Picus in 2022 were malicious.
- Unsigned code is vulnerable code. And when cybercriminals see a vulnerable spot, they use it to their advantage. Do you really want to take the risk? According to CheckPoint, one in 60 organizations worldwide is a victim of ransomware attacks every week. The same report shows that ransomware costs are skyrocketing, resulting in seven times higher than the pay-off requested.
- A single data breach could cost you an arm and leg (or more). We’re not talking only about the costs related to the time and efforts to contain the breach and recovery from it. You’ll also have to spend money in case of legal actions (e.g., lawyers, compensations), as well as security and privacy regulations fines. How likely is it that your organization may incur a fine? Judge it for yourself. DLA Piper’s January 2023 report shows that the amount of the EU General Data Protection Regulation (GDPR) fines issued in 2022 more than doubled compared to the previous year, reaching an astonishing $1.74 billion.
Right, so far so good. You now have a solution for nearly all use cases. But what if the certificate’s private key has no permissions? Can you also fix it directly in Visual Studio? This is what we’re going to see next.
4. Change Your Private Key’s Permissions (Check With Your Administrator First)
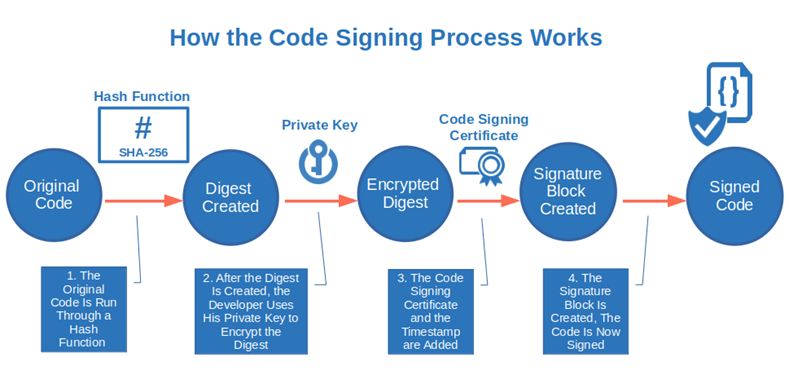
This is kind of a special case that can’t be addressed directly in Visual Studio. But what does a private key have to do with code signing? Let’s think about code signing for a minute and how it works.
Code signing is based on public key cryptography technology. When you apply for a publicly trusted code signing certificate, a key pair (public and private keys) is generated. The public key is included in the code signing certificate issued by the CA, whereas the private key is used by the developer to encrypt and sign the code.
If the developer’s private key doesn’t have the correct permission at the time of signing, the developer will get the SignTool error: no certificates were found that met all the given criteria.
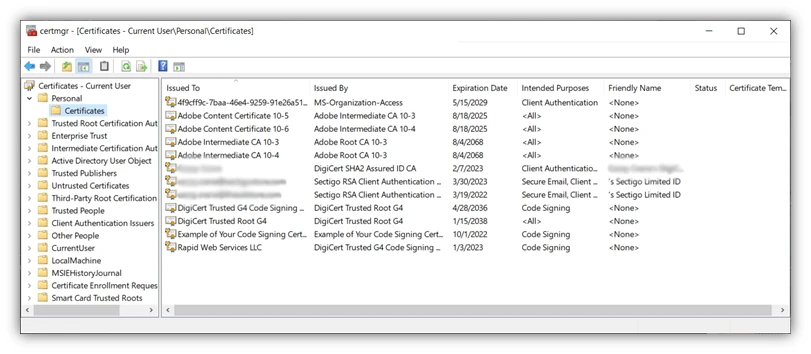
How can you set the correct permissions? You can do this using Windows Certificate Manager.
- Search for ‘certificate’ in the Windows Start menu and select Manage User Certificates.
- Navigate to the certificates folder under Personal (or to the folder where you store your certificates)
- Find your code signing certificate and right-click on it. Select Manage Private Keys.
- A pop-up window will come up. Under Security, go to your username and select the correct permission.
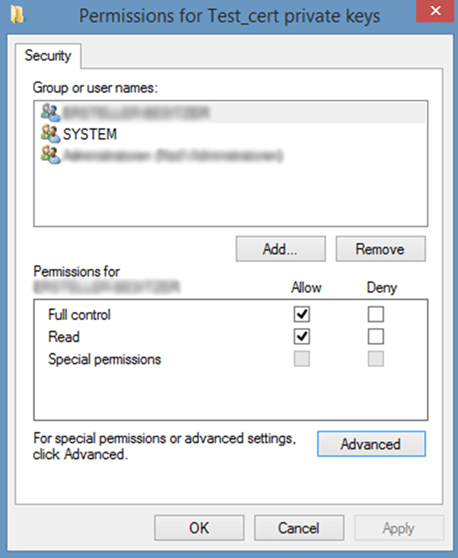
Now you can go back to your project in Visual Studio and start signing your code.
Are you getting a slightly different but equally cryptic error, like, ‘An error occurred while signing signtool.exe not found’ when you’re trying to sign your code?
We got you covered. Don’t miss our next article to find out how to fix that error, too. Because, as Yoda said: ‘Much you learn, you still my old Padawan. This is just the beginning.’
Final Thoughts on SignTool Error: No Certificates Were Found That Met All the Given Criteria
Microsoft SignTool and Visual Studio are two powerful tools that help organizations protect their code integrity and build customers’ trust by signing their codes in a few simple steps. However, with software developers constantly under pressure to accelerate deployment and releases, running into errors isn’t uncommon.
As with any piece of technology, a small glitch or oversight can produce an error that, if you don’t know its meaning or how to fix it, could cost your organization dearly in time and productivity.
Now that you’ve familiarized yourself with the SignTool error ‘No certificates were found that met all the given criteria’ and its main causes, resolving and avoiding it in the future will be easy as ABC. All you have to do is:
- Pick the best suitable solution among those listed in this article, and
- Follow the steps indicated.
Hungry for more? Find out everything about the PowerShell common error ‘PowerShell script is not digitally signed.’
