

How to Fix the ‘Windows Requires a Digitally Signed Driver’ Error in Windows 7, 8, 10 and 11
 (4 votes, average: 5.00 out of 5)
Your driver installation is halted, and a pop-up message informs you that a digitally signed driver is required to continue. What do you do? We’ll cover three options that’ll fix the problem and help you securely install even unsigned drivers in all recent Windows versions.
All hardware components connected to a device need drivers (i.e., small software communication components) to operate. Without user- or kernel-mode drivers, you won’t be able to print something, browse the internet, or even read this article as your screen won’t function.
Although you often rely on user-mode drivers to run applications, many drivers have direct access to the heart of the operating system (i.e., kernel). To prevent malicious exploitation of these sensitive components, the latest Windows versions automatically block any installation of unsigned drivers through a driver enforcement policy. So, when a user tries to install an unsigned driver, this causes the warning “Windows requires a digitally signed driver” to display.
And having a warning display isn’t a bad thing, given the exponential surge of cybercrime. In fact, in the first six months of 2023, Chainalysis reports that ransomware gangs squeezed close to $450 million out of their victims. So, it’s better that users are warned and can go into the situation with open eyes.
What’s the best way for software vendors and developers to prevent such a warning from displaying? And what can users and other software installers do to eliminate the warning? Keep reading to get answers to these questions.
Software Vendors & Developers: How to Eliminate the “Windows Requires a Digitally Signed Driver” Error in Windows 7/8/10/11
There are two ways to get rid of the “Windows requires a digitally signed driver” message:
- From a developer’s or publisher’s perspective: Digitally sign your software using a code signing certificate and take steps to ensure your driver meets the Windows Hardware Compatibility Program (WHCP) security and digital signing requirements.
- From a user’s perspective: Disable Windows’ native data integrity check security mechanisms. However, there are risks associated with doing so, and we’ll speak more about that later in the article.
Code Signing Eliminates the “Windows Requires a Digitally Signed Driver” Warning
As explained in the National Institute of Standards and Technology (NIST) Security Considerations for Code Signing whitepaper, code signing certificates are tiny digital files that use cryptography to:
- Prove your digital identity as a software vendor,
- Protect your software from tampering, and
- Shield your customers from malware infection by informing them of file changes.
These are critical security considerations when you consider that the number of software supply chain attacks surged by over 300% in 2022 compared to the previous year.
Used to sign drivers, software apps, and codes, code signing certificates help you enhance customers’ trust in your organization and products. As we’ve anticipated though, they’re also the golden ticket to eliminate the error “Windows requires a digitally signed driver” in Windows 7, 8, 10, and 11. Sounds brilliant, right? So, how can a single digital file accomplish so much?
Sign Windows Drivers (and Save Up to 21% While Doing So)
Digitally sign your Windows drivers using an extended validation (EV) code signing certificate for as little as $277.71/year for a 3-year certificate.
1. The Code Signing Certificate Is Issued Only After a Vetting Process
Security and digital identity are at the core of the code signing process from the very beginning. In fact, when you, as a publisher or a developer, purchase a code signing certificate from a trusted certificate authority (CA), you are required to:
- Send the CA your organization’s verifying documentation (or personal details) required to prove your identity.
- Undergo a video-based identity verification.
The CA will review and validate the information by a more or less rigorous background check, depending on the type of certificate chosen (i.e., a standard code signing certificate or extended validation certificate). This procedure guarantees that the certificate is only released to organizations/individuals that a renowned third party has verified.
Once the CA has successfully validated the information, it sends out a secure hardware USB token. Depending on the CA, either the certificate and private key will come pre-installed on the USB token, or you’ll receive a blank token and will have to generate the key on it yourself.

Pro Tip: Before you purchase your code signing certificate, make sure you pick the right one. Since 2016, all user-mode and kernel-mode drivers for Windows 10, and above must be signed exclusively with the more secure extended validation (EV) certificate. For now, you can still sign Windows 7 and 8 user-mode drivers with a standard certificate; however, the EV certificate will let you cover all Windows releases in one go.
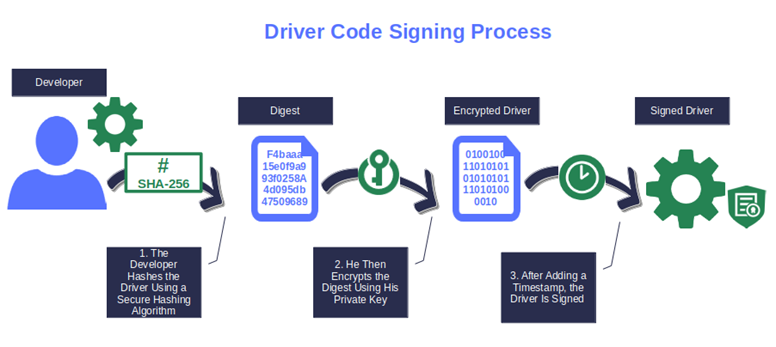
2. The Driver Is Signed Using a Secure Hashing Algorithm and the Developer/Publisher’s Private Key
After you’ve got the code signing certificate in hand, you’re ready to sign your driver. But what does the digital signing process look like under the hood?
- Hash the driver code using a secure hashing algorithm. The code is run through a mathematical formula (i.e., one-way hash function), and transformed into a fixed-length string of hexadecimal characters (i.e., a hash digest or hash value).
- Encrypt the digest. The hash digest is then encrypted using your private key. A timestamp will be added to ensure that the software will still be recognized as authentic even after the certificate has expired.
- Sign it. The digest and code signing certificate value are then bundled into a signature block and added to the driver.
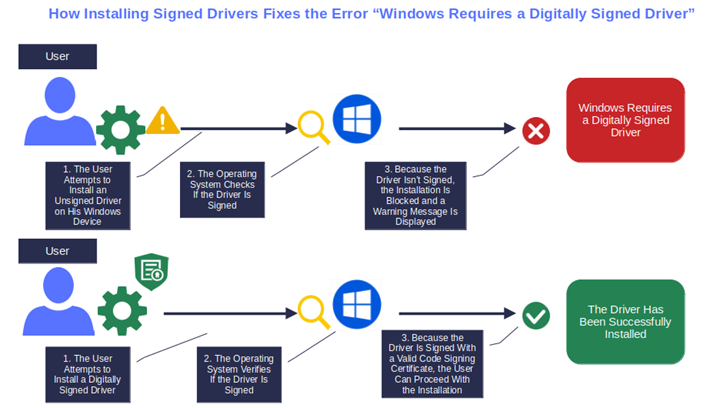
That’s it. Adieu! Goodbye, “Windows requires a digitally signed driver” message! From now on, every time a user tries to install your driver, the error will no longer display as their operating system will:
- Verify the authenticity of your digital signature. The operating system uses the public key to decrypt the digest and checks the signature.
- Confirm the integrity of the driver. The operating system generates a hash digest and compares it with the one it has just decrypted. If they match, the installation will proceed. If they don’t, the user will be alerted, and the installation will be blocked.
What could a software provider or developer want more? The error is gone for good, and your customers, drivers, and organizations are protected. But let’s take a moment to look at things in terms of the dangers you place users in by giving them an unsigned driver.
What Happens When a User Tries to Install an Unsigned Driver?
Let’s say you’ve just developed a new driver. When you test it on a few lab machines, it works like a charm, so you publish it on your website and make it available for download.
After a few hours, your customer service is inundated by support requests. Users are complaining that the installation fails with an error message saying that a digitally signed driver is required.
Alarmed, you check the driver on the download page. Low and behold, you realize that the driver in question isn’t signed! How was it possible? It passed all the tests. And then, you remember. On the devices your team uses for testing, Windows is always set in Test Mode (i.e., the driver signature enforcement is turned off, we’ll learn more about it in a moment). D’oh! That’s why nobody noticed the missing signature!
Everybody makes mistakes, but this kind of oversight can cost you dearly as it’ll:
- Hurt customers’ trust. Today, customer trust is a key factor that can make or break a company’s success. One simple mistake can easily shatter that trust beyond repair. In fact, only 37% of consumers interviewed by PWC in 2023 would keep on purchasing from a business that somehow let them down.
- Damage your reputation. 53% of customers surveyed by Ernst and Young are very concerned about data security, and breaches. What would you think would happen to your brand reputation, if your organization or user fell victim to a data breach caused by an unsigned driver? Yup, it would go down the drain in a matter of minutes.
- Decrease your sales and the number of downloads. This is one of the direct consequences of a data breach or of a poor reputation. When customers no longer see you as a reliable enterprise, they’ll take their money somewhere else.
- Prevent you from publishing Microsoft drivers. Are you developing kernel-mode or user-mode drivers for Microsoft 10 or 11? If they’re unsigned and don’t follow Microsoft’s driver signing policy, you won’t be able to publish them.
The bottom line is that Windows requires a digitally signed driver in Windows 7, 8, 10 and 11. If you want to keep your drivers secure and avoid users seeing the error when they try to install them, you must sign them with a code signing certificate.
Sign Windows Drivers (and Save Up to 21% While Doing So)
Digitally sign your Windows drivers using an extended validation (EV) code signing certificate for as little as $277.71/year for a 3-year certificate.
But as a user, is there a workaround you can use to remove Windows security checks during code development to get rid of the message?
Software Installers & Users: 3 Ways to Fix the “Windows Requires a Digitally Signed Driver” Error in Windows 7, 8, 10 and 11
Surfshark reports that the number of compromised accounts topped 110 million globally in Q2 2023. This represents a dramatic surge of 156% compared to Q1. Security is a big deal in today’s cyber world. Attackers are getting clever and have learned to exploit even the smallest vulnerabilities to get what they want.
This is one of the reasons why, as a user, you shouldn’t take the error “Windows requires a digitally signed driver” lightly. Hence, before implementing a risky workaround, try our first, best solution:
1. Download Your Drivers From Microsoft Official Sources Only
Check if the driver you want to install is available on any Microsoft legitimate webpage. Sites like Microsoft Download Center or Microsoft-approved vendors’ platforms publish only software and drivers that have been tested, signed, and meet Microsoft’s security guidance and standards.
This will enable you to verify that the driver you’re looking to install:
- Has been developed by the vendor (i.e., it’s authentic), and
- Hasn’t been tampered with.
How? When you attempt to install a signed driver, your client automatically checks the validity of its digital signature as briefly described in the previous section. If something isn’t right, the system will warn you and block the installation.
On the other hand, if the signature is valid and the driver hasn’t been modified, you’ll be able to securely install it without any warning or error. Easy, right?
Have you looked everywhere but can’t find a signed driver for hardware you want to install? Let’s explore the most used alternatives available to install an unsigned driver without being blocked by the message “Windows requires a digitally signed driver.”
2. Run Windows in Test Mode (Using Windows Command Line or Window Settings)
Test mode is usually geared toward software developers. However, should you as a user need to test an unsigned driver, you can use this method, too. Be careful, though, as doing so isn’t without risk.
To switch your Windows operating system into test mode, follow the steps below, no matter which Windows version you have. You can do this in one of two ways — using the Windows Command Line interface or changing your Windows Settings.
Before you start, if your device has Windows 8, 10 or 11 installed, ensure you deactivate secure boot, if necessary. Here’s how.
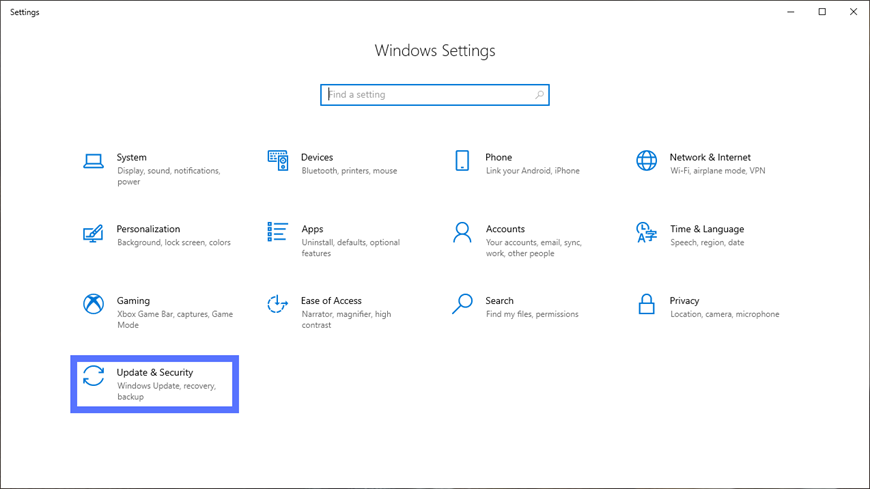
- Open Windows Settings. In the search bar, type “Windows settings.”
- Click on Update & Security. When you do this, a window with several options will open.
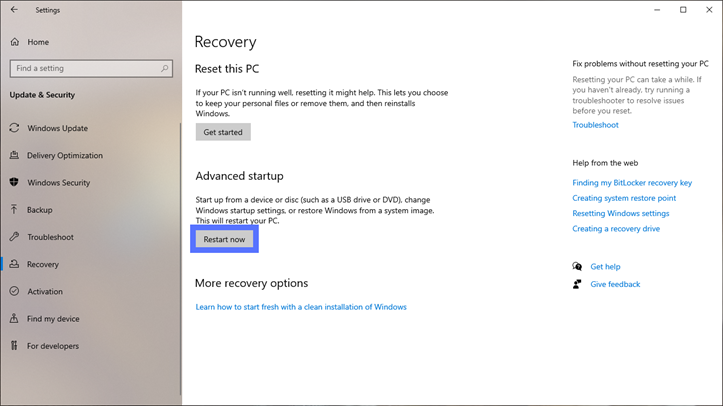
- Restart your computer. On the left hand-side click on “Recovery” and hit the “Restart now” button.
- Deactivate Secure Boot and restart your machine. After rebooting, go back to the “Startup Settings” window, click on Troubleshoot > Advanced Options > UEFI Firmware Settings > Restart.
You can now enable Test Mode by following the steps below.
How to Enable Test Mode in Windows 10
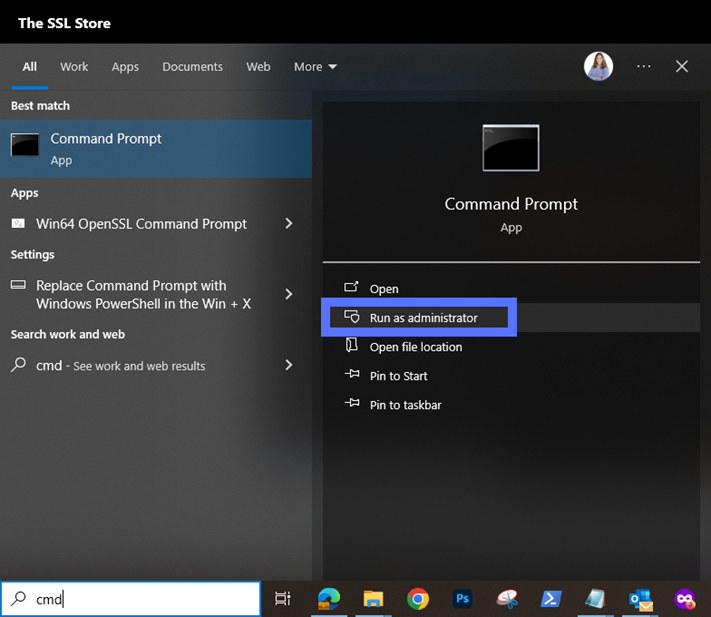
- Open the Command Prompt as administrator. Click on Start, type “Cmd” in the search bar, and select Run as administrator.
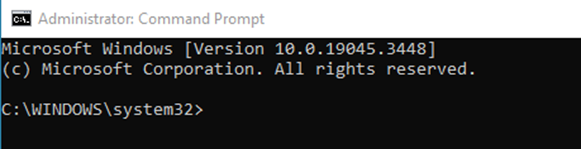
- Enter your administrator password. A Command Prompt window will open (as shown below).
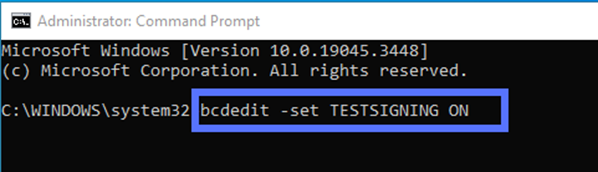
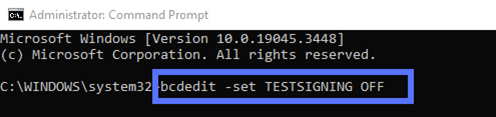
- Type bcdedit -set TESTSIGNING ON. Hit Enter to enable testing mode.
- Reboot your device.
That’s it. Your unsigned driver can now be installed without triggering the error message. Remember, when you enter test mode, Windows will allow the installation of any unsigned driver and software. Therefore, to reduce the risk of security issues, always scan the driver with an anti-virus program before proceeding.
To exit the Test Mode, reopen a command prompt as administrator, type bcdedit -set TESTSIGNING OFF, and restart your Windows 10 system.
How to Enable Test Mode in Windows 10 via Windows Settings
Don’t feel comfortable or confident making updates using the Windows Command Line tool? That’s okay, you can also activate it in your Windows Settings:
- Navigate to Windows Settings. In your computer’s run bar and type “Windows Settings.”
- Open Update & Security. In this new window, you can change your device settings.
- Select Recovery and restart your device. In the left-hand navigation bar, select the Recovery option.
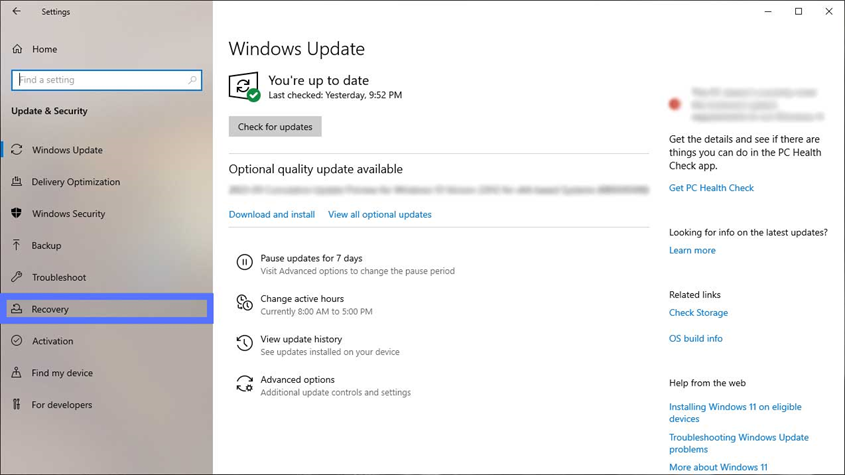
- Select Restart Now under Advanced Startup. This will restart your machine so you can change your Windows startup settings.
- Disable driver signature reinforcement. Once your computer boots up, under “Startup Settings,” choose “Troubleshoot” and select the option labeled “Disable driver signature reinforcement.”
- Restart your machine. You’ll need to do this for the setting to take effect and to move forward with installing unsigned drivers.
3. Disable Windows Driver Signature Enforcement
Let’s start by saying this upfront: Disabling a device security feature is never a good idea from a security perspective. The Windows driver signature enforcement is no exception; It’s a bit like leaving your front door unlocked because your son forgot the keys. You know that it’ll put you in danger of burglary, but you accept the risk as you don’t want to get up in the middle of the night to open the door.
So, once again, if you can get hold of digitally signed drivers that work, we strongly recommend you use those instead of disabling your device’s security measure. Taking this approach will help shield your devices against malware (including rootkits) that could be hidden inside an unsigned driver and protect your sensitive data.
But, sometimes, using a signed driver isn’t an option. We get that. And if you find yourself in this situation and have decided to disable Windows driver signature enforcement anyhow, then there are a few ways to go about doing so depending on which version of Windows you’re using.
In this article, we’ll show you a technique that’ll work on multiple Windows releases.
- Restart your device. At the very beginning, when the computer’s manufacturer logo appears, hit the F8 key to enter the Advanced boot options. (Shift + F8 for Windows 8 and 8.1.) For Windows 10 users, you’ll first have to enable the Advanced Boot options while signed in as administrator.
- Select Disable Driver Signature Enforcement. Using your keyboard’s arrow keys, navigate down the screen until you reach the “Disable driver signature enforcement” option. Hit Enter to select it.
Done! You can now successfully install any unsigned driver. Keep your workstation secure. Don’t forget to switch on the driver signature enforcement feature as soon as the installation is completed.
You aren’t comfortable with playing around with the Boot menu? You can get rid of the error “Windows requires a digitally signed driver” in Windows 7, 8, 10, and 11 by disabling the driver signature enforcement directly from the operating system. How? Look for your actual operating system version and implement the steps described below.
Windows 10 Professional edition, Windows 8, 8.1 or, 7
Keep calm, and follow the instructions:
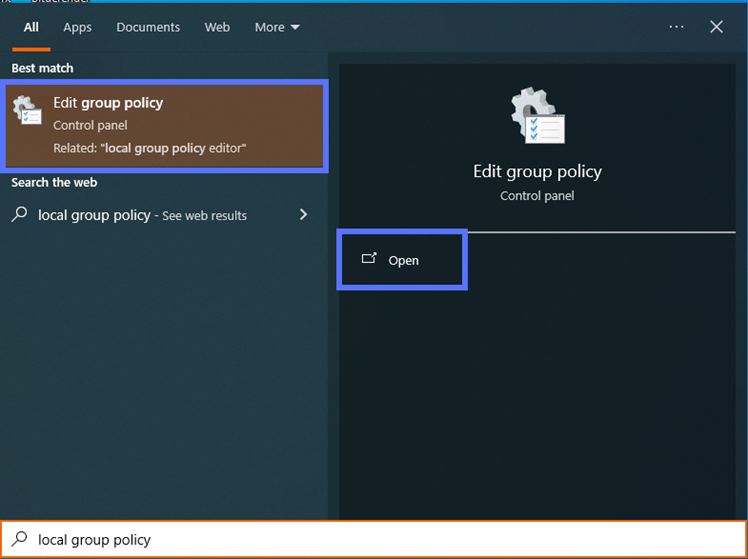
- On the desktop, click the “Start” button. In the search box, type “local group policy.”
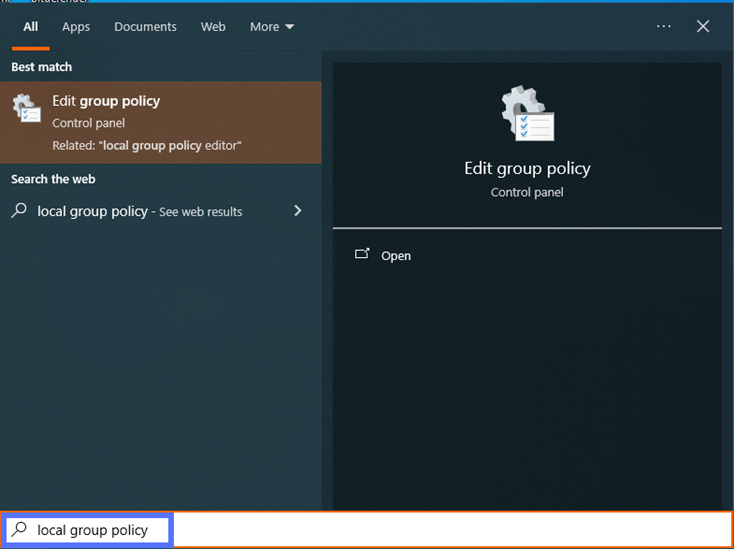
- Select “Edit group policy” and click on “Open”. A pop-up window labeled “Local Group Policy Editor” will open.
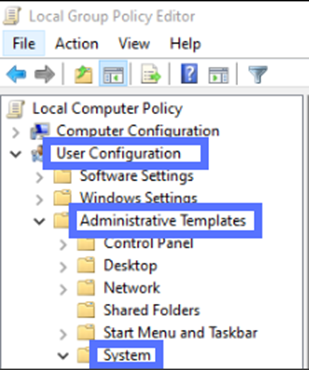
- Under “User Configuration,” click on “Administrative Template.” Select “System.”
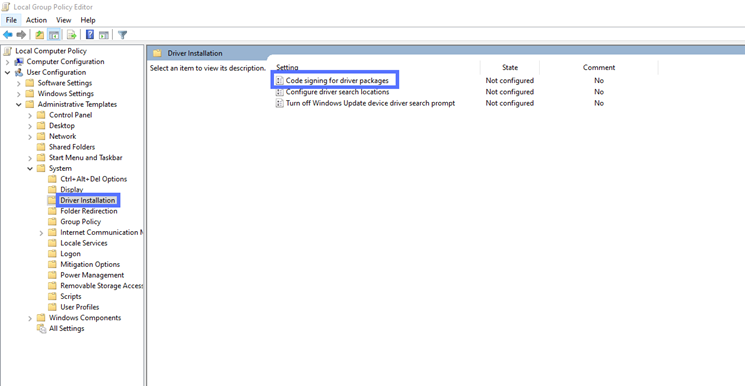
- Double-click on Driver installation in the left-hand navigation. In the main window on the right-hand side, you’ll see a list of files. Double-click on “Code Signing for Driver packages.”
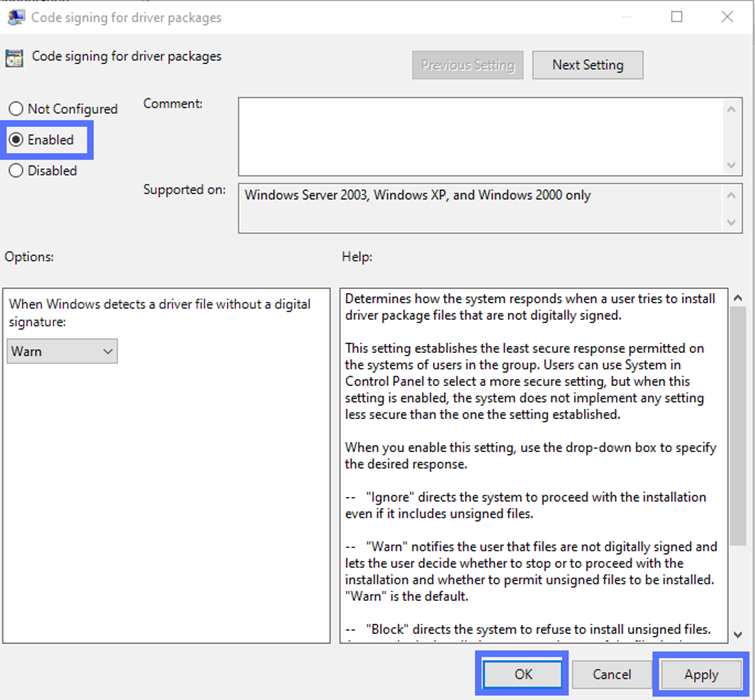
- A pop-up window will open. Select the “Enable” radio button. Click “Apply” and then “OK” to save your selection.
- Close all windows and restart your device.
Windows 10 Home, Professional, Enterprise, Education
Do you have Windows 10 installed on your device and you’re looking for a faster procedure? Have a look at this short video.
Windows 11, All Editions
If you’re a proud owner of a Windows 11 computer, there’s a tutorial for this new version of the operating system, too:
Remember: Once you’ve installed your driver, complete the same process to reactivate the driver signature enforcement.
Want to learn how to fix a slightly different error message such as “No signed device drivers were found”? We’ve created a quick guide with a bunch of solutions for that, too. Don’t miss it.
Final Thoughts on How to Fix “Windows Requires a Digitally Signed Driver in Windows 7, 8, 10, and 11
Software installation error messages can have a detrimental effect on users and organizations:
- Productivity loss,
- Loss of customer trust,
- Drop in software downloads, and
- Loss of revenue (due to lost sales when systems aren’t functioning properly).
These are just a few examples of how severely an error message like “Windows requires a digitally signed driver” can hit you.
But, as we’ve just learned, every situation has its silver lining. In this instance, it’s code signing. Whenever possible, only distribute or install drivers that have been digitally signed using a code signing certificate issued by a reputable certificate authority (CA).
In all other circumstances, use one of the techniques we provided, but remember to:
- Download drivers only from official, reputable sources,
- Scan these components for malware, viruses, and
- Revert back to the original security settings as soon as the drivers have been installed.
This kind of workaround can be helpful and occasionally required, but it doesn’t imply that you should put at risk the security of your device or, for organizations, your customers’ devices.
