

Azure Key Vault Set Up and Code Signing Tutorial (with FAQs)

 (7 votes, average: 5.00 out of 5)
This step-by-step instructional guide will walk you through how to issue an HSM-backed cloud code signing certificate in Azure Key Vault and use it to sign an executable using Azure SignTool
In June 2023, industry leaders rolled out new Code Signing Baseline Requirements. The goal was to improve the security and integrity of these certificates and the applications they sign. These new security requirements mean your cryptographic keys must be generated and stored on secure hardware (such as a hardware security module [HSM]).
For some developers, this means turning to cloud-based code signing solutions such as Azure Key Vault. The good news is that we’ve already addressed what an Azure Key Vault code signing certificate is at length and shown you how to sign packages using a code signing certificate stored in Azure Key Vault.
Now, it’s time to explore the specifics of how to set up your Azure Key Vault and create a certificate that can be used to sign software apps, executables, scripts, and other types of code. Next, we’ll walk you through how to sign an executable using Azure SignTool.
Lastly, we’ll wrap things up by addressing some of our customers’ most frequently asked questions (FAQs).
GoGetSSL Cloud Code Signing: A Simpler Alternative to Azure Key Vault
There is more than one option for cloud-based code signing solutions. GoGetSSL Cloud Code Signing is similar to Azure Key Vault, but without all the unnecessary bells and whistles. Your code signing certificate’s private key will be securely generated and stored using DigiCert’s KeyLocker cloud storage.
Azure Key Vault Tutorial — Part 1: How to Issue an Azure Key Vault Code Signing Certificate
Follow these instructions to store a code signing certificate and private key in Azure Key Vault. This allows you to store your signing key securely (complying with current industry standards) without needing a USB token or buying an on-prem hardware security module (HSM).
Got a cup of coffee? Great — it’s time to dive in.
Set Up a New Azure Key Vault
Azure Key Vault is a cloud service within Microsoft Azure. If you don’t already have an Azure account, then your first step is to create one. You can create a free Azure account to start or choose the pay-as-you-go option.
Once this account is created, log in to the Microsoft Azure Portal. Here, you’ll select Key Vaults and click Create.
In the Create a Key Vault wizard, you’ll specify the requisite details (select or create a Resource Group, Key Vault Name, Region, etc.). Be sure to select the Premium pricing tier, as shown in the screenshot below. This is necessary to enable your private keys to be securely stored in HSM-secured storage, which is compliant with the industry’s baseline security requirements we mentioned earlier.
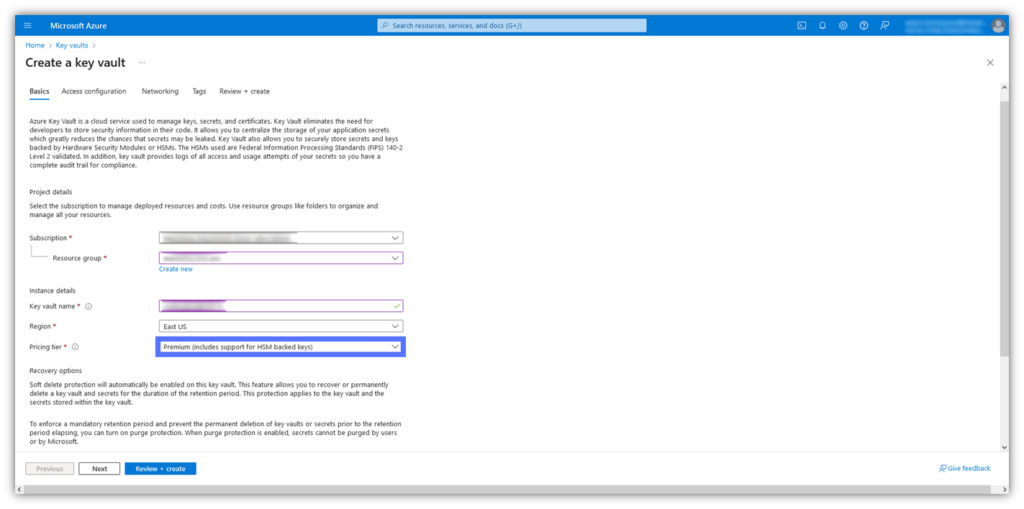
If you try to store your key in a way that isn’t secured by a FIPS 140-2 Level 2 or Common Criteria EAL 4+ (or higher) compliant device, then it won’t be compliant with the industry’s baseline security requirements. This could result in your code signing certificate being revoked because it won’t be trusted.
NOTE: You do not need to set up an Azure Key Vault Managed HSM; just a standard key vault will do.
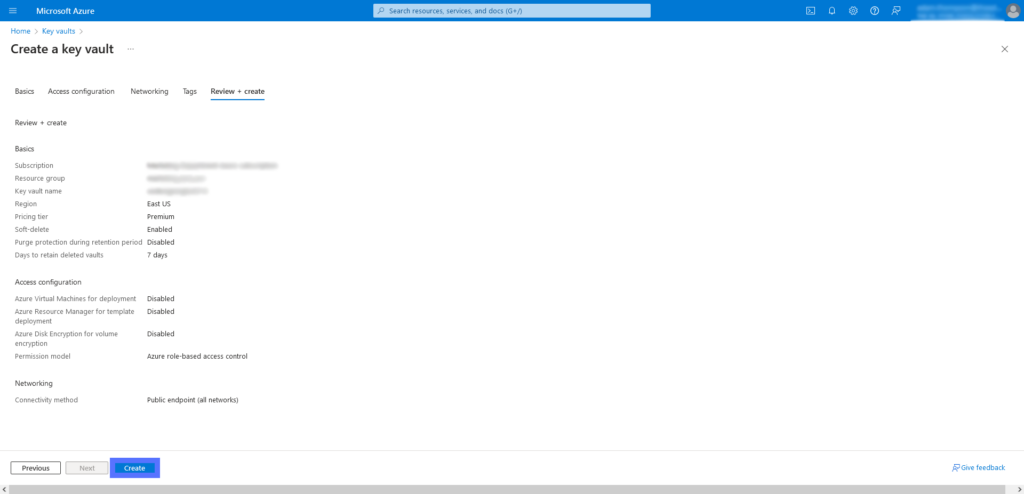
Once you’ve completed all of the steps in this section’s various tabs (Access Configuration, Networking, Tags, and Review + Create), it’s time to press the Create button on the last page to create your new Azure Key Vault. This will trigger the Key Vault to deploy.
Once deployment is complete, navigate to the Azure Key Vault you’ve just created. In the Overview menu, you’ll find your Vault URI (Uniform Resource Identifier). Save this for later, as you’ll need it to serve as a resource locator.
Assign Key Vault Roles and Permissions
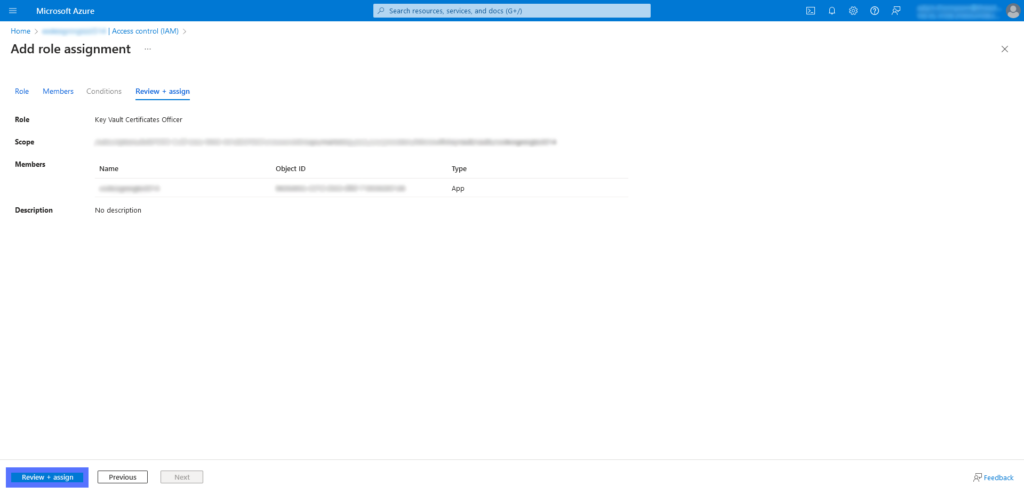
In the left-hand navigation menu, select Access Control (IAM) > Role, which will take you to a screen where you can add role assignments. Here, you’ll see a list of various job function roles. Select Key Vault Administrator and hit Next.
Use the other tabs (Members and Conditions) to set your role permissions, assign privileges to specific users, and select other specifications. In the Review + Assign tab, review your selections before implementing them.
Purchase a DigiCert or GoGetSSL Code Signing Certificate
Purchase either a DigiCert or GoGetSSL code signing certificate. These two certificate authority brands are compatible with Azure Key Vault. The reason we say that is that Sectigo and Comodo SSL code signing certificates require key attestation, a functionality that Azure Key Vault doesn’t support.
Save Up to 45% on a GoGetSSL Cloud Code Signing Certificate
Digitally sign up to 1,000 signing without having to manage a physical USB token for as little as $372.69/year.
Generate a Certificate Signing Request (CSR)
Once you’ve purchased your certificate, navigate to Objects > Certificates in the left-hand menu and select Generate/Import in the menu near the top of the page. This will bring you to a page labeled Create a Certificate, where you can complete your CSR.
Select or enter the following details, as shown on the main screen in the following screenshot:
- Method of Certificate Creation: Generate
- Certificate Name: Whatever you want you name your certificate
- Type of Certificate Authority (CA): Select the option Certificate issued by a non-integrated CA.
- Subject: This is where you’ll enter the name of the issuing CA using the format CN=My Organization Name. For example: CN=ABC Random Tech Company Inc
- DNS Names: 0
- Content Type: PKCS #12
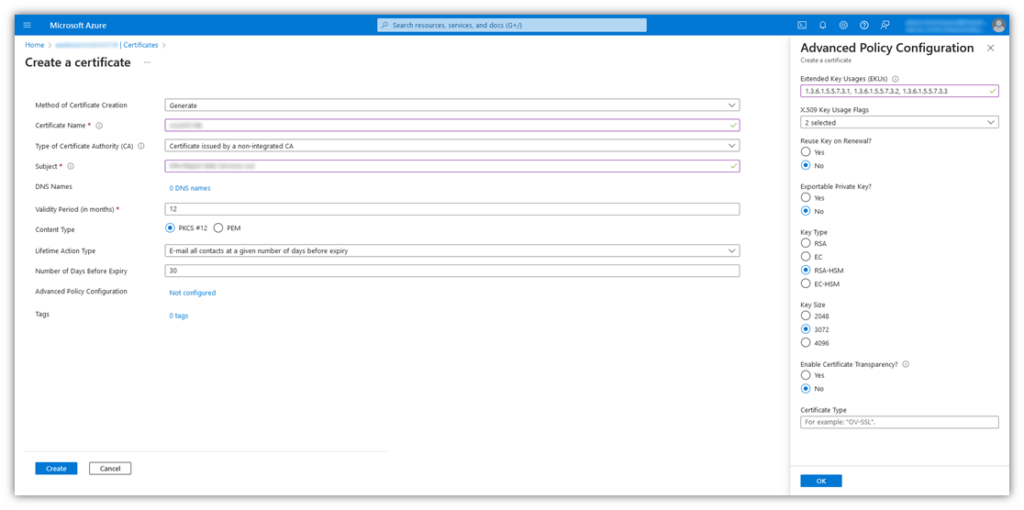
See that Advanced Policy Configuration screen on the right side of our screenshot? You can access this by clicking the Not Configured button below where you’ve entered your CSR details. Enter or select the following options:
- Extended Key Usages (EKUs): Add 1.3.6.1.5.5.7.3.3 to the list of options selected.
- Reuse Key on Renewal: Select No.
- Exportable Private Key: Select No.
- Key Type: Select either RSA-HSM or EC-HSM. Now, there are two important things to note:
- Select a key type that ends in HSM to ensure it’s stored in a compliant manner. Otherwise, your certificate will likely be revoked.
- Select an RSA-HSM certificate if you’re planning to use your Azure Key Vault stored certificate to sign projects in Visual Studio. ECC certificates are not supported by Visual Studio.
- Key Size: Select 3072, as it’s the minimum size required by the industry’s baseline security requirements.
- Enable Certificate Transparency: Select Yes or No.
- Certificate Type: Select the code signing certificate’s validation level, for example Organization Validation Code Signing (OV-CS) or Extended Validation Code Signing (EV-CS) .
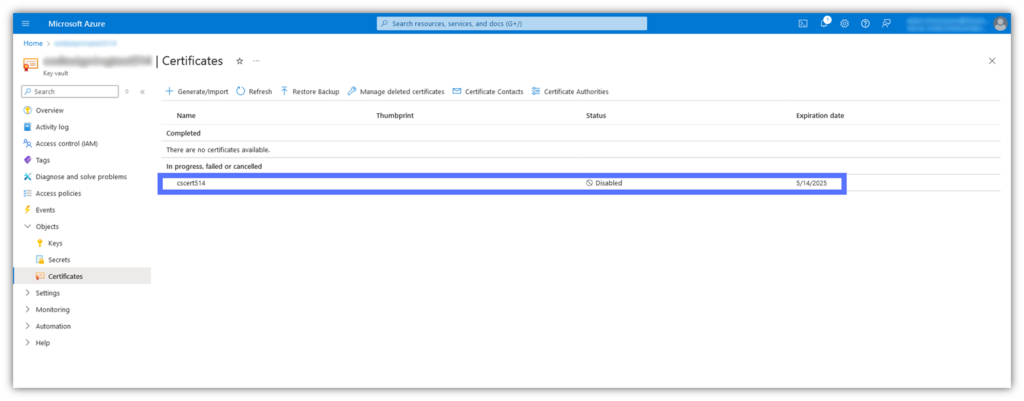
Press OK and Create to proceed. This will take you back to the AKV Certificates page. There, you’ll see your new Azure Key Vault code signing certificate listed under the section In Progress, Failed or Cancelled, as shown below:
NOTE: Completing the CSR generation process also creates the cryptographic key pair.
Submit Your CSR to the Issuing CA
Your certificate provider will provide further instructions on how to submit your CSR to the certificate authority. You’ll likely need access to your certificate signing request data.
To access your CSR information, click on the certificate name listed under the In Progress, Failed or Cancelled heading. This will load a new screen where you can select Certificate Operation. In the sidebar area, select Download CSR and save it to a preferred location.
Are we done yet? Almost. But first, you have to complete one of the most important steps: validation.
Complete the CA’s Validation Process
For DigiCert certificate users, you’ll receive an email that requires you to acknowledge that you’re storing the code signing certificate’s cryptographic keys in a secure, compliant location:
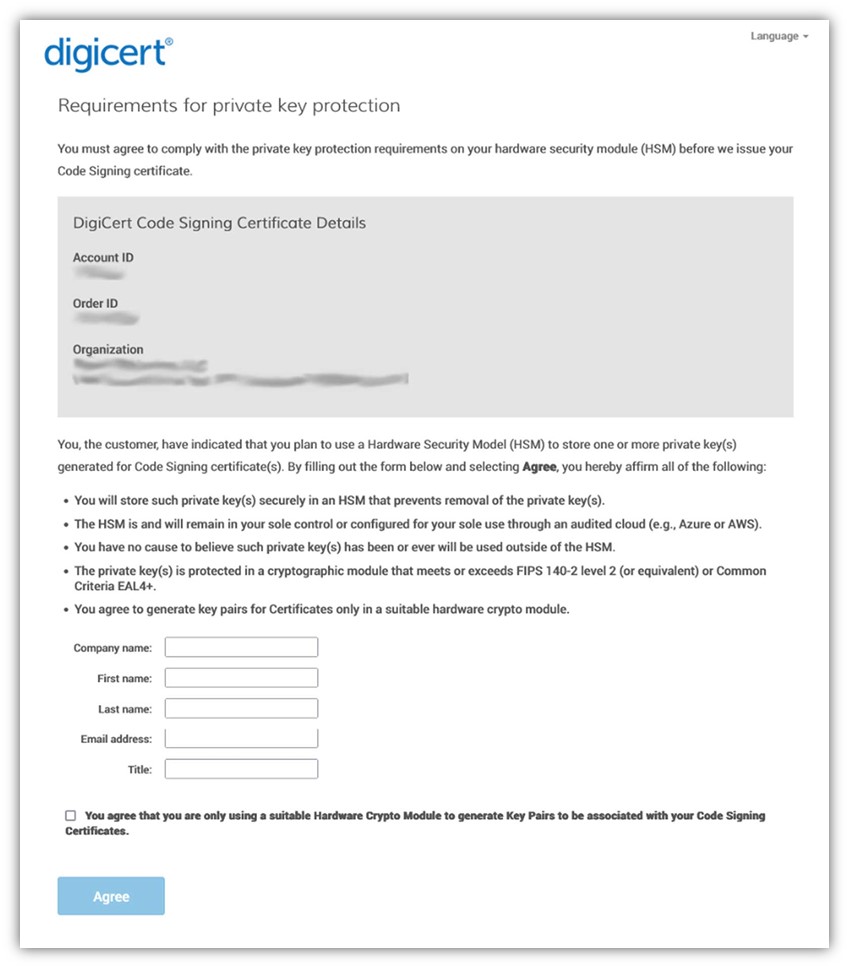
This form underscores the importance of selecting the HSM storage method when you originally created your Azure Key Vault. If you selected a non-HSM option when setting up your AKV, then your certificate could be revoked for non-compliant key storage.
Next, complete any additional forms required by the CA. For DigiCert and GoGetSSL certificate users, your code signing certificate will be issued via email (in a .zip folder) once the validation process is complete (which may take a few days).

Save 27% – DigiCert Code Signing Certificate
Enhance your code’s integrity and boost user confidence through digital “shrink-wrapping” using a DigiCert Code Signing Certificate.
Merge Your New Certificate and Cryptographic Key
Download the .zip folder from the DigiCert email and save it to a preferred location. The contents will look like this, and it contains all three elements of your trust chain:
- Root CA certificate
- Intermediate CA certificate
- Leaf certificate

Next, open the certificate in Azure Key Vault by clicking on the name of your certificate on the Certificates page. Select the following on the next screen:
- Select Certificate Operation and then click Merge Signed Request, as highlighted below:
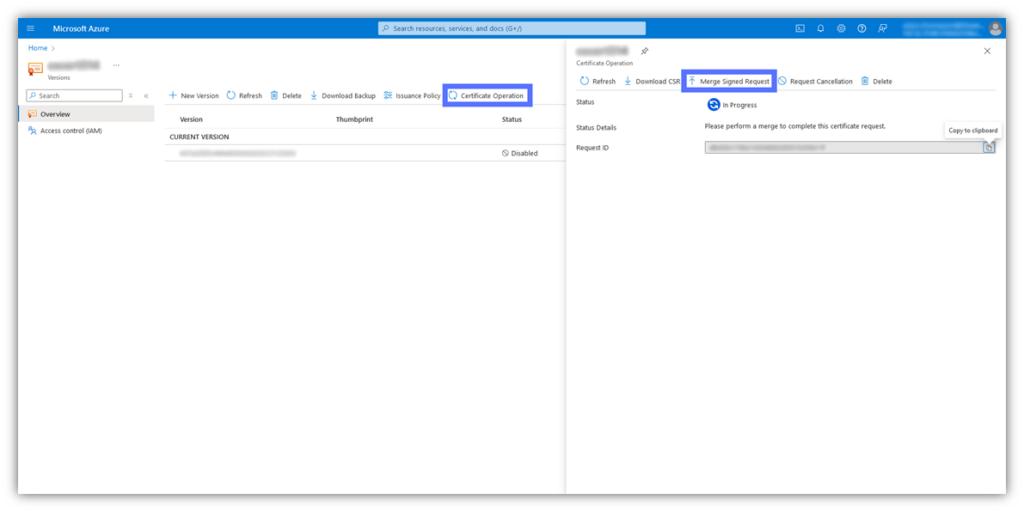
- Grab your leaf certificate (e.g., your_company_name.crt) from the .zip folder you downloaded.
- Open the certificate in a text editor app, and copy-paste the certificate text data into Azure Key Vault when prompted.
Your new code signing certificate and its private key will be merged and ready for use to sign with your preferred signing tool(s).
Azure Key Vault Tutorial — Part 2: How to “Connect the Dots” Between Other Apps & Key Vault
There are a few more things you’ll need to do before diving into using your certificate to sign code and apps. For starters, you’ll need to install the signing tool you want to use and configure access permissions for your cryptographic key.
For this article, we’re going to use AzureSignTool as our example. But you can also use other compatible code signing tools to sign your software using a certificate that’s stored in Azure Key Vault.
Install AzureSignTool
You can’t sign software using a tool you don’t have installed. AzureSignTool is a popular open-source version of SignTool that’s designed to work with Azure Key Vault.
Before proceeding any further, ensure you’ve got the latest version of the .NET software development kit (.NET SDK) installed on your machine. After that, open Windows Command Prompt (CMD) by going to Start > CMD and run: dotnet tool install –global AzureSignTool.
This should be what you see:

Create a Microsoft Entra ID Application
You’ll need to create an application in Microsoft Entra. Formerly known as Azure Active Directory (Azure AD), Entra is the umbrella name for Microsoft’s identity platform and network access solutions.
This step is required because its IAM platform only works with registered apps. This establishes trust between your app and Entra, so that Entra knows that your app is trusted to use your code signing certificate and private key.
Follow Microsoft’s instructions to create and register the app. NOTE: Leave the optional Redirect URI field blank. However, you’ll want to write down the Tenant ID and Application ID (i.e., Client ID), the latter of which identifies your app in Entra.
Once the app is registered:
- Navigate to Certs & Secrets and select Client Secrets.
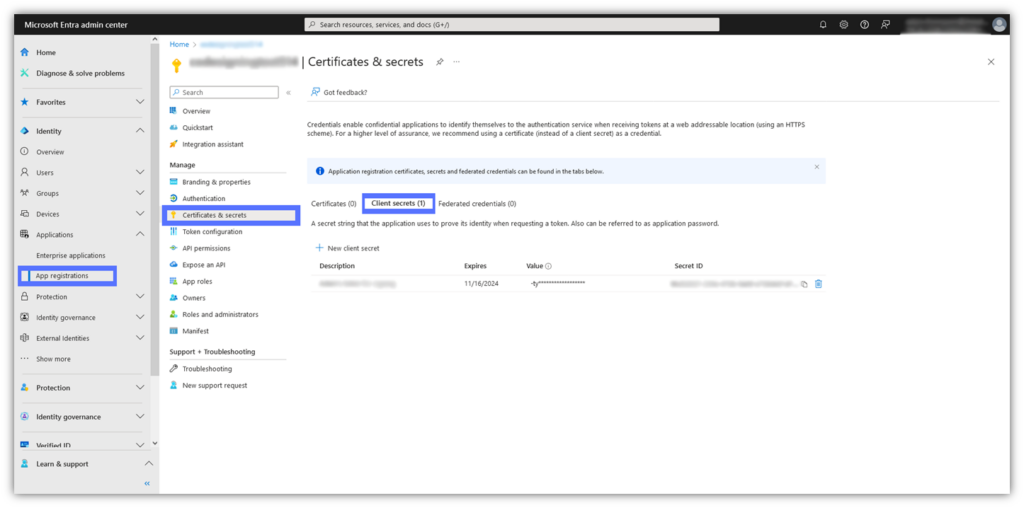
- Click New Client Secret to create a new secret, which will appear in the section below and display several key pieces of information (i.e., Name, Expiration Date, Value, and Secret ID).
- Copy-paste the values displayed there, as you won’t be able to access or see them again at a later time.
Assign Permissions to the App in Azure Key Vault’s Access Control (IAM)
Remember earlier when we assigned the Key Vault Administrator role? We’re going to do something similar, but this time, we’re going to assign permissions to the newly registered Entra ID app.
Be sure to select a role with adequate access permissions (but not too many, either, since excess privileges can create bad situations). Some users recommend assigning the single role Key Vault Crypto User, or the dual roles Key Vault Reader + Key Vault Crypto User.
Azure Key Vault Tutorial — Part 3: How to Sign Code Using an AKV Certificate
Alright, now that we’ve got everything set up and ready to go, it’s time to put your certificate to good use. Let’s sign an app executable using AzureSignTool. You can do this in CMD by using the following command:
azuresigntool sign -kvu [vault uri] -kvc [certificate name] -kvi [application id] -kvs [secret] -kvt [tenant id] -tr http://timestamp.digicert.com -v [filename.exe]
NOTE: Be sure to replace the bracketed placeholder values with your legitimate values. This will involve using all of the we said to collect earlier, along with your executable’s file name.
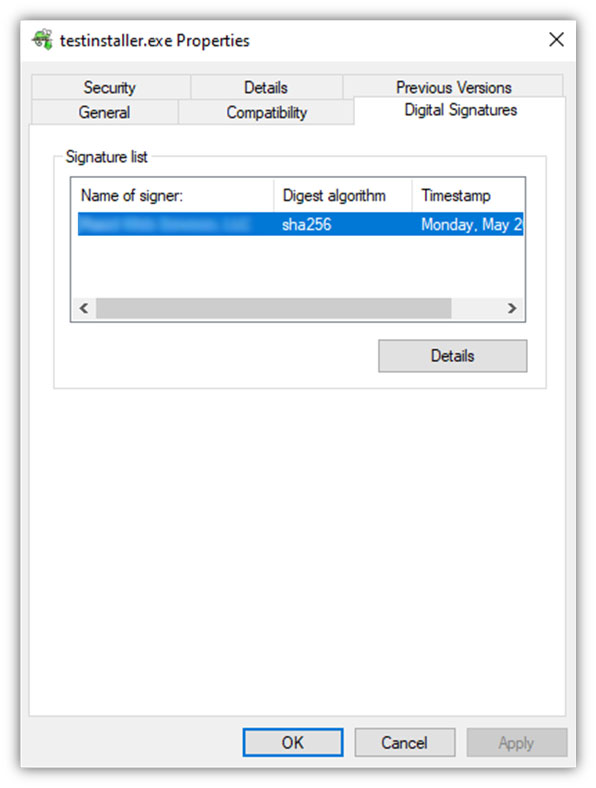
Here’s what it looks like when you’ve digitally signed your executable:
Azure Key Vault Code Signing FAQs
We sometimes receive questions about signing executables and other projects using code signing certificates and keys that are stored in Azure Key Vault. Here are some answers to what may be one of your burning questions…
1. How Does Azure Code Signing Work?
Azure Key Vault code signing works by allowing users to securely store their cryptographic private keys in secure, cloud-based key storage. While these keys are not directly accessible or exportable, authorized users can use them to sign software, executables, and other projects using compatible, popular signing tools.
2. Are All Azure Key Vaults Compliant for Code Signing Key Storage?
No. Not all of Azure Key Vault’s key storage options meet the strict FIPS 140-2 Level 2 or Common Criteria EAL 4+ requirements outlined by the CA/B Forum. This is why it’s important when setting up your Key Vault to select the Premium tier option.
Otherwise, use an alternative secure key storage solution like GoGetSSL Cloud Code Signing.
GoGetSSL Cloud Code Signing: A Simpler Alternative to Azure Key Vault
There is more than one option for cloud-based code signing solutions. GoGetSSL Cloud Code Signing is similar to Azure Key Vault, but without all the unnecessary bells and whistles. Your code signing certificate’s private key will be securely generated and stored using DigiCert’s KeyLocker cloud storage.
3. Can You Import an Existing Code Signing Certificate into Azure Key Vault?
In a word: no. Because of the secure hardware requirements specified by the CA/Browser Forum (CA/B Forum), your code signing certificate’s private key must be generated and stored on secure hardware.
If you were to generate it on one piece of secure hardware and then try to export it to another, you run the risk of that sensitive key data being intercepted and compromised. This is why keys must be generated in Azure Key Vault for them to be stored in a Vault.
4. How Do I Enable Logging in Azure Key Vault?
Azure Key Vault logging is something every security-conscientious administrator should care about. It’s crucial to know precisely who is accessing your Key Vault and who is using your AKV-stored code signing certificates to sign something.
Microsoft has provided a guide that will walk you through the process of how to enable Key Vault logging.
5. What Is the Difference Between Traditional SignTool and AzureSignTool?
The difference between these two code signing tools is that the one with “Azure” in the name is tailored to work with Azure Key Vault specifically. SignTool, on the other hand, works with many platforms and isn’t specifically targeted for compatibility with Azure Key Vault.
