

How to Hash a File in 60 Seconds or Less
 (10 votes, average: 5.00 out of 5)
Knowing how to hash a file is as easy as 1-2-3 — quite literally, in this case. We’ll show you how to hash your files in just three easy steps in Windows Command Line
When you download any application on the internet, there’s always some level of risk involved. If you download a file from a legitimate site, you should be able to trust it, right? Ideally, yes. But there are always the cases when things go wrong (e.g., someone hacks the website and uploads malicious versions of the company’s files) and an unauthorized party may alter a file. This is why you need to hash a file to help users recognize the unauthorized modification has occurred.
A file hash is a long string of hexadecimal numbers that looks like a whole lot of gibberish, but it serves an invaluable purpose: it’s a way to check whether the integrity of a file has been compromised. We won’t get into all of the specifics about what a hashing algorithm is or how it works — we have other articles that already do that.
Let’s explore how to hash a file for enhanced software security.
How to Hash a File in One Minute
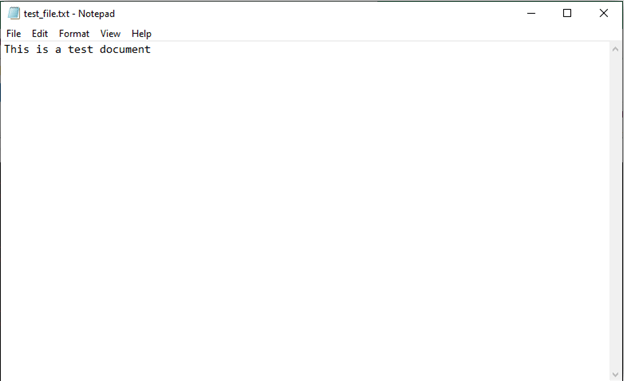
Let’s use a simple text document as an example of a file we’re going to hash. In this case, the file simply says, “This is a test document” and that’s it. I know, it’s a very creative, “super secret” message for sure.

Anyhow, now that we have our file created, we’re going to quickly hash it using Windows Command Line. So, here we go!
1. Open Windows Command Line. In your Start bar, type CMD and press Enter to open Windows Command Line.
2. Decide which hashing algorithm you want to use. Different hash functions (i.e., hashing algorithms) suit different needs and purposes. For example, you’ll want to use a fast hashing algorithm for digital signatures but a slow one for secure password storage. (Note: it’s recommended that you store your password hash values and not the plaintext passwords themselves.)
3. Hash a file using the certutil -hashfile command. Next, you’ll want to use the certutil -hashfile command along with the file path that leads to where you’re storing the file you want to hash. You’ll also want to specify the hash function (hashing algorithm) you want to use to hash your file. Some examples include SHA256, MD5 and SHA1. (Both MD5 and SHA1 have been deprecated, so they’re not typically recommended but you’ll still sometimes find them being used.)
The resulting command for hashing a file using SHA-256 will look something like this:
certutil -hashfile c:\example\test_file.txt SHA256
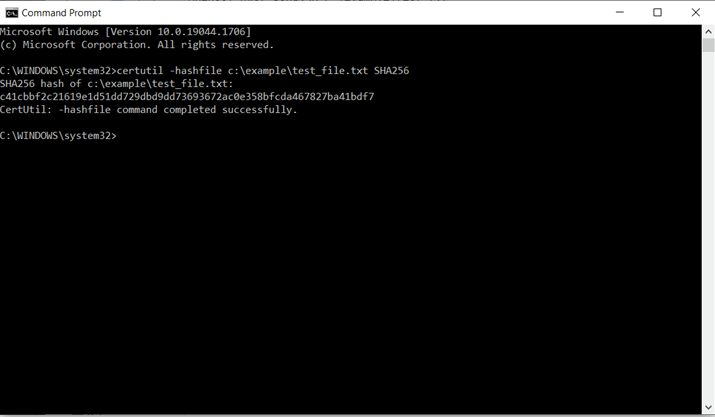
That’s it! You’ve hashed your file quickly and easily. In this case, the resulting SHA-256 hash value (i.e., digest) for the file in this example is the following:
c41cbbfc21619e1d51dd729dbd9dd73693672ac0e358bfcda467827ba41bdf7
How to Check If a File Hash Digest Has Changed
Now that you know how to hash a file, you’ll also want to check to make sure that changing something in it will result in an entirely new hash value. For example, if I took the text document I hashed and then altered it by adding an exclamation mark, then the resulting file will have a completely different hash digest.
A screenshot of the modified version of the test file with the exclamation mark added to the original phrase, making it say: “This is a test document!”
In this case, the new hash value will be the following hexadecimal string:
ca5d973b1c351570001d9ba32fe3c2189696f97836eac1f082dc8ad1d4aa3085

Let’s quickly compare the two hashes side by side so you can see the difference:
| Original File’s SHA-256 Hash Value | Modified File’s SHA-256 Hash Value |
|---|---|
| c41cbbfc21619e1d51dd729dbd9dd73693672ac0e358bfcda467827ba41bdf7 | ca5d973b1c351570001d9ba32fe3c2189696f97836eac1f082dc8ad1d4aa3085 |
Yes, even changing something as minimal as a single character (in this case, adding an exclamation mark) altered the entire hash digest.
Why Hashing Matters to File and Software Security
Hashing is an essential tool when it comes to ensuring the integrity of your software and protecting your organization’s brand and reputation. Why? Because, basically, hashing serves as a form of checksum.
When people download your software, for example, you can provide the file’s or executable’s hash value for them to use to check themselves. This helps to establish trust and provides your users with a way to verify that your software hasn’t been altered. If the hash values don’t match, then users will know that the file or software in question may have been modified and, therefore, it can’t be trusted.
But, sometimes, hashing isn’t enough. Remember the issue we mentioned earlier? Imagine that someone hacks your website and uploads their own malicious version of your software. They replace the hash values on your site with the ones for their dangerous files. If your users use those hash digests to confirm the files are authentic, they’ll just confirm that the hash values on the site match the ones for the file.
However, there’s no digital identity for them to verify. This is where digital signatures and digital certificates come into play.
Hashing Is a Critical Element of Digital Signatures and Certificates
Digital signatures add an extra layer of security to your software and files by adding your organization’s digital identity to the equation. These signatures are made possible through digital certificates such as code signing certificates.
A code signing certificate allows you to digitally sign your software to assert your organization’s verified identity. This way, when users download or try to install it, they won’t see the Windows Defender SmartScreen “Unknown publisher” warnings that look like this:

For example, a standard code signing certificate will allow your organization’s verified digital identity information to display where it says “Unknown Publisher” in the screenshot above. With an extended validation (EV) code signing certificate, it’ll get rid of the SmartScreen warning altogether because the certificate (and, therefore, your software) will automatically be trusted by Windows operating systems and browsers.
Of course, there are other uses and types of digital certificates as well. You can use digital certificates to cryptographically sign emails, documents, and even software and other executables to protect the integrity of your digital assets and communications.
